How To Create A Weathered Paint Effect
Mastering the Art of Weathered Paint Effects: A Comprehensive Guide
Achieving a convincing weathered paint effect is a highly sought-after technique in various creative disciplines, from furniture refinishing and artistic painting to model making and architectural decoration. The appeal lies in its ability to imbue an object with a sense of history, authenticity, and character, transforming the mundane into the visually engaging. This comprehensive guide will delve into the core principles, essential materials, and step-by-step methodologies for creating realistic and captivating weathered paint finishes, ensuring your creations tell a story of time and exposure.
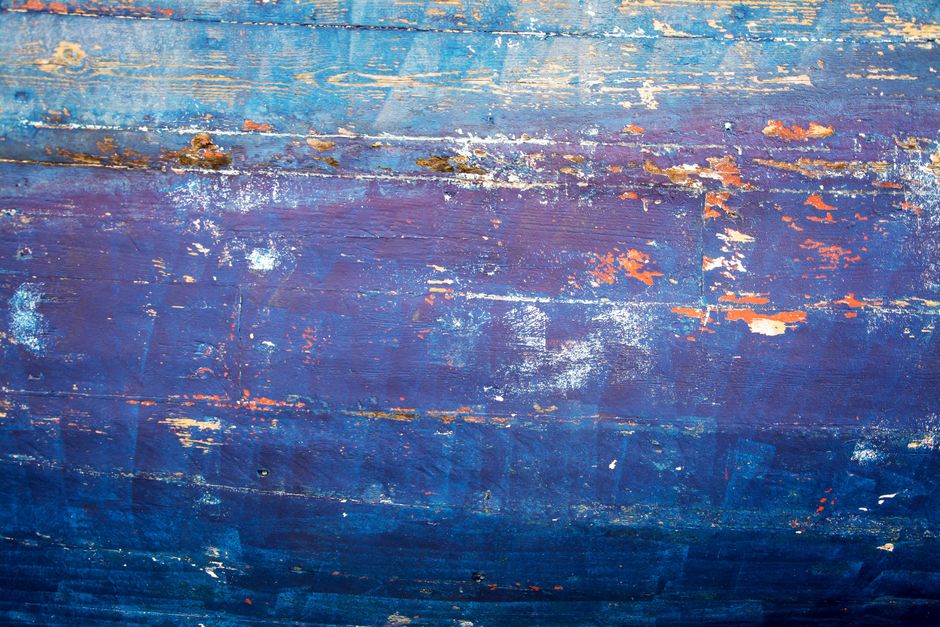
The fundamental concept behind a weathered paint effect is the simulation of natural degradation. This degradation occurs through exposure to elements like sun, rain, wind, and general wear and tear. These forces cause paint to fade, chip, crack, peel, and accumulate dirt and grime. Replicating these processes requires an understanding of how they manifest and the tools and techniques to mimic them. The key is not to randomly apply distress, but to observe real-world examples and thoughtfully translate those observations into your chosen medium. Authenticity is paramount; overdone or misplaced distressing can look artificial and detract from the desired aesthetic.
Essential Materials for Weathered Paint Effects:
A successful weathered paint project hinges on the right tools and materials. While the specific items may vary slightly depending on the scale and substrate, a core set of supplies is generally required.
- Paints: Acrylics are incredibly versatile for this purpose due to their fast drying times, water solubility (allowing for easy manipulation and layering), and wide range of available colors. Oil-based paints can also be used, offering a richer sheen and slower drying, which can be beneficial for certain blending techniques, but cleanup is more involved. Latex paints are suitable for larger architectural projects. Consider a base coat, a topcoat (often a lighter or contrasting color), and washes or glazes in darker or earth tones.
- Brushes: A variety of brushes is crucial. Stiff-bristled brushes (like chip brushes or natural bristle craft brushes) are excellent for dry brushing and creating texture. Softer synthetic brushes are good for applying washes, glazes, and achieving smoother transitions. Smaller detail brushes will be necessary for accentuating specific areas of wear.
- Sanding Tools: Sandpaper of various grits is indispensable. Start with coarser grits (e.g., 80-120) for initial distressing and revealing underlying layers. Progress to finer grits (e.g., 220-400) for smoothing and creating subtle wear. Sanding sponges offer flexibility for curved surfaces.
- Scraping and Picking Tools: Palette knives, putty knives, craft knives, and even old credit cards can be used to create chipped and peeled paint effects. Small, sharp tools are ideal for precise gouges and scrapes.
- Stencils and Masks: For creating specific patterns of wear or protecting areas from distressing, stencils and masking tape are invaluable.
- Waxes and Sealants: Wax, particularly furniture wax, can be used as a resist technique. When applied over a painted layer and then painted over again, it prevents the top layer from adhering, allowing for easy removal to reveal the color beneath. A matte or satin sealant is typically applied at the end to protect the finish and control sheen.
- Distressing Mediums (Optional but Recommended): Specialized products like crackling mediums (single or two-part), peeling mediums, and aging waxes are available from art supply and craft stores. These can significantly enhance the realism and ease of achieving certain weathered effects.
- Cleaning Supplies: Rags, paper towels, water, and mild soap are necessary for cleanup and wiping away excess paint or dust.
Key Techniques for Creating Weathered Paint Effects:
The beauty of weathered paint lies in the variety of techniques that can be employed, often in combination, to achieve a layered and authentic look.
1. Layering and Subtractive Distressing (Chipping and Sanding):
This is perhaps the most fundamental and widely used technique. It involves applying multiple layers of paint, allowing each to dry thoroughly, and then strategically removing the top layers to reveal the colors underneath.
- Base Coat: Apply your first color, which will often be the deepest or most dominant color you want to show through as aged or worn. Ensure this layer is completely dry.
- Second Layer: Apply a contrasting or lighter color over the base coat. This will be the primary "painted" surface.
- Distressing (Sanding): Once the second layer is dry, use sandpaper to gently abrade the surface. Focus on areas that would naturally experience the most wear: edges, corners, handles, and raised details. Sand in the direction of the paint application or natural grain of the material if applicable. The amount of sanding dictates the intensity of the reveal. Light sanding will create subtle scuffs, while more aggressive sanding will expose more of the base coat.
- Distressing (Scraping/Picking): For more pronounced chipped or peeled effects, use sharp tools. Lightly score the surface with a craft knife and then gently pry up the edges to simulate peeling paint. Palette knives can be used to scrape away sections of paint, creating a more irregular and broken appearance. Always work sparingly and with intention. Observe real-world examples of chipped paint to understand how it naturally flakes and separates.
2. Dry Brushing:
Dry brushing is excellent for adding subtle highlights, texture, and a faded appearance. It mimics the effect of paint wearing thin due to friction.
- Method: Load a stiff-bristled brush with a small amount of paint. Wipe most of the paint off onto a paper towel until very little color transfers when brushed onto a scrap surface. Then, lightly and quickly sweep the brush across the raised areas of your project. The dry bristles will catch on the textures and edges, depositing a faint layer of paint that creates a subtle, aged look.
- Application: This technique is perfect for highlighting wood grain, carved details, or the edges of furniture. It can also be used to soften the appearance of a painted surface, making it look sun-bleached.
3. Washing and Glazing:
Washes and glazes are liquid paint mixtures used to add depth, shadow, and a stained or grimy appearance.
- Washes: A wash is a thin, watery mixture of paint (often a darker color like brown, black, or grey). It’s applied over the entire surface or targeted areas. The excess wash is then wiped away with a damp cloth, leaving the pigment settled in the recesses, crevices, and around details, simulating accumulated dirt and grime.
- Glazes: Glazes are similar to washes but can have a more controlled and transparent application. They are often used to subtly shift the color of a surface, add a tint, or create a soft, aged patina. A glaze can also be used to unify multiple layers of paint, making the distressing appear more cohesive.
4. Stencil and Masking for Targeted Wear:
Stencils and masking tape allow for precise control over where wear and tear appears.
- Stencils: Use stencils to create patterns of grime or fading in specific locations, such as around doorknobs or on designated decorative areas. Apply a wash or a dry-brushed layer through the stencil.
- Masking Tape: Apply masking tape to areas you want to protect from distressing. This is useful for creating clean lines of wear, like where two painted surfaces would meet and rub against each other. After distressing, carefully remove the tape to reveal a sharper edge of wear.
5. Wax Resist Technique:
This is a classic method for creating a chipped or distressed look that feels organic and layered.
- Application: Apply a layer of furniture wax (or even a candle) to specific areas of your dry painted surface. The wax acts as a barrier.
- Painting Over: Apply your next layer of paint over the waxed areas.
- Distressing: Once the top layer is dry, gently rub the waxed areas with a cloth or a fine-grit sandpaper. The paint over the wax will not adhere well and will easily rub away, revealing the color underneath. This is particularly effective for creating a look of paint flaking off in large patches.
6. Crackling Mediums:
Crackling mediums are designed to create a cracked or crazed appearance, simulating aged paint that has become brittle.
- Single-Part Crackling Medium: Applied between two layers of paint. The topcoat dries and cracks spontaneously, revealing the layer beneath.
- Two-Part Crackling Medium: A more pronounced crackling effect. The first part is applied to the base coat, and the second part is applied over it. When the second part dries, it causes the first part to crack.
- Tips: Experiment with the thickness of application and drying times, as these factors influence the size and depth of the cracks. Some crackling mediums are heat-activated, allowing for more control.
7. Aging Waxes and Patinas:
Specialized aging waxes and patinas are available to quickly impart a weathered look.
- Aging Waxes: These are often colored waxes (e.g., dark brown, black) that are applied over a painted surface. They settle into recesses and details, creating an antique or aged appearance. Excess wax is buffed off, leaving a soft, aged patina.
- Patina Solutions: These can be applied to metal objects to simulate oxidation and verdigris. While not strictly paint, they contribute to an overall weathered aesthetic.
Step-by-Step Process for a Typical Weathered Paint Project:
Let’s outline a common approach for creating a weathered look on furniture or a decorative object.
- Preparation: Clean the surface thoroughly to remove any dirt, grease, or old finishes. Lightly sand if necessary to create a good surface for paint adhesion. Prime the surface if required for the paint type being used.
- Base Coat Application: Apply your first color. This is the color you want to show through the most. Allow it to dry completely.
- Second Layer Application: Apply your second color, the primary "painted" surface. Let it dry thoroughly.
- Strategic Distressing (Sanding and Scraping): Begin by lightly sanding edges and corners. Gradually increase the pressure and sandpaper grit in areas that would naturally wear. Use scraping tools for more pronounced chips and peels. Remember to observe and replicate natural patterns.
- Wash or Glaze Application (Optional): Apply a dark wash or glaze to the recesses and details to simulate dirt accumulation and add depth. Wipe away excess with a damp rag.
- Dry Brushing (Optional): Use a dry brush technique to highlight raised areas and add subtle texture or a sun-bleached effect.
- Waxing or Cracking (Optional): If using a wax resist or crackling medium, apply these according to the product instructions at the appropriate stage.
- Final Sealing: Once you are satisfied with the weathered effect, apply a clear matte or satin sealant. This protects the finish, unifies the look, and controls the final sheen. Avoid high-gloss sealants, as they can detract from the aged appearance.
Tips for Achieving Realism and Avoiding Common Mistakes:
- Observe Real Life: The best inspiration for weathered paint effects comes from observing real-world examples. Look at old doors, weathered furniture, antique signs, and vintage vehicles. Notice where paint chips, fades, and accumulates dirt.
- Work in Layers: Weathering is a cumulative process. Build up your effects gradually, layer by layer. This allows for more control and a more convincing outcome.
- Don’t Overdo It: It’s easy to get carried away with distressing. Less is often more. Step back frequently and assess your work. A subtly weathered piece will often look more authentic than one that is aggressively distressed everywhere.
- Consider the Substrate: The material you are painting will influence how paint weathers. Wood will show grain differently than metal or plastic.
- Vary Your Techniques: Combine multiple techniques for a richer, more complex, and believable effect.
- Directionality Matters: When sanding or scraping, try to work in the direction that paint would naturally wear on the object.
- Cleanliness is Key: While you are simulating dirt and grime, the process itself should be clean. Wipe away dust and excess materials as you work to maintain control.
- Test First: If you are unsure about a technique or product, always test it on a scrap piece of material before applying it to your main project.
- Embrace Imperfection: The essence of weathering is imperfection. Don’t strive for absolute symmetry or uniformity. Natural aging is inherently irregular.
By understanding the principles of natural degradation and mastering these techniques, you can create stunning and authentic weathered paint effects that add depth, character, and a captivating sense of history to your creations. The ability to mimic time’s passage through paint is a powerful artistic skill, offering endless possibilities for transforming ordinary objects into pieces with a compelling narrative.


