
5 Easy Watercolor Techniques: Have you ever been captivated by the vibrant colors and ethereal beauty of watercolor paintings? The fluid nature of watercolor, its ability to capture light and create delicate washes, has drawn artists for centuries. But for beginners, watercolor can seem intimidating.
The fear of making mistakes, of losing control over the water and paint, can be paralyzing. However, there’s no need to be afraid! This article will guide you through five simple yet effective watercolor techniques that will unlock your creative potential and set you on a path to mastering this captivating art form.
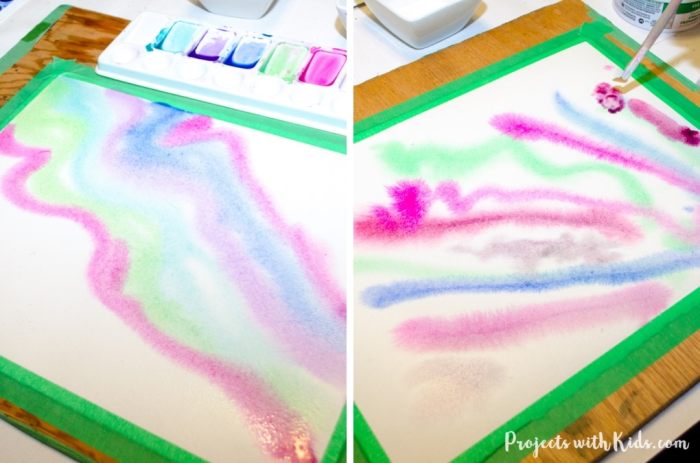
These techniques are designed to be accessible, even if you’ve never touched a brush before. We’ll cover everything from creating smooth washes to layering colors for depth and dimension. We’ll also explore techniques like blending, lifting, and using salt to add unique textures and effects.
Each technique is explained in a clear and concise manner, with step-by-step instructions and helpful tips. So grab your paints, brushes, and paper, and let’s embark on a journey of watercolor exploration together!
Watercolor Techniques for Beginners

Watercolor painting is a beautiful and versatile art form that has captivated artists for centuries. Its ethereal quality and ability to capture light and shadow make it a popular choice for both seasoned professionals and aspiring artists. For beginners, learning watercolor techniques can be an exciting journey, opening doors to a world of creativity and self-expression.
This article will explore five easy watercolor techniques that are perfect for those just starting out.
Basic Watercolor Techniques
These techniques are the foundation of watercolor painting and are essential for creating a variety of effects. They involve manipulating the amount of water and paint used to achieve different textures and tones.
- Washes:Washes are thin layers of watercolor that are applied to the paper in a smooth, even manner. They are often used to create backgrounds or to establish the overall tone of a painting. To create a wash, dilute watercolor paint with water and apply it to the paper with a wide brush.
The amount of water used will determine the intensity of the color. A more diluted wash will be lighter and more transparent, while a less diluted wash will be more opaque and intense.
- Layering:Layering involves applying multiple washes of watercolor on top of each other to create depth and dimension. When layering washes, it is important to allow the previous layer to dry completely before applying the next. This prevents the colors from muddying and allows them to blend seamlessly.
The order in which you apply the layers will also affect the final result. For example, applying a darker wash over a lighter wash will create a more dramatic effect.
- Blending:Blending is a technique that involves merging two or more colors together to create a smooth transition. This can be achieved by using a wet-on-wet technique, where the colors are applied to the paper while it is still wet. Alternatively, you can use a dry-on-wet technique, where the colors are applied to the paper after it has dried slightly.
The amount of water used will determine the degree of blending. A more diluted wash will create a softer blend, while a less diluted wash will create a more defined blend.
Advanced Watercolor Techniques
Once you’ve mastered the basics, you can experiment with these techniques to create more complex and interesting effects.
- Glazing:Glazing is a technique that involves applying thin, transparent layers of watercolor over a dry layer of paint. This allows you to create depth and richness in your paintings. The colors will blend together subtly, creating a luminous effect.
Glazing can be used to create a variety of effects, such as adding highlights to a painting or creating a sense of depth and atmosphere.
- Lifting:Lifting is a technique that involves removing watercolor paint from the paper using a damp brush or a sponge. This can be used to create highlights, lighten areas of the painting, or to create interesting textures. When lifting paint, it is important to work quickly and gently, as the paint can become difficult to remove once it has dried.
Blending Technique: 5 Easy Watercolor Techniques
Blending is a fundamental watercolor technique that involves seamlessly merging two or more colors to create smooth transitions and gradients. It is a versatile technique used to create depth, dimension, and realism in watercolor paintings.
Wet-on-Wet Blending, 5 easy watercolor techniques
Wet-on-wet blending is a popular technique that involves applying wet watercolor paint to a wet surface. This method allows colors to naturally blend and diffuse, creating soft edges and ethereal effects. To achieve this, you first need to wet the paper with clean water using a brush or sponge.
While the paper is still damp, apply the first color. Then, before the first color dries completely, apply the second color next to it. The colors will naturally blend as they meet, creating a soft, graduated transition.
Brush Selection and Techniques for Blending
The choice of brush can significantly influence the blending effect. Round brushes are ideal for achieving smooth, even transitions, while flat brushes can be used to create broader, more textured blends.
- Using a Round Brush:To blend colors smoothly with a round brush, use a light touch and gently sweep the brush back and forth between the colors. This technique is especially effective for creating subtle gradients and blending multiple colors together.
- Using a Flat Brush:Flat brushes can be used to create more dramatic blends, particularly when working on larger areas. Apply the colors with a light touch and use the flat side of the brush to gently blend them together.
- Dry Brushing:This technique involves using a brush with minimal water to gently blend colors together. Dry brushing creates a subtle, textured effect that can be used to add depth and dimension to a painting.
Blending for Realistic Transitions
Blending is an effective technique for creating realistic transitions in watercolor paintings. For example, when painting a sky, you can use blending to create a smooth gradient from blue to white, mimicking the natural transition from the darker blue of the horizon to the lighter blue of the zenith.
Similarly, when painting a landscape, you can use blending to create a gradual transition from the green of the foreground to the blue of the distant mountains.
I’ve been experimenting with some fun watercolor techniques lately, like layering washes and creating textures with salt. It reminded me of a project I did a while back – making diy faux stained glass bottles with acrylic paint! The way the light shines through the layers of color really mimics the look of stained glass.
I’m thinking of trying to replicate that effect with watercolor next, using different colors and maybe even adding some metallic accents.
I’ve been loving experimenting with 5 easy watercolor techniques lately – it’s so relaxing and the results are always surprising! I even got inspired to try a new hairstyle after watching a tutorial on tricks treats cascade braid with sarah lockhart.
Now, back to those watercolors – I’m excited to try a new technique with a vibrant palette!
Learning 5 easy watercolor techniques can open up a world of creative possibilities. You can use them to create beautiful backgrounds for your artwork, like the one I made for my stamped star wall DIY money saving wallpaper alternative project.
After all, the right background can really make your art pop, and watercolor is a fantastic way to achieve that!