
DIY Mini Gradient Egg Cup Planters: A Vibrant Springtime Craft
Transforming humble egg cups into charming, colorful planters offers a delightful and surprisingly impactful DIY project, perfect for adding a touch of spring vibrancy to your home or for crafting personalized gifts. This tutorial will guide you through creating mini gradient egg cup planters, a project that blends simple technique with impressive visual results. The gradient effect, achieved through careful color blending, elevates these tiny vessels from mere holders to miniature works of art, ideal for showcasing small succulents, air plants, or even delicate seedlings. Beyond their aesthetic appeal, these planters are exceptionally budget-friendly, utilizing readily available materials, and offer a rewarding crafting experience for individuals of all skill levels. Whether you’re a seasoned crafter looking for a quick and rewarding project or a beginner seeking an accessible introduction to decorative painting, this guide provides all the necessary steps and considerations to ensure successful and beautiful results. The versatility of this project also allows for immense personalization; the color palette is entirely yours to dictate, allowing you to match existing decor, celebrate a specific season, or create themed collections for different plant types. Furthermore, the miniature scale makes them perfect for windowsill gardens, desk decorations, or as unique additions to tiered plant stands, maximizing their impact in even the smallest of spaces.
To embark on this creative endeavor, gather the following essential materials: a collection of clean, empty egg cups (ceramic, plastic, or even sturdy paper ones can work, though ceramic offers the most durable and paintable surface), acrylic paints in your desired gradient colors (consider a progression from light to dark, or a blend of complementary hues), a fine-tipped paintbrush for detailed work and blending, a slightly larger brush for base coats, a small container of water for rinsing brushes, paper towels for drying, painter’s tape (optional, for creating crisp color transitions), a protective surface to work on (newspaper, a drop cloth, or a silicone mat), and a clear sealant or varnish (matte or glossy, depending on your preference) for durability and a finished look. For those seeking an even more refined finish, a fine-grit sandpaper can be beneficial for smoothing the egg cup surface prior to painting. The choice of egg cup material is crucial; while plastic can be painted, it may require a primer for optimal adhesion. Ceramic egg cups, on the other hand, provide a more robust and receptive surface for acrylic paints. When selecting acrylic paints, opt for good quality brands that offer vibrant pigments and good coverage, as this will significantly impact the final appearance of your gradient. Remember to choose colors that work harmoniously together to achieve a visually pleasing gradient effect. Consider the types of plants you intend to house in these planters when selecting your color palette; some colors might complement certain plant textures or foliage better than others.
Begin by preparing your egg cups. Ensure they are thoroughly cleaned and completely dry. Any residual moisture or debris can interfere with paint adhesion and the overall finish. If you are using ceramic egg cups that have a glossy surface, lightly scuffing the exterior with fine-grit sandpaper can create a slightly rougher texture, which will help the acrylic paint adhere more effectively. Wipe away any dust generated by sanding with a dry cloth or a slightly damp paper towel, allowing the cups to dry once more. This step, while seemingly minor, is crucial for a long-lasting and professional-looking result. For plastic egg cups, applying a thin layer of acrylic primer specifically designed for plastic is highly recommended to prevent chipping and ensure the paint adheres properly. Allow the primer to dry completely according to the manufacturer’s instructions before proceeding to the painting stage.
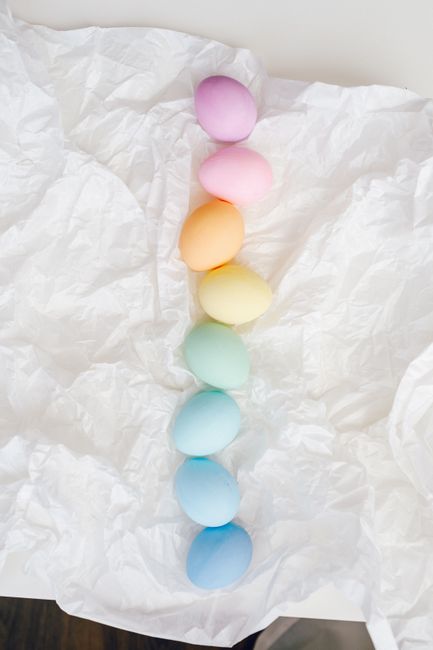
The core of this DIY project lies in creating the gradient effect. Start by applying a base coat of your lightest color to the entire exterior of the egg cup using your larger brush. Aim for smooth, even coverage. Allow this first coat to dry completely. Applying multiple thin coats is generally better than one thick coat, as it prevents drips and ensures a more uniform finish. Once the base coat is dry, identify the next color in your gradient sequence. If you are not using painter’s tape, begin applying the second color to the upper portion of the egg cup, overlapping slightly with the first color. Use your fine-tipped paintbrush for this step. While the second color is still wet, use a clean, damp brush (with just a tiny amount of water) to gently blend the edge where the two colors meet. Work the brush back and forth in small, circular motions, allowing the colors to meld together. The key is to work relatively quickly while the paint is wet to achieve a smooth transition. Avoid over-blending, which can result in a muddy appearance.
Continue this process, gradually introducing your subsequent colors down the egg cup. For each new color, apply it to the area above the previous color, again overlapping slightly. Immediately after applying the new color, use your damp blending brush to soften the transition line between the new color and the one below it. Pay close attention to the width of your color bands and the smoothness of the blend. For a more precise gradient, you can strategically use painter’s tape. Apply a strip of painter’s tape to define the upper edge of a color band. Paint the color up to the tape and allow it to dry completely. Once dry, carefully remove the tape. Then, apply the next color just below the taped edge, and blend it downwards. This method helps create sharper distinctions between colors if desired, or it can be used to create distinct sections within your gradient. Experiment with different blending techniques to find what works best for your artistic vision. Some crafters prefer a softer, more diffused gradient, while others aim for more defined color shifts. The amount of water on your blending brush is critical; too much water will dilute the paint and make it transparent, while too little will make blending difficult.
For a crisper gradient, especially when moving between strongly contrasting colors, employing painter’s tape is a highly effective strategy. After applying and drying your first color, carefully mask off the area where you want the first color to end and the next color to begin with painter’s tape. Ensure the tape is pressed down firmly to prevent any paint seepage. Apply your second color up to the edge of the tape. Allow this second coat to dry thoroughly. Once completely dry, carefully remove the painter’s tape. The result will be a clean, sharp line between your colors. You can then proceed to apply your third color just below this sharp line and blend downwards, or if you desire another sharp transition, reapply painter’s tape. This method allows for greater control and is particularly useful for achieving a more graphic or geometric gradient effect. Consider the surface area of your egg cup when deciding how many color bands to incorporate. Too many colors in too small a space can lead to a cluttered appearance.
Once you have applied and blended all your desired colors, allow the paint to dry completely. This can take several hours, depending on the thickness of the paint and the humidity of your environment. Resist the urge to touch the painted surface before it is fully dry, as this can lead to smudges and imperfections. After the paint has dried, it’s time to apply a protective sealant. A clear acrylic sealant, available in both matte and glossy finishes, will protect your painted egg cups from moisture, wear, and tear, ensuring their longevity and making them suitable for use as planters. Apply the sealant in thin, even coats, following the manufacturer’s instructions. Typically, two to three thin coats are recommended for optimal protection. Allow each coat to dry completely before applying the next. The sealant will not only protect your artwork but also give your planters a professional and polished look. A matte sealant will provide a subtle, non-reflective finish, while a glossy sealant will add a subtle sheen and enhance the vibrancy of your colors.
After the sealant has completely dried, your DIY mini gradient egg cup planters are ready for planting! Carefully add a small amount of potting soil suitable for your chosen plants. Small succulents and air plants are ideal for these miniature planters due to their small size and low water requirements. For succulents, ensure they have adequate drainage; you may need to add a small layer of pebbles at the bottom of the egg cup before adding soil. Gently place your plant into the soil and add a little more soil around the base. Water sparingly, allowing the soil to dry out between waterings. These planters also make fantastic gifts. Imagine a set of these beautifully crafted egg cups, each with a different gradient color scheme and planted with a tiny succulent, given to friends or family. They add a personal and artistic touch to any space.
To further enhance the SEO potential of this article, consider incorporating relevant keywords naturally throughout the text. These might include: "DIY planters," "egg cup crafts," "gradient painting," "mini planters," "succulent planters," "air plant holders," "spring crafts," "handmade gifts," "decorative painting," "acrylic paint crafts," "upcycling crafts," and "small plant pots." By strategically weaving these terms into headings, subheadings, and the body of the article, you increase the likelihood of this content being discovered by users searching for these specific topics. For instance, using "DIY Mini Gradient Egg Cup Planters" as the primary title is a strong starting point. Further optimization can involve using variations like "Crafting Gradient Egg Cup Planters: A Step-by-Step Guide" or "How to Make Adorable Gradient Egg Cup Planters for Small Plants."
The beauty of this project lies in its adaptability and scalability. You can create a single, striking gradient planter or a whole collection, each with a unique color story. Consider creating themed sets, such as a "sunset gradient" with oranges, pinks, and purples, or a "calming ocean gradient" with blues and greens. The miniature size makes them perfect for creating a vibrant display on a windowsill, a desk, or even as part of a larger tablescape. For those who enjoy adding extra decorative elements, consider incorporating small beads, glitter (applied with the sealant), or even delicate stencils before the final sealing coat. However, the gradient effect itself is often the star of the show, requiring minimal additional embellishment. Remember to always work in a well-ventilated area when using paints and sealants.
The longevity of your gradient egg cup planters is significantly influenced by the quality of materials and the care taken during the crafting process. Using high-quality acrylic paints that are known for their durability and colorfastness will ensure your gradients remain vibrant over time. Similarly, a good quality clear sealant provides a robust protective barrier against environmental factors. When it comes to plant care, overwatering is the most common culprit for plant demise in small containers. Ensure your chosen plants are well-suited to the limited space and drainage capabilities of egg cup planters. Succulents and air plants are excellent choices because they thrive in drier conditions and do not require extensive root systems. For additional drainage, consider drilling a small hole in the bottom of ceramic egg cups if you are comfortable with this process, though this requires specialized drill bits and caution. Alternatively, a layer of gravel or perlite at the bottom of the planter before adding soil can improve aeration and drainage.
The creative possibilities are truly endless with this project. You can experiment with different color combinations, explore various blending techniques, and even incorporate subtle textures by dabbing paint with a sponge or using textured mediums. For a more advanced approach, consider using an airbrush to achieve incredibly smooth and seamless gradients. However, for a beginner-friendly and highly accessible project, the hand-painting method described above is perfectly sufficient to yield beautiful results. The key is practice and patience. Don’t be discouraged if your first attempt isn’t perfect; each project is a learning experience. The satisfaction of transforming simple egg cups into unique and personalized decorative items is immense, making this a rewarding craft for any occasion. The eco-friendly aspect of upcycling egg cups also adds an extra layer of appeal, promoting sustainability and resourcefulness. By giving these discarded items a new lease on life, you’re not only creating something beautiful but also contributing to a more mindful approach to consumption.
