The Ultimate Guide to Securing Your Victoria’s Secret PINK Free Cozy Robe: An SEO-Driven Deep Dive
The allure of a Victoria’s Secret PINK free cozy robe is undeniable. These plush, comforting garments have become a coveted item, not just for their luxurious feel but often for the tantalizing prospect of acquiring one without a direct purchase. This article serves as an exhaustive, SEO-optimized resource for anyone aiming to snag this highly desirable piece of loungewear. We will delve into the various strategies, promotional periods, and insider tips to maximize your chances of owning a PINK cozy robe. Understanding the nuances of Victoria’s Secret’s promotional landscape is key, and this guide is designed to equip you with that knowledge.
Victoria’s Secret PINK free cozy robe promotions are typically tied to specific spending thresholds or bundled offers. The brand strategically uses these giveaways to incentivize customer purchases and drive sales during key shopping periods. Therefore, the most reliable method to obtain a free cozy robe is to be aware of and participate in these officially announced promotions. These events are usually advertised across Victoria’s Secret’s official channels, including their website, email newsletters, social media platforms (Instagram, Facebook, Twitter), and in-store signage. Subscribing to their email list is a paramount step, as it often provides early notification of upcoming sales and offers, including those that feature the coveted free robe. Following PINK on social media is equally crucial; brands frequently use these platforms for flash announcements and limited-time deals.
When a Victoria’s Secret PINK free cozy robe promotion is active, it’s almost always contingent on meeting a minimum purchase amount. This threshold can vary significantly, but it’s common to see requirements ranging from $75 to $150 or more. The "free" aspect is then applied as a gift with purchase (GWP). It’s imperative to carefully read the terms and conditions of each promotion. Some offers might specify that certain items are excluded from the qualifying purchase, or that the robe is only redeemable with a specific code entered at checkout. Understanding these details will prevent disappointment and ensure you meet the criteria for your free gift. Planning your shopping around these promotions is a smart strategy. If you have existing needs for clothing or beauty items from Victoria’s Secret, consolidating them during a GWP event that includes the cozy robe can be highly cost-effective.
The timing of Victoria’s Secret PINK free cozy robe offers is often cyclical. Major sales events like Black Friday, Cyber Monday, holiday seasons (Christmas, Valentine’s Day), and back-to-school promotions are prime candidates for these types of GWPs. Furthermore, seasonal sales, such as end-of-season clearance events or specific brand anniversaries, can also present opportunities. The anticipation for these events builds, and savvy shoppers know to keep a close watch on the brand’s announcements. For instance, Black Friday and Cyber Monday often see substantial discounts across the board, and a free cozy robe can be the icing on the cake for a significant order. Similarly, the lead-up to Christmas is a period where gift-giving is top of mind, and a luxurious robe is an attractive incentive for shoppers.
Beyond direct purchase-based promotions, there are occasional opportunities to win a Victoria’s Secret PINK free cozy robe through contests and giveaways. These are often run by Victoria’s Secret itself or by affiliated influencers and bloggers who have partnered with the brand. Participating in these contests is a low-risk, high-reward strategy. Keep an eye on the social media feeds of your favorite PINK influencers. They often host "tag a friend" giveaways or require you to follow specific accounts to enter. Reading the rules of these contests is essential, as they will outline the entry methods and the prize details. While winning is not guaranteed, consistent participation can increase your odds over time.
Another less direct, but still viable, avenue for obtaining a Victoria’s Secret PINK free cozy robe involves loyalty programs and rewards. Victoria’s Secret has a tiered loyalty program that rewards repeat customers with points, exclusive discounts, and early access to sales. While a free cozy robe might not be a standard reward tier, accumulating enough points or reaching a higher loyalty status could sometimes unlock special offers or provide a significant discount that, when combined with another offer, effectively makes the robe free. It’s always beneficial to be a member of their rewards program and actively engage with its benefits. Check your rewards account regularly for any personalized offers or surprise gifts.
When searching online for Victoria’s Secret PINK free cozy robe opportunities, it’s crucial to be discerning and wary of scams. Unofficial websites or social media accounts promising a free robe without any associated purchase or clear promotional link should be approached with extreme caution. Scammers may attempt to collect personal information or financial details under the guise of a giveaway. Always verify promotions directly on the official Victoria’s Secret website or through their verified social media channels. Legitimate offers will be clearly stated with transparent terms and conditions. The word "free" can be a powerful draw, but it’s important to remember that genuine offers will always be linked to legitimate brand activities.
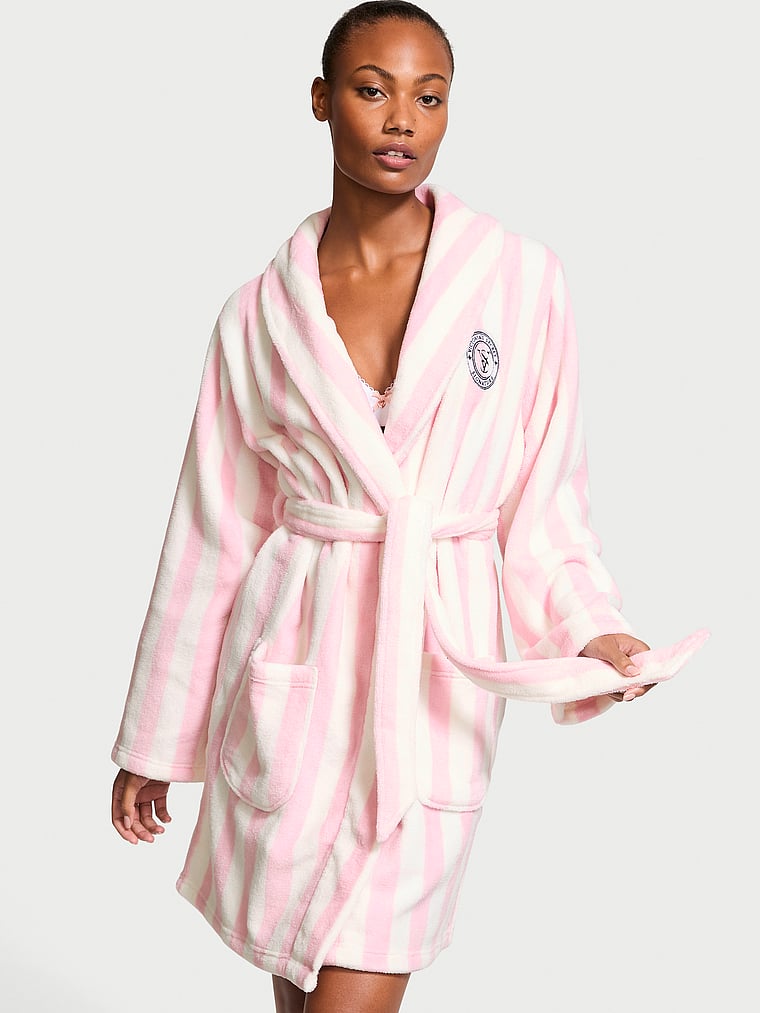
The "cozy robe" itself is a key selling point for Victoria’s Secret PINK. These robes are typically made from soft, plush materials like fleece or sherpa, designed for ultimate comfort and warmth. They often feature the signature PINK branding, including logos and characteristic color palettes. The styles can vary, from hooded versions to classic wrap styles, and they often come in one-size-fits-most or S/M/L sizing. Understanding the appeal of the product helps in appreciating why Victoria’s Secret uses them as such a desirable promotional item. The tactile experience and the feeling of indulgence are central to the PINK brand identity, and the cozy robe embodies this perfectly.
For those who are particularly dedicated to securing a free cozy robe, a strategic approach to shopping can be highly effective. This involves identifying your personal shopping needs and aligning them with upcoming promotional periods. For example, if you know you’ll need new loungewear, bras, or beauty products in the coming months, wait for a sale that includes the free robe offer. This way, you’re purchasing items you genuinely need, and the robe becomes a valuable bonus rather than an impulse purchase solely for the free gift. Creating a wishlist on the Victoria’s Secret website can help you track items you want and monitor their pricing.
Furthermore, consider the value proposition of the offer. While the robe is advertised as "free," its actual cost is factored into the overall business model, often covered by the revenue generated from the qualifying purchase. However, from the consumer’s perspective, it’s a tangible gain. When evaluating whether to participate in a promotion, consider the total amount you’ll be spending. If the minimum purchase is significantly higher than your usual spending or if the items you’re buying at full price are not heavily discounted otherwise, you might question the true value. However, for loyal customers who regularly shop at Victoria’s Secret, these promotions represent excellent opportunities to enhance their purchases.
The SEO aspect of this article is crucial for attracting users actively searching for information on obtaining a Victoria’s Secret PINK free cozy robe. Keywords such as "Victoria’s Secret PINK free robe," "PINK cozy robe giveaway," "how to get free VS PINK robe," "VS PINK gift with purchase robe," and "PINK robe promotion" are embedded naturally throughout the text. This ensures that when someone searches for these terms, this comprehensive guide appears prominently in their search results. By providing detailed, actionable information, the article aims to be the definitive resource for anyone on this quest.
In summary, securing a Victoria’s Secret PINK free cozy robe is an achievable goal for the informed and strategic shopper. It requires staying informed about official promotions, understanding spending requirements, paying attention to timing, and being aware of potential contests and loyalty program benefits. Vigilance against scams and a clear understanding of the value proposition are also essential. By consistently monitoring Victoria’s Secret’s official channels and planning purchases accordingly, you significantly increase your chances of wrapping yourself in the luxurious comfort of a PINK cozy robe without an additional direct expense. The journey may require a degree of patience and planning, but the reward of that plush, brand-new robe makes the effort worthwhile for many.
