DIY Copper Pipe Childs Desk: A Comprehensive Guide for Building a Stylish and Sturdy Workspace
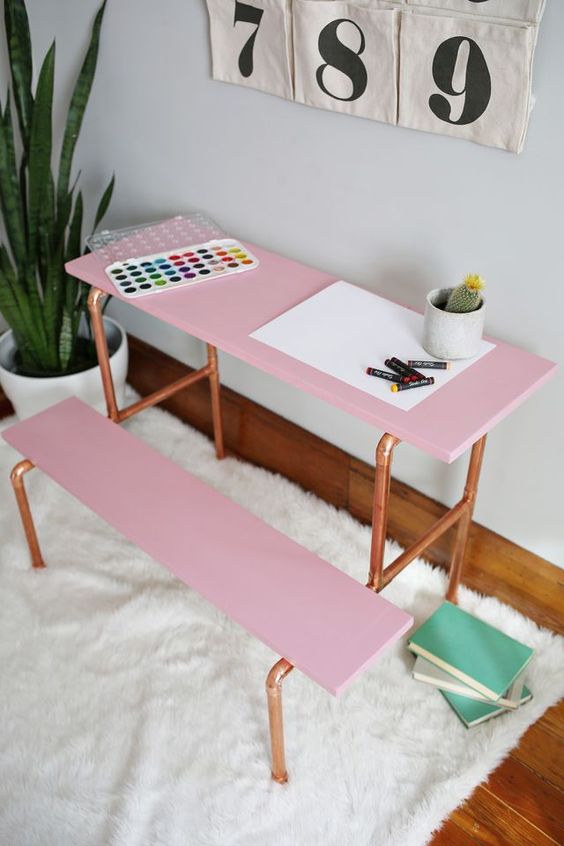
Constructing a DIY copper pipe child’s desk offers a unique and robust solution for a child’s study area. This project combines the industrial aesthetic of copper piping with the practicality of a functional desk, providing a durable and customizable piece of furniture. The inherent strength of copper, coupled with a well-engineered design, ensures a desk that can withstand the rigors of childhood use. Beyond its visual appeal and sturdiness, a DIY approach allows for complete control over dimensions, finishes, and integrated features, tailoring the desk perfectly to your child’s needs and your available space. This guide will walk you through every step, from material selection and planning to assembly and finishing, empowering you to create a bespoke workspace that is both charming and functional.
Understanding the Benefits of a Copper Pipe Desk
The appeal of a copper pipe desk extends beyond its aesthetic. Copper is a naturally robust material, offering excellent tensile strength and resistance to corrosion, making it an ideal choice for furniture that needs to be durable. Unlike wood, which can be susceptible to scratches, dents, and moisture damage, a well-constructed copper pipe frame is remarkably resilient. This means the desk is likely to last for years, even as your child grows and their needs evolve. Furthermore, the visual impact of a copper pipe desk is undeniable. The warm, metallic sheen of copper adds a touch of modern industrial chic to any room, making it a statement piece that is both stylish and practical. For children, a desk that feels substantial and well-built can foster a sense of importance and respect for their workspace, encouraging them to engage more readily with their studies and creative pursuits. The DIY aspect also offers a significant advantage in terms of customization. You are not limited by standard furniture sizes or configurations. You can design a desk that perfectly fits a specific nook, incorporates adjustable shelving, or even includes integrated lighting or charging ports. This adaptability is particularly valuable when catering to the diverse needs of children, from early learners requiring ample surface area for art projects to older students needing a dedicated study zone.
Planning Your DIY Copper Pipe Childs Desk
Before embarking on the construction, meticulous planning is paramount. This phase dictates the success and functionality of your finished desk.
1. Determine the Dimensions: The first and most critical step is to define the desk’s dimensions. Consider your child’s age and height. A general guideline for desk height is to have the surface level with their bent elbows when sitting comfortably with their feet flat on the floor. For younger children, a desk around 20-24 inches high might suffice, while older children may require a height of 28-30 inches. The width and depth of the desk should accommodate their current and future needs. Ensure there’s enough surface area for a computer, books, and writing materials, while also allowing for comfortable legroom underneath. Measure the intended location of the desk to ensure it fits the space without feeling cramped. Sketching out your desired dimensions on graph paper will be immensely helpful in visualizing the final product.
2. Design the Structure and Style: The beauty of a DIY project lies in its customizability. For a child’s desk, consider incorporating elements that are both practical and engaging. Will it be a simple writing desk, or will it include built-in shelving for books and supplies? Perhaps a small hutch or a ledge for a tablet would be beneficial. Think about the overall aesthetic. Do you want a minimalist design, or something more elaborate with additional pipework for decorative elements? Researching existing copper pipe furniture designs online can provide a wealth of inspiration. Consider the weight of the materials that will be placed on the desk; this will inform the necessary strength of the pipe and joint design. For instance, if it’s intended to hold heavy books, reinforcing the frame might be necessary.
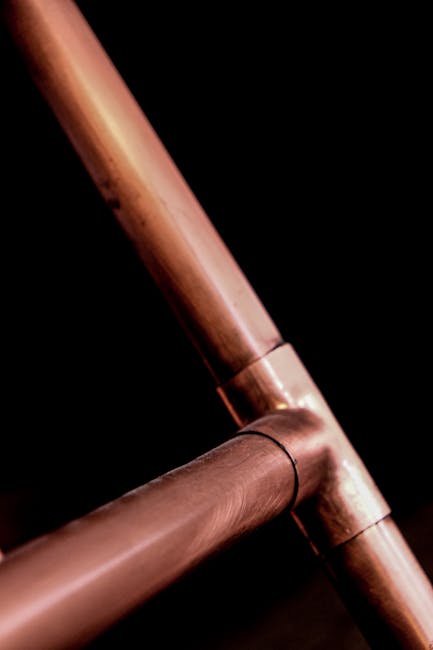
3. Material Selection – Copper Pipe and Fittings: The heart of this project lies in the copper piping itself. Copper pipes are readily available at hardware stores and plumbing supply shops. You’ll primarily be using standard copper tubing. The most common sizes for desk construction are ½ inch and ¾ inch diameter pipes. Larger diameters will offer more rigidity but also increase the weight and cost. The choice between type K, L, or M copper tubing is generally less critical for furniture applications than for plumbing. Type M is typically the thinnest and most economical, while Type L and K are thicker and more robust. For a desk, Type M is usually sufficient, but if you anticipate significant stress on the frame, consider Type L. You’ll also need a variety of copper fittings to connect the pipes and create the desired structure. These include elbows (90-degree and 45-degree), tees, couplings (for joining pipes of the same diameter), and reducers (if you decide to use different pipe sizes). Flanges are crucial for attaching the desk legs to the desktop. Consider whether you want to use threaded fittings or compression fittings. Threaded fittings, often referred to as "pipe fittings" for furniture, are commonly used in DIY copper pipe projects and create a secure, screw-in connection. These often come with their own decorative caps or end pieces.
4. Desktop Material: The desktop is as important as the frame. Wood is the most common choice, offering a classic and durable surface. Plywood (¾ inch thickness is recommended for stability) is a cost-effective and versatile option that can be easily cut to size and finished. Solid wood planks, such as pine, oak, or maple, offer a more premium look and feel, but will be heavier and more expensive. Consider the finish: natural wood grain, painted, or stained? For a child’s desk, a durable, wipeable finish is essential. Laminate or even a thick piece of acrylic could also be considered for a more contemporary look, though these might require more specialized attachment methods. Ensure the chosen desktop material is appropriately sized for your planned frame dimensions.
5. Tools and Supplies: Beyond the copper pipe and fittings, you’ll need a range of tools. A pipe cutter is essential for making clean, straight cuts on the copper tubing. A deburring tool or sandpaper will be needed to smooth the edges of the cut pipes. For assembling threaded fittings, pipe dope or Teflon tape is crucial to ensure a watertight and secure seal, even though this is not a plumbing application, it helps prevent loosening. If you opt for brazing or soldering, you’ll need a torch, flux, and solder. However, for a simpler DIY build, threaded fittings are highly recommended. A level is essential for ensuring the desk is stable and even. A drill and appropriate drill bits will be needed for attaching the desktop to the frame. Screws, sandpaper, primer, and paint or stain for finishing the desktop are also necessary. Safety gear, including gloves and eye protection, is non-negotiable throughout the project.
Gathering Your Materials and Tools
With a clear plan in hand, it’s time to procure your materials and gather your tools. A comprehensive list, compiled during the planning phase, will prevent multiple trips to the store and ensure you have everything you need before you begin.
Copper Pipe and Fittings: Purchase your copper pipes, ensuring you have calculated the total length required for all the legs, supports, and any decorative elements. It’s always wise to purchase a little extra pipe than you think you’ll need, as mistakes can happen during cutting. For fittings, carefully count the number of elbows, tees, couplings, and flanges required based on your design. Pay attention to the diameter of the fittings to match your chosen pipe size. Threaded fittings are generally preferred for furniture construction as they allow for easier assembly and disassembly if needed.
Desktop Material: Obtain your chosen desktop material. If you’re using plywood or solid wood planks, ensure they are the correct thickness and dimensions. You may need to have them cut to size at the lumber yard or hardware store if you don’t have the tools to do so yourself.
Fasteners and Adhesives: For attaching the desktop to the copper frame, you’ll need appropriate screws. The length of the screws will depend on the thickness of your desktop material and the flange thickness. Pipe dope or Teflon tape is essential for sealing threaded pipe fittings.
Finishing Supplies: Depending on your chosen finish for the desktop, you’ll need sandpaper (various grits), primer, paint, or stain. Sealants or varnishes can add durability and protection to the finished surface.
Tools Checklist: Ensure you have all the necessary tools readily accessible. This includes a pipe cutter, deburring tool, measuring tape, level, drill, drill bits, screwdriver, safety glasses, gloves, and potentially clamps to hold pieces in place during assembly. If you’re opting for a more permanent connection using soldering or brazing, you’ll need the appropriate torch, flux, and solder. However, for a beginner-friendly and easily adjustable desk, threaded fittings are the recommended path.
Step-by-Step Construction Guide
This detailed guide outlines the process of building your DIY copper pipe child’s desk, from cutting the pipes to assembling the frame and attaching the desktop.
1. Cutting the Copper Pipes: Begin by carefully measuring and marking your copper pipes according to the dimensions determined in your plan. Use a sharp copper pipe cutter to make clean, straight cuts. A dull cutter can crimp the pipe, making it difficult to insert into fittings. Once cut, use a deburring tool or sandpaper to smooth the inner and outer edges of each pipe end. This is crucial for ensuring a proper fit with the fittings and for safety.
2. Assembling the Frame – Legs and Supports: Start by assembling the desk legs. Screw the chosen fittings (e.g., elbows and tees) onto the ends of the pipe sections. Apply pipe dope or Teflon tape to the threads of each fitting before screwing them together. This ensures a tight seal and prevents loosening. Use your level frequently to ensure the legs are plumb and the frame is square. For a desk with multiple legs, it’s often easier to assemble each leg structure individually before connecting them with crossbars or stretchers.
3. Building the Desktop Support Structure: Once the legs are assembled, connect them with horizontal pipes to create the base for the desktop. This typically involves using tee fittings to attach crossbars between the legs. Ensure these crossbars are level and securely fastened. If your design includes any additional shelving or decorative pipework, assemble these sections now, connecting them to the main frame using the appropriate fittings.
4. Attaching the Desktop: Place your prepared desktop material onto the assembled copper frame. Position it carefully, ensuring it is centered and flush with the edges of the frame. Use a drill to create pilot holes through the desktop and into the mounting flanges of the copper frame. This prevents the wood from splitting. Then, secure the desktop to the frame using screws. If your flanges don’t have pre-drilled holes, you may need to drill them yourself. Ensure the screws are of an appropriate length to securely fasten the desktop without protruding through the other side.
5. Adding Finishing Touches: Once the desk is fully assembled, it’s time for finishing. Sand down any rough edges on the desktop. Apply primer and then your chosen paint or stain. Follow the manufacturer’s instructions for drying times and application of multiple coats. For added durability, especially in a child’s environment, consider applying a clear protective sealant or varnish. The copper pipe frame can be left as is for a natural patina, or it can be sealed with a clear lacquer to prevent tarnishing and maintain its polished look. This can be applied with a spray can or a brush.
Customization and Creative Enhancements
Beyond the basic structure, a DIY copper pipe child’s desk offers endless opportunities for personalization and functional enhancements.
1. Integrated Storage Solutions: Maximize the desk’s utility by incorporating clever storage. This could involve adding shelves above the desktop using smaller pipe sections and fittings, or creating under-desk cubbies. Consider attaching small copper pipe baskets or even repurposed metal buckets to the sides of the desk for storing pens, pencils, or art supplies. Another option is to create a simple pipe-based rack for books or even a tablet holder.
2. Lighting and Power Integration: For older children who may do homework or use a laptop, integrating lighting can be a valuable addition. You could design a simple pipe arm that extends upwards from the back of the desk, holding a small lamp. For added convenience, consider incorporating a power strip or USB charging ports into the desk structure. This might involve creating a small compartment or mounting point for the electrical components, ensuring they are safely housed and accessible.
3. Decorative Elements: The copper itself offers a strong visual appeal, but you can further enhance the desk’s aesthetics. Consider using different sizes of copper pipe for visual interest, or incorporating decorative caps on the ends of the pipework. You could also paint or stain certain sections of the pipework in contrasting colors for a more playful look. Some DIY enthusiasts have even incorporated small LED strip lights within the pipework itself for a subtle ambient glow.
4. Adjustable Features: For a desk that can grow with your child, consider making certain elements adjustable. This might involve using extendable pipe sections or designing leg supports that can be adjusted in height. This foresight can significantly extend the lifespan of the desk and ensure it remains a functional workspace for years to come.
Maintenance and Care
Maintaining your DIY copper pipe child’s desk is straightforward and ensures its longevity and aesthetic appeal.
Copper Pipe Frame: The copper pipe frame will naturally develop a patina over time, a characteristic that many find desirable. If you prefer to maintain its bright, polished look, you can clean it periodically with a copper cleaner or a paste made from lemon juice and baking soda. Apply the cleaner, let it sit for a few minutes, and then rinse and dry thoroughly. To prevent future tarnishing, you can apply a clear lacquer designed for metal. Ensure the surface is clean and dry before application. Avoid abrasive cleaners or harsh chemicals, as these can damage the copper.
Desktop Surface: The care for the desktop will depend on the material and finish you’ve chosen. For wooden desktops, regular dusting is sufficient. For painted or stained surfaces, use a damp cloth to wipe away spills and grime. Avoid using excessive moisture, as this can damage the finish. If the finish becomes scratched or worn over time, it can be easily touched up or refinished. For laminate or acrylic surfaces, follow the manufacturer’s cleaning recommendations.
General Upkeep: Periodically check all the fittings to ensure they remain secure. If any joints appear loose, tighten them gently. Ensure the screws attaching the desktop to the frame are also secure. With regular, simple maintenance, your DIY copper pipe child’s desk will remain a stylish and functional piece of furniture for years to come.
SEO Considerations:
Throughout this article, keywords such as "DIY copper pipe child’s desk," "copper pipe furniture," "kids desk build," "homemade desk," "industrial desk," "customizable desk," and "child study table" have been integrated naturally. The comprehensive nature of the guide, covering planning, materials, construction, customization, and maintenance, provides in-depth content that search engines favor. The clear headings and subheadings break down the information, making it easy for readers to scan and for search engines to index. The detailed steps and practical advice add value and authority to the content. By focusing on providing a complete and actionable resource for someone searching for this specific project, the article aims to rank well for relevant search queries. The emphasis on "child’s desk" and "DIY" specifically targets users looking for practical, hands-on solutions for children’s furniture.
