Emma’s Wedding Invites Checklist: Your Comprehensive Guide to Seamless Invitation Planning
The wedding invitation suite is often the first tangible glimpse your guests get of your upcoming celebration. It sets the tone, conveys essential information, and serves as a cherished keepsake. For a seamless and stress-free planning process, a meticulously organized checklist is paramount. This guide, tailored around "Emma’s Wedding Invites," provides a comprehensive, SEO-friendly breakdown to ensure no detail is overlooked from concept to mailing.
Understanding the Core Components of an Invitation Suite. Before diving into the checklist, it’s crucial to define the typical elements that constitute a wedding invitation suite. These can vary based on your wedding’s formality and style, but generally include: the main invitation card, an RSVP card (with a pre-addressed and stamped envelope), and an insert card for additional details like accommodations, directions, registry information, or wedding website details. For more elaborate affairs, a save-the-date card, reception card, and even a details card for specific events like a welcome party or farewell brunch might be included. "Emma’s Wedding Invites" offers a spectrum of these components, allowing couples to curate a suite that perfectly reflects their vision.
Step 1: Define Your Wedding Style and Budget. This foundational step influences every subsequent decision, particularly when engaging with a service like "Emma’s Wedding Invites." Consider the overall aesthetic of your wedding: formal and classic, rustic and bohemian, modern and minimalist, or vibrant and festive. This will guide your choice of paper quality, font styles, color palettes, and embellishments. Simultaneously, establish a realistic budget for your invitations. This includes the cost of the invitations themselves, postage, any assembly services you might opt for, and potential extras like calligraphy or wax seals. "Emma’s Wedding Invites" provides various collections at different price points, making it easier to align your vision with your financial constraints.
Step 2: Determine Your Guest List and Gather Addresses. Accuracy and organization are key here. Create a master spreadsheet of all invited guests, including their full names and mailing addresses. Double-check for any typos, especially in street names and zip codes, as errors can lead to undelivered invitations. Decide on the "household" approach – will you address the invitation to an individual, a couple, or a family? This decision should be consistent across your guest list. "Emma’s Wedding Invites" often offers templates that accommodate various addressing styles, simplifying this data entry.
Step 3: Select Your Invitation Style and Design with "Emma’s Wedding Invites." This is where your wedding style and budget truly come into play. Explore the "Emma’s Wedding Invites" catalog, paying attention to:
- Format: Traditional folded, flat cards, or unique die-cut shapes.
- Paper Stock: Smooth, textured, linen, cotton, or recycled. Consider the weight and feel.
- Color Palette: Choose colors that complement your wedding theme.
- Font Selection: Legibility is paramount. Opt for fonts that are easy to read and reflect your wedding’s formality.
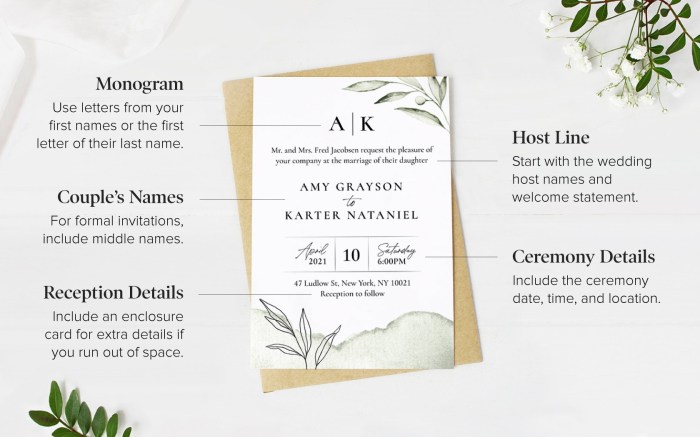
- Wording: This is crucial. Consult your "Emma’s Wedding Invites" representative or their online resources for traditional and modern wording options. Key information to include on the main invitation:
- Host(s) names (e.g., "Mr. and Mrs. John Smith request the honor of your presence…")
- Request line (e.g., "…at the marriage of their daughter, Emma Jane, to David Michael…")
- Date of the wedding
- Time of the wedding
- Ceremony venue name and address
- Reception information (if at a different location, or if it follows immediately)
- Embellishments: Foil stamping, letterpress, embossing, ribbons, wax seals, or custom illustrations. "Emma’s Wedding Invites" excels in offering a range of premium embellishments to elevate your design.
Step 4: Design and Order Your Save-the-Dates (Optional but Recommended). For weddings requiring significant travel or taking place during peak seasons, save-the-date cards are essential. These are typically sent out 6-8 months in advance (or even earlier for destination weddings). They should include:
- The couple’s names
- The wedding date
- The wedding city and state
- A mention of a formal invitation to follow
- Your wedding website URL (if you have one)
"Emma’s Wedding Invites" offers coordinating save-the-date designs that can perfectly match your main invitation suite, creating a cohesive brand for your wedding.
Step 5: Draft and Finalize Your RSVP Card. This small but vital piece of the suite ensures you get an accurate headcount.
- Clear RSVP Deadline: Give guests ample time to respond, but not so much that they forget. 3-4 weeks before the wedding is standard.
- Response Options: Clearly state "Accepts with Pleasure" and "Declines with Regret."
- Name Line(s): Provide space for guests to write their names, ensuring you know who is responding.
- Meal Choice (if applicable): If you’re offering a plated meal, include checkboxes for each option.
- Plus-One Accommodation: If you’re allowing guests to bring a plus-one, ensure there’s space for them to indicate this.
- Pre-Addressed and Stamped Envelope: Crucial for ease of response. "Emma’s Wedding Invites" can often facilitate this service.
Step 6: Create Your Insert Card(s). This is your space to provide essential logistical details. Common inserts include:
- Directions Card: Detailed driving instructions to the ceremony and reception venues. Include landmarks if helpful.
- Accommodation Card: List recommended hotels, including room block information (if applicable) and booking deadlines.
- Registry Information: While traditionally omitted from the invitation itself, it’s common to include a discreet mention of your registry on an insert card or direct guests to your wedding website. "Emma’s Wedding Invites" provides elegant templates for these inserts.
- Wedding Website: If you have a wedding website, this is the perfect place to direct guests for comprehensive information about events, travel, local attractions, and more.
Step 7: Review and Proofread Extensively. This is arguably the most critical step. Before approving your designs with "Emma’s Wedding Invites," meticulously proofread every single word, number, and name.
- Check Names: Couple, parents, wedding party members.
- Verify Dates and Times: Ensure they are accurate.
- Confirm Venue Names and Addresses: No room for error here.
- Proofread Wording: For grammatical errors and typos.
- Confirm RSVP Deadline: Is it clearly stated and reasonable?
- Get a Second (or Third) Opinion: Have multiple people proofread your drafts. "Emma’s Wedding Invites" often has design specialists who can also assist with proofreading.
Step 8: Order Samples and Finalize Quantities. Before placing your full order with "Emma’s Wedding Invites," request physical samples. This allows you to:
- Assess Paper Quality: Feel the weight and texture.
- Evaluate Color Accuracy: Ensure the printed colors match your vision.
- Check Print Clarity: See how the fonts and any embellishments look in person.
- Determine Final Quantities: Order slightly more than your guest count (typically 10-15% extra) to account for mistakes, last-minute additions, or keepsakes.
Step 9: Address and Assemble Your Invitations. This can be a time-consuming but rewarding process.
- Addressing: You can opt for calligraphy, professional printing services (often offered by "Emma’s Wedding Invites"), or address them yourself.
- Assembly: This involves carefully placing each component within the main invitation, tucking in the RSVP card with its pre-stamped and addressed envelope, and sealing the outer envelope.
- Assembly Services: "Emma’s Wedding Invites" may offer assembly services, which can be a lifesaver for couples with large guest lists or limited time.
Step 10: Weigh and Calculate Postage. This is a crucial step to avoid returned mail.
- Weigh a Fully Assembled Invitation: Take one complete invitation suite (including any inserts, envelopes, and embellishments) to the post office and have it weighed.
- Account for Thickness and Weight: Heavy cardstock, multiple inserts, and embellishments can increase the weight and thickness, requiring additional postage.
- Consider Non-Machineable Surcharges: Square envelopes, overly thick invitations, or those with certain embellishments might incur additional postage fees. "Emma’s Wedding Invites" can often provide guidance on standard mailing requirements.
- Purchase Stamps: Buy the correct postage, including any necessary surcharges. For save-the-dates, a standard stamp is usually sufficient, but always check current postal rates.
Step 11: Mail Your Invitations. The general rule of thumb for mailing wedding invitations is 6-8 weeks before the wedding date. For destination weddings or those during busy holiday seasons, consider mailing them 10-12 weeks in advance. Ensure all invitations are stamped and have complete, legible addresses.
Step 12: Track RSVP Responses. As RSVPs begin to arrive, diligently track them against your guest list.
- Use a Spreadsheet: Mark off guests who have responded and note their meal choices or any special requests.
- Follow Up with Non-Responders: After the RSVP deadline, reach out to any guests who haven’t responded. This is essential for finalizing your guest count for catering and seating arrangements.
By following this comprehensive checklist, couples can navigate the process of selecting and sending their wedding invitations with confidence and ease, ensuring that "Emma’s Wedding Invites" becomes a seamless and integral part of their wedding planning journey. This structured approach minimizes stress and allows for the creation of a beautiful and informative invitation suite that perfectly sets the stage for your special day.
