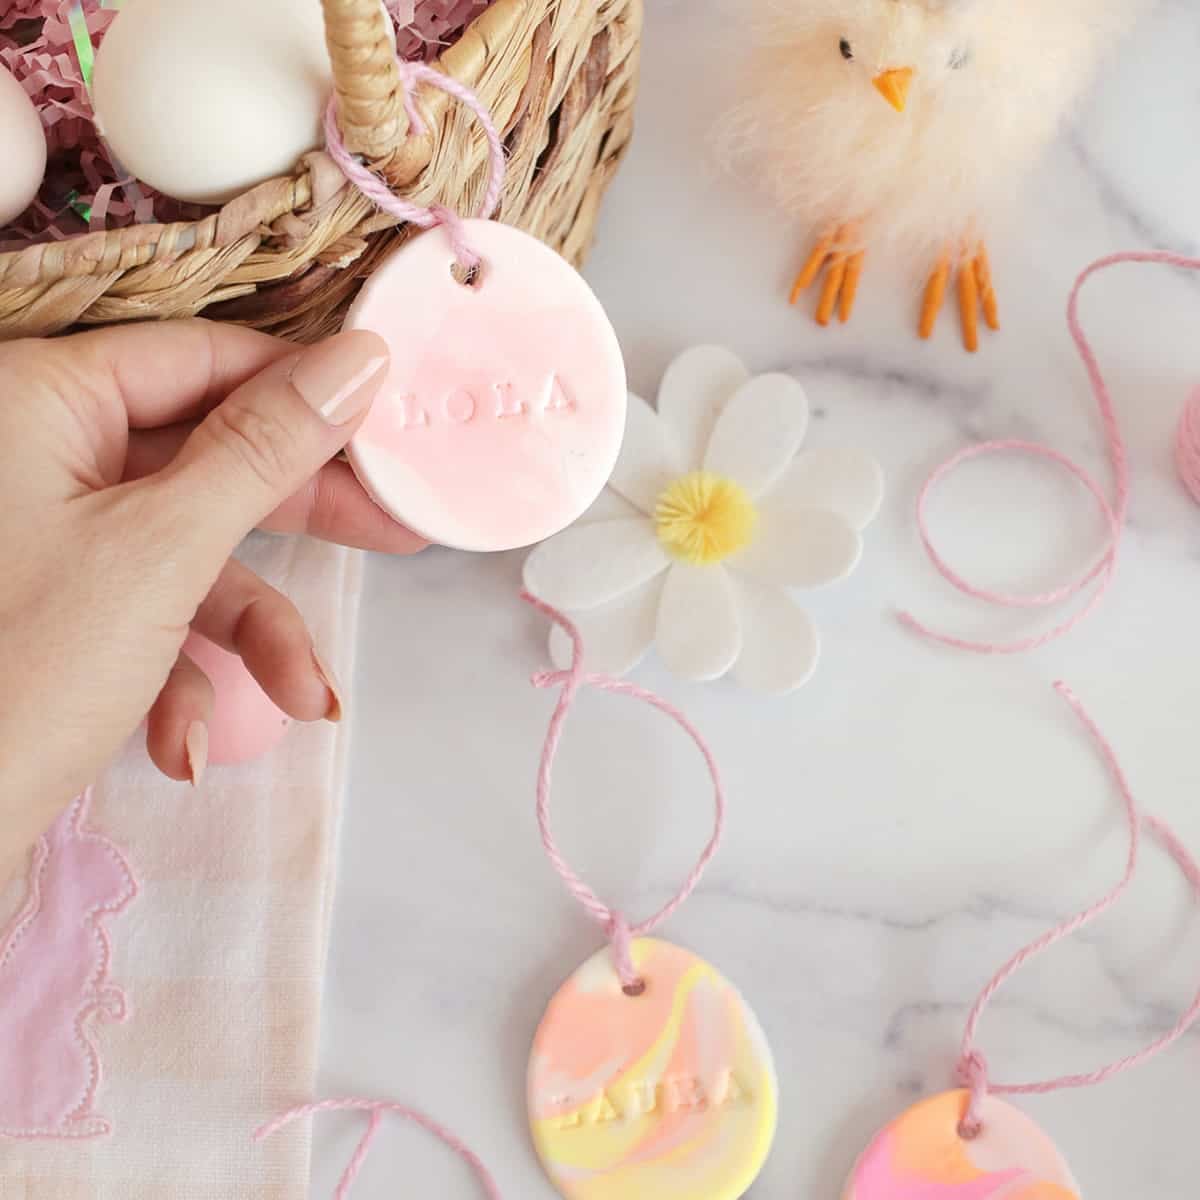

Marbled Easter Basket Name Tags with Air-Dry Clay: A DIY Masterclass
Creating personalized and charming Easter baskets is a beloved tradition, and a significant part of that charm lies in the details. Among these, custom name tags add a personal touch that elevates a simple basket into a cherished keepsake. This comprehensive guide focuses on crafting marbled Easter basket name tags using air-dry clay, a process that is both accessible for crafters of all levels and yields stunning, professional-looking results. We will delve into the techniques, materials, and design considerations that will empower you to create unique and eye-catching name tags, enhancing the visual appeal of any Easter basket and ensuring your creations are easily identifiable. This DIY project is not only fun and rewarding but also offers a fantastic opportunity to explore creative expression and personalize your Easter celebrations.
The appeal of marbled Easter basket name tags lies in their inherent uniqueness and handcrafted quality. Unlike mass-produced tags, each marbled piece possesses an individual pattern, ensuring no two are exactly alike. This bespoke nature makes them particularly special, especially when gifted to children or loved ones. The marbling technique, achieved by combining different colors of air-dry clay, creates organic, flowing patterns that resemble natural stone or precious gemstones. This visual complexity, achieved with simple tools and materials, adds a touch of sophistication to even the most whimsical Easter baskets. Furthermore, air-dry clay is a remarkably forgiving medium. It requires no kiln or special firing equipment, making it accessible for home crafters. Once dried, it is lightweight yet durable, perfect for attaching to a variety of basket materials. The ability to paint, seal, and embellish these clay tags further expands the creative possibilities, allowing for a truly personalized aesthetic that complements any Easter theme or color scheme. This project offers a tangible way to inject personality and homemade charm into your holiday preparations, making each Easter basket a truly memorable gift.
To embark on your journey of creating marbled Easter basket name tags, a well-equipped crafting station is essential. The primary material, of course, is air-dry clay. Opt for a good quality brand that dries to a smooth, hard finish without excessive cracking. You’ll need multiple colors of clay to achieve the marbled effect. Consider a palette that complements your Easter theme, such as pastel pinks, blues, and yellows for a traditional look, or bolder jewel tones for a more contemporary feel. White and black clay are excellent for creating contrast and definition within your marbling. Essential tools include a rolling pin (a dedicated clay roller or even a smooth glass bottle will suffice), a craft knife or a sharp blade for precise cutting, and circular cookie cutters or nesting cutters in various sizes to create uniform tag shapes. For imprinting names or designs, alphabet stamps are invaluable. Ensure they are small enough to fit comfortably on your tags. A toothpick or a fine-point tool can be used for smaller details or for creating small holes for hanging. For the finishing touches, you’ll need acrylic paints in coordinating colors, paintbrushes of various sizes, and a clear sealant (matte or gloss, depending on your preference) to protect and enhance the finished tags. Finally, ribbon, twine, or raffia will be needed to attach the tags to your Easter baskets. Gathering these supplies in advance will ensure a smooth and enjoyable crafting experience, allowing you to focus on the creative process of marbling and personalization.
The art of marbling clay begins with the careful selection and preparation of your colors. For the most effective marbling, choose 2-4 contrasting or complementary colors. For instance, a combination of white, light pink, and a touch of gold can create a delicate, elegant marble. For a bolder look, consider deep purple, teal, and black. Begin by taking equal-sized portions of each chosen clay color. Roll each portion into a separate snake or log. The thickness of these logs will influence the final marbling pattern; thicker logs tend to produce bolder, more distinct swirls, while thinner logs create finer, more intricate patterns. Once you have your clay logs, gently twist them together. You can twist them individually or twist several together to create a more complex blend. Avoid over-twisting at this stage; the goal is to create distinct ribbons of color, not to fully homogenize them. Once twisted, gently press the combined logs together to form a single, cohesive mass.
The marbling process itself is where the magic happens. Lay your twisted clay mass on a clean, non-stick surface, such as a silicone mat or a piece of parchment paper. Begin to gently roll out the clay using your rolling pin. As you roll, the colors will begin to swirl and blend, creating the characteristic marbled effect. For a more pronounced marble, fold the clay in half and roll it out again. Repeat this folding and rolling process a few times. The number of folds will directly impact the intensity and density of the marbling. More folds lead to a finer, more diffused marble, while fewer folds result in bolder, more expansive swirls. Be mindful not to overwork the clay at this stage, as excessive manipulation can lead to the colors muddying and losing their definition. The key is to achieve a balance between blending and distinct color separation. Once you are satisfied with the marbled pattern, ensure the clay is rolled to an even thickness, typically around ¼ inch, which is ideal for cutting out name tags. This thickness provides enough substance for durability while remaining lightweight.
Cutting and shaping your marbled clay is the next crucial step in transforming your marbled sheets into personalized Easter basket name tags. Once your marbled clay is rolled to the desired thickness and you’re happy with the pattern, it’s time to cut out your shapes. Utilize your chosen cookie cutters to create uniform and appealing tag forms. Circular cutters are a popular choice for their classic aesthetic, but you can also experiment with ovals, squares, or even Easter-specific shapes like bunnies or eggs. For a more custom look, you can freehand cut shapes with your craft knife. After cutting, carefully remove the excess clay from around your tags. It’s advisable to work with a few tags at a time to prevent the clay from drying out too quickly.
Personalizing your tags with names is what truly sets them apart. Before the clay begins to harden, use your alphabet stamps to imprint each recipient’s name onto the surface of the tag. Arrange the stamps carefully to ensure the name is legible and centered. Press down firmly and evenly to achieve a clear impression. If you don’t have alphabet stamps, you can use a fine-tip stylus or a toothpick to carefully write the names directly into the clay. For a more decorative touch, consider adding small etched designs or patterns around the names using your toothpick or stylus. This could include small dots, lines, or even simple floral motifs.
Creating a hanging mechanism is essential for attaching your tags to Easter baskets. While the clay is still soft, use a straw or the tip of your toothpick to create a small hole at the top of each tag. Ensure this hole is large enough to accommodate your chosen ribbon or twine. If you plan on painting your tags after they dry, you might opt for a larger hole or even two smaller holes on opposite sides to facilitate easier hanging. Be sure to smooth out any rough edges around the hole with your fingertip to maintain a clean finish.
Once your name tags are cut, stamped, and prepared for hanging, the drying process begins. Air-dry clay needs time to harden completely. The drying time can vary depending on the thickness of your tags, the humidity in your environment, and the specific brand of clay you are using. Typically, this can range from 24 to 72 hours. Place your tags on a flat, clean surface, such as a drying rack or a piece of parchment paper, in a well-ventilated area. Avoid direct sunlight or heat, as this can cause the clay to crack or dry unevenly. Periodically check the tags to ensure they are drying uniformly. They are fully dry when they feel hard and solid to the touch and no longer have a cool, damp sensation. Patience is key during this stage to ensure the integrity of your creations.
The finishing touches are where your marbled Easter basket name tags truly come to life. Once your clay tags are completely dry, it’s time for painting and sealing. Many air-dry clays will have a natural, soft white or off-white color, but you can choose to paint them to further enhance their aesthetic. Use acrylic paints to add details or to subtly enhance the marbled colors. You can paint over the entire surface, use metallic paints to highlight the raised lettering from the stamps, or add small painted accents like floral patterns or polka dots. If you want to make the names stand out more, consider using a contrasting color for the lettering. Allow the paint to dry completely between coats and before proceeding to the sealing stage.
Sealing your painted or unpainted clay tags is a crucial step for durability and to bring out the vibrancy of the colors. Apply a clear sealant, such as a matte or gloss varnish, using a paintbrush. The sealant will protect the clay from moisture, dirt, and wear, and will also give it a finished look. A matte sealant will provide a subtle, natural finish, while a gloss sealant will add a shiny, polished appearance. Ensure you apply an even coat and allow it to dry completely according to the product’s instructions. This sealing process not only protects your artwork but also enhances the depth and richness of the marbled patterns, making them truly pop.
Attaching your beautifully crafted marbled Easter basket name tags is the final, satisfying step. Once the sealant is fully dry, thread your chosen ribbon, twine, or raffia through the pre-made hole at the top of each tag. The material you choose can further enhance the overall aesthetic of your Easter basket. Natural twine or raffia offers a rustic, earthy feel, while satin ribbon adds a touch of elegance. For a whimsical touch, consider brightly colored baker’s twine. Tie a neat knot to secure the tag to your basket. You can tie it directly onto the handle, loop it around a decorative element, or even attach it to a small cluster of faux flowers or Easter grass already adorning the basket. Ensure the knot is secure enough that the tag won’t fall off but can still be easily removed. This final touch transforms your personalized name tags into the crowning glory of your meticulously prepared Easter baskets, adding a professional and heartfelt element that is sure to be appreciated.
The versatility of marbled Easter basket name tags made with air-dry clay extends far beyond their primary purpose. These handcrafted creations can also serve as charming embellishments for other Easter decorations. Consider attaching them to homemade Easter cards, using them as unique gift toppers for non-Easter presents, or even incorporating them into a festive tablescape by tying them to napkin rings. Their durable, sealed finish makes them suitable for repeated use year after year, adding a personal and eco-friendly touch to your holiday traditions. Furthermore, the process of creating these tags can be adapted for various occasions and themes throughout the year. The marbling technique can be used to create personalized jewelry charms, decorative magnets, or even small ornaments for other holidays. The inherent adaptability of air-dry clay and the marbling technique makes this a valuable crafting skill to have, offering endless creative possibilities for personalization and gifting. Exploring different color combinations, stamp designs, and finishing techniques will allow you to continuously evolve your creations and tailor them to a wide array of artistic endeavors.

