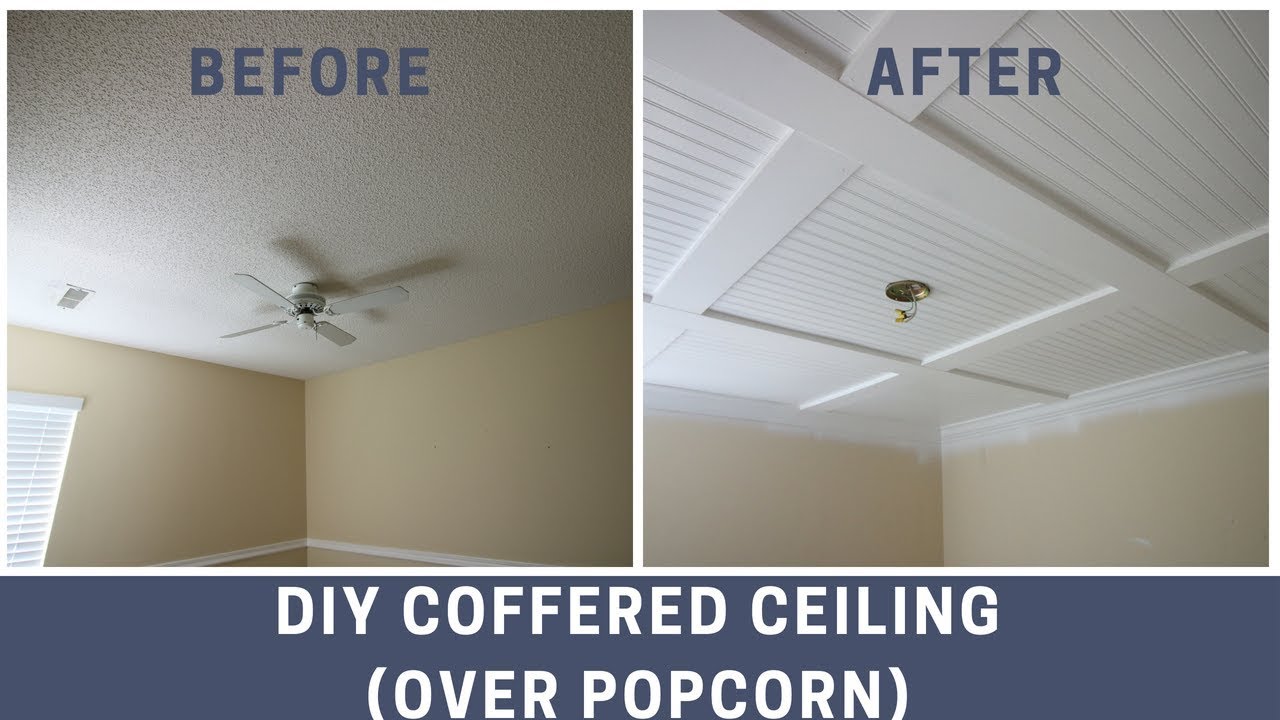

DIY Paneled Ceiling: A Modern Solution to Cover Popcorn Ceilings
Transforming a dated popcorn ceiling into a sleek, modern paneled surface is a rewarding DIY project that dramatically enhances a room’s aesthetic. This comprehensive guide details the process of covering popcorn ceilings with wood paneling, offering a durable, stylish, and ultimately satisfying upgrade. The primary motivation for undertaking this project often stems from the desire to eliminate the textured, dust-collecting nature of popcorn ceilings, which are remnants of a bygone era of interior design. Beyond aesthetics, paneling provides a smooth, cleanable surface and can even introduce architectural interest and dimension to an otherwise flat and unremarkable ceiling. This article will walk you through every step, from planning and material selection to installation and finishing, empowering you to achieve a professional-looking result.
Assessing Your Ceiling and Planning Your Project
Before purchasing any materials, thoroughly assess your existing popcorn ceiling. Inspect for any signs of water damage, loose material, or structural issues. If significant damage is present, these must be addressed before proceeding with paneling. Measure the total square footage of the ceiling accurately. This will be crucial for calculating the amount of paneling, furring strips, fasteners, and finishing materials needed. Consider the overall style of your room and the type of paneling that best complements it. Options range from simple beadboard and shiplap to more intricate decorative panels. Think about the direction you want the panels to run. Running them parallel to the longest wall can create an illusion of greater length, while running them perpendicular can make a narrow room feel wider. A consistent layout is key for a polished look.
Material Selection: Choosing the Right Paneling and Support
The cornerstone of your DIY paneled ceiling is the paneling itself. For covering popcorn ceilings, lightweight materials are generally preferred to minimize stress on the existing structure. Plywood, MDF (medium-density fiberboard), beadboard, and shiplap are popular choices. Plywood offers durability and can be painted or stained. MDF is cost-effective and provides a very smooth surface, ideal for painting, but it’s susceptible to moisture. Beadboard, characterized by its rhythmic grooves, offers a classic cottage or farmhouse feel. Shiplap, with its overlapping edges, creates a distinct modern farmhouse aesthetic. When choosing, consider the weight and ease of handling, especially if working alone.
Crucially, you’ll need a system to attach the new panels to the ceiling, bypassing the popcorn texture. Furring strips are essential for this. These are thin strips of wood (typically 1×3 or 1×4 lumber) that create a level surface and provide a solid substrate for screwing the paneling into. They will be attached directly to the ceiling joists. If your ceiling joists are not conveniently spaced or located, you might need to install additional furring strips perpendicular to the joists to create a grid. The spacing of these furring strips will depend on the thickness and rigidity of your chosen paneling. Thicker, more rigid panels may require fewer furring strips, while thinner, more flexible materials will benefit from closer spacing. Always consult the manufacturer’s recommendations for your specific paneling.
Tools and Safety Equipment
A successful DIY project hinges on having the right tools. For covering a popcorn ceiling with paneling, you’ll need:
- Measuring Tape: For accurate measurements.
- Pencil: For marking.
- Stud Finder: To locate ceiling joists for attaching furring strips.
- Level: To ensure furring strips and panels are installed straight.
- Circular Saw or Miter Saw: For cutting paneling and furring strips to size. A miter saw is ideal for precise angled cuts if needed.
- Drill/Driver: For pre-drilling holes and driving screws.
- Drywall Screw Gun (Optional but Recommended): For efficient and consistent screw installation.
- Utility Knife: For scoring and cutting smaller sections or trimming edges.
- Caulking Gun and Caulk: For sealing gaps and imperfections.
- Sanding Block or Orbital Sander: For smoothing edges and surfaces.
- Paint Brushes/Rollers: For applying primer and paint or stain.
- Safety Glasses: Essential eye protection.
- Dust Mask or Respirator: To protect your lungs from dust.
- Work Gloves: To protect your hands.
- Sturdy Ladder or Scaffolding: For safe access to the ceiling. Ensure it’s stable and rated for your weight.
- Painter’s Tape: For protecting surrounding areas and creating clean lines.
- Drop Cloths: To protect floors and furniture from dust and debris.
- Toggle Bolts or Drywall Anchors (if joist spacing is inconsistent): For securing furring strips to drywall where joists are not directly accessible.
Step-by-Step Installation Guide
Step 1: Preparation and Safety First
Clear the room of all furniture or cover it thoroughly with drop cloths. Remove any light fixtures, ceiling fans, or vents. Turn off the power to any ceiling lights at the breaker box to prevent electrical shock. Wear safety glasses and a dust mask at all times. Lay down drop cloths to protect your floors and any remaining furniture.
Step 2: Locate Ceiling Joists
Using a stud finder, locate the ceiling joists. Mark their positions with a pencil. These are the structural beams that run through your ceiling and are essential for securely attaching the furring strips. Most standard homes have joists spaced 16 or 24 inches on center. If your joists are not consistently spaced or you need to install furring strips in a different orientation, you may need to rely on drywall anchors or toggle bolts for some attachment points, but prioritize attaching to joists whenever possible for maximum stability.
Step 3: Install Furring Strips
This is a critical step for creating a flat, attachable surface. Measure and cut your furring strips to the desired lengths. Start by attaching the first furring strip parallel to a wall, ensuring it’s perfectly level. Use a drill to pre-drill pilot holes through the furring strip and into the ceiling joists. Secure the furring strip with appropriate screws. The screws should be long enough to pass through the furring strip and penetrate at least 1 inch into the ceiling joist.
Continue installing furring strips across the entire ceiling, maintaining consistent spacing. The spacing will depend on your paneling choice and manufacturer recommendations. For most common paneling materials like beadboard or shiplap, spacing them 16 or 24 inches apart, mirroring your joist spacing, is generally sufficient. If you’re using thinner or more flexible panels, you might need to install furring strips every 12 inches or even create a grid pattern with furring strips running both parallel and perpendicular to the joists. Regularly check for levelness with your level to ensure a smooth and even surface for your paneling.
Step 4: Cutting and Fitting the Paneling
Begin cutting your chosen paneling material to fit the ceiling. Measure each section carefully before cutting. It’s often best to start in a corner and work your way across the ceiling. For the first panel, ensure it’s perfectly square and parallel to the wall. Use your circular saw or miter saw for clean, straight cuts. When cutting around light fixtures or vents, use a template or carefully measure and cut out the necessary shapes.
Consider the weight of the panels and have a helper if needed, especially for larger sections. For shiplap or beadboard, pay attention to the overlapping or interlocking mechanism to ensure a seamless fit. If you encounter any minor imperfections in your cuts or edges, you can use a utility knife to carefully trim them.
Step 5: Attaching the Paneling
Once you have your first panel cut and ready, position it against the furring strips. Use your drill/driver to secure the panel. The screws should be driven through the panel and into the furring strips. For a clean look, use screws that are slightly shorter than the combined thickness of the panel and furring strip, and consider countersinking them so they are flush with or slightly below the surface. If you are using shiplap, screw through the tongue or the groove, depending on the profile, into the furring strips.
Continue installing the remaining panels, ensuring each one fits snugly against the previous one. Maintain consistent spacing for any intentional gaps, as is common with shiplap. For beadboard, the grooves will naturally create a visual rhythm. Work methodically across the ceiling, checking for levelness and ensuring tight seams.
Step 6: Cutting Around Obstacles
This is often the most challenging part. For light fixtures, ceiling fans, or vents, you’ll need to cut precise openings. Measure the exact location and size of the opening needed on the panel before cutting. Use a jigsaw for intricate cuts or a router with a template for consistent circular openings. If you’re installing a new ceiling fan, ensure you’ve installed a proper ceiling fan brace during the furring strip phase to support its weight.
Step 7: Sealing and Finishing
Once all the panels are installed, it’s time for the finishing touches. Inspect all the seams and edges for any gaps or imperfections. Use a paintable caulk to fill any small gaps between panels or between the panels and the walls. This will create a smooth, seamless look and prevent dust from accumulating in these areas. Apply the caulk with a caulking gun, smooth it with a damp finger or caulk smoothing tool, and wipe away any excess.
If you plan to paint or stain your paneled ceiling, now is the time to prepare the surface. Lightly sand any rough edges or areas where caulk has been applied to ensure a smooth finish. For painted ceilings, apply a high-quality primer specifically designed for wood or MDF. This will ensure even paint coverage and a durable finish. Once the primer is dry, apply your chosen paint in two or more thin coats, allowing adequate drying time between coats. For stained ceilings, apply your stain according to the manufacturer’s instructions, followed by a protective topcoat of polyurethane or varnish for durability.
Step 8: Reinstallation of Fixtures and Final Touches
Carefully reattach your light fixtures, ceiling fans, and vents. Ensure all electrical connections are secure and that the fixtures are properly mounted. Double-check that everything is aligned and looks professional.
Tips for Success and Common Pitfalls to Avoid
- Measure Twice, Cut Once: This adage is particularly important for ceiling projects where mistakes can be costly and time-consuming to correct.
- Work in Good Light: Ensure your workspace is well-lit to avoid errors and for safety.
- Don’t Rush: Patience is key. Take your time with each step, especially the cutting and fitting of panels.
- Over-Tightening Screws: Be careful not to over-tighten screws, as this can strip the wood or the drywall anchors, compromising the security of the paneling.
- Uneven Furring Strips: This is a major pitfall. If your furring strips are not level, your paneled ceiling will not be flat, and the panels may not fit together properly.
- Ignoring Joist Spacing: Relying solely on drywall anchors for heavy paneling can lead to sagging over time. Prioritize attaching to ceiling joists.
- Water Damage: Always address any existing water damage before covering it. Paneling will not fix structural issues.
- Ventilation: Ensure adequate ventilation during the painting or staining process, especially if working in a confined space.
Conclusion
Installing a DIY paneled ceiling to cover a popcorn ceiling is a transformative project that can significantly update the look of any room. By carefully planning, selecting the right materials, and following these step-by-step instructions, you can achieve a professional-quality finish that you can be proud of. The result is not only a more aesthetically pleasing ceiling but also a cleaner, more modern, and potentially more valuable home. The satisfaction of a job well done, combined with the visual impact of your new paneled ceiling, makes this a worthwhile endeavor for any homeowner looking to elevate their interior space.
