Maternity diy make a tunic – Maternity DIY: Make a Tunic is a great way to create a stylish and comfortable wardrobe for your growing bump. Sewing your own maternity tunic allows you to choose the perfect fabric, pattern, and fit to flatter your changing body.
Not only will you have a unique piece of clothing, but the process of creating it can be a relaxing and empowering experience during pregnancy.
This guide will walk you through everything you need to know to make your own maternity tunic, from choosing the right fabric and pattern to mastering basic sewing techniques. We’ll explore different styles, provide step-by-step instructions, and offer tips for achieving a comfortable and flattering fit.
So, gather your sewing supplies and let’s get started!
Maternity Tunics: A DIY Guide for Expecting Mothers: Maternity Diy Make A Tunic
Maternity tunics are a stylish and comfortable clothing option for expecting mothers. They offer a relaxed fit that accommodates the growing belly, while still looking fashionable and put-together. Creating your own maternity tunic through a DIY project can be a rewarding experience, allowing you to personalize your style and save money.
Benefits of DIY Maternity Tunics
DIY projects offer numerous benefits for expecting mothers, particularly when it comes to maternity wear.
- Customization:You can choose the fabric, pattern, and details that best suit your preferences and style. This allows for a unique and personalized piece of clothing that reflects your individual taste.
- Cost-effectiveness:Creating your own maternity tunic can be significantly cheaper than purchasing ready-made options. You can often find affordable fabrics and patterns at local craft stores or online retailers.
- Creative outlet:Sewing can be a relaxing and enjoyable activity, providing a creative outlet during pregnancy. It can also be a bonding experience, especially if you involve your partner or friends in the project.
- Sense of accomplishment:Completing a DIY project can boost your confidence and provide a sense of accomplishment, especially during a time of significant physical and emotional change.
Choosing the Right Fabric and Pattern
Selecting the right fabric and pattern is crucial for creating a comfortable and flattering maternity tunic.
Fabric Considerations
- Comfort:Choose soft and breathable fabrics like cotton, linen, or jersey, which are gentle on the skin and allow for air circulation. Avoid fabrics that are itchy or too clingy, as they can be uncomfortable during pregnancy.
- Stretch:Opt for fabrics with some stretch, such as jersey or spandex blends, to accommodate the changing body shape and provide a comfortable fit throughout pregnancy.
- Washability:Consider fabrics that are easy to wash and maintain, as maternity wear is likely to get stained or soiled during pregnancy.
Pattern Selection
- Fit:Choose a pattern that is designed for a loose and comfortable fit, with ample room for the growing belly. Avoid patterns that are too tight or restrictive.
- Style:Select a pattern that reflects your personal style and preferences. There are many different styles of maternity tunics available, from casual and flowy to more formal and elegant.
- Skill level:Choose a pattern that matches your sewing experience and skill level. If you are a beginner, start with a simple pattern that has clear instructions and fewer steps.
DIY Maternity Tunic Styles
Maternity tunics are a versatile and comfortable clothing option for expecting mothers. They offer ample room for a growing belly and can be styled in various ways to suit different occasions. This section will explore some popular maternity tunic styles and provide a step-by-step guide to creating your own DIY maternity tunic pattern.
Empire Waist Maternity Tunic
The empire waist maternity tunic is a classic choice for expectant mothers. It features a high waistline that sits just below the bust, creating a flattering silhouette that accentuates the neckline and emphasizes the baby bump. This style is typically loose and flowing, offering maximum comfort and movement.
Wrap Maternity Tunic, Maternity diy make a tunic
Wrap maternity tunics are another popular choice for expectant mothers. They feature a wrap-style design that allows for easy adjustment as the belly grows. The wrap design also provides a flattering and slimming effect.
A-Line Maternity Tunic
A-line maternity tunics are characterized by their wider hemline that flows out from the waist. This style is both comfortable and stylish, and it can be dressed up or down for various occasions.
Creating a Basic Maternity Tunic Pattern
Creating a basic maternity tunic pattern is relatively simple and requires only a few basic measurements.
Step 1: Measure Your Bust, Waist, and Hip
Take your bust, waist, and hip measurements. For the waist measurement, take it at the point where your belly button sits.
Step 2: Draw a Rectangle
On a piece of paper, draw a rectangle. The length of the rectangle will be the desired length of your tunic. The width of the rectangle should be equal to your bust measurement plus a few inches for ease of movement.
Step 3: Mark the Waistline
Mark the waistline on the rectangle. The waistline should be located approximately 2 inches below the bust measurement.
Step 4: Shape the Tunic
Draw a curved line from the waistline to the hemline. The curve should be gradual and create a loose, flowing shape.
Step 5: Add the Neckline
Draw a neckline on the top of the rectangle. The neckline can be round, V-shaped, or any other style you prefer.
Step 6: Add the Sleeves
Draw two sleeves on the sides of the rectangle. The sleeves can be long, short, or three-quarter length.
Step 7: Cut Out the Pattern
Cut out the pattern along the lines you have drawn.
Adjusting a Regular Tunic Pattern for a Pregnant Body
If you already have a regular tunic pattern, you can adjust it to fit your pregnant body. The key adjustment is to add extra width to the waist area. This can be done by adding a wedge-shaped piece of fabric to the center of the pattern.
The width of the wedge should be equal to the difference between your current waist measurement and your pre-pregnancy waist measurement.
To add a wedge-shaped piece of fabric, you can use a ruler and a pencil to draw a line down the center of the pattern from the waistline to the hemline. Then, draw two lines extending out from the center line at a 45-degree angle. The length of these lines should be equal to half the difference between your current waist measurement and your pre-pregnancy waist measurement. Cut out the wedge and sew it to the center of the pattern.
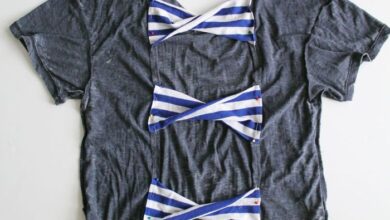
I’m all about finding creative ways to repurpose old clothes during my maternity leave, and turning a t-shirt into a comfy tunic is a classic. It’s a simple project, but it got me thinking about how even simple things can have a big impact.
Just like how Novo Resources is making a splash in the battery and precious metals industry, presenting at the Battery and Precious Metals Virtual Investor Conference in October. Their innovative approach to resource extraction could be a game-changer, much like that DIY tunic that’s become my new go-to outfit for lazy days.
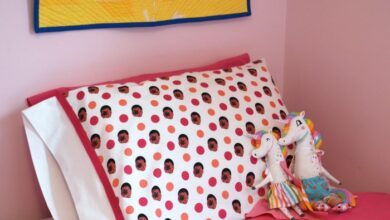
Making a maternity tunic is a fun and practical DIY project. You can personalize it with unique details, like adding a cute polka dot pattern to the fabric. Speaking of polka dots, I recently saw a tutorial for making a polka dot etched drinking glass that looked amazing! I think the same technique could be applied to a tunic, adding a subtle touch of whimsy to the design.
Making a maternity tunic is a great way to stay stylish and comfortable during pregnancy. The loose fit allows for plenty of room for your growing belly, and you can even use a stretchy fabric for maximum comfort. When it comes to styling, a simple and chic updo is a must, and the upside down braided top knot is a perfect choice.
This style keeps your hair out of your face while still looking polished and elegant. Pair your new tunic with a cute pair of flats or sandals, and you’re ready to take on the day!