Backyards are no longer just spaces for childhood games; they are becoming fertile ground for new media ventures. Playground Productions, a company dedicated to content for children and families, has announced its ambitious project to adapt the beloved video game franchise Backyard Baseball into an animated series titled Backyard Sports. This announcement, made during a significant "Backyard Sports Returns" panel at San Diego Comic-Con, marks a significant expansion of the iconic gaming brand into new storytelling mediums, further solidifying Playground’s vision of a burgeoning "Backyardiverse."
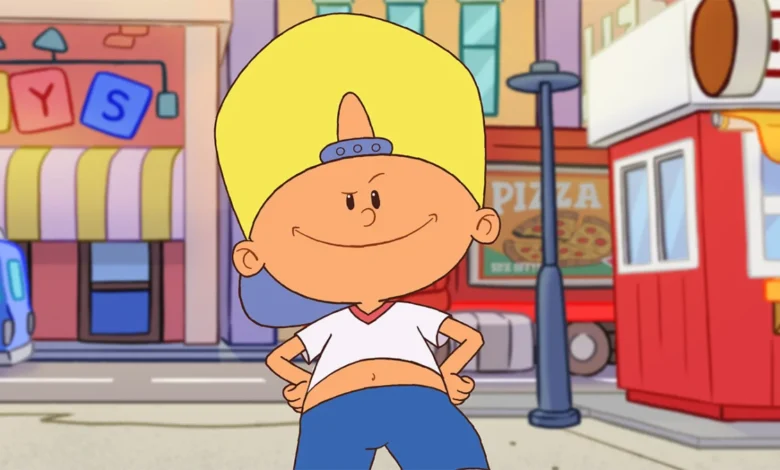
The animated series, officially named Backyard Sports: The Animated Series, boasts a star-studded voice cast that aims to capture the nostalgic essence of the original game while introducing these characters to a new generation. Leading the ensemble is Tiffany Haddish, lending her voice to the character of Kiesha Phillips. Donald Faison will portray Dante Robinson, a fan favorite from the original games. Christopher Mintz-Plasse is set to voice Dmitri Petrovich, a character known for his unique personality. The roster also includes Arturo Castro as the legendary star player Pablo Sanchez, whose in-game prowess made him a household name among gamers. Utkarsh Ambudkar will voice Achmed Khan, Deborah Baker Jr. as Kimmy Eckman, Michael Vlamis as Tony Delvecchio, Ashleigh Crystal Hairston as Sunny Day, Will Neff as the memorable Mr. Clanky, Vincent Tong as Kenny Kawaguchi, Joey Rudman as Marky Dubois, and Lindsay Barnett as Vinnie. The selection of these actors suggests a deliberate effort to blend established comedic and dramatic talent with voices that can resonate with both long-time fans and newcomers to the Backyard universe.
The origins of the Backyard phenomenon trace back to 1997 with the initial release of Backyard Baseball. This game, along with its subsequent iterations, introduced over 30 distinct "Backyard Kids" to a generation of players. These characters, with their diverse personalities and relatable quirks, formed the emotional core of the franchise. Over time, the games evolved, famously incorporating kid versions of actual Major League Baseball superstars such as Derek Jeter and Randy Johnson, further blurring the lines between the game’s fictional world and real-world sports heroes. This rich history of character development and gradual expansion provides a deep well of material for the animated series.
The timing of the Backyard Sports: The Animated Series announcement is particularly noteworthy. It coincided with the "Backyard Sports Returns" panel at San Diego Comic-Con, a prime venue for generating buzz within the entertainment and gaming communities. This event took place just a few weeks after the July 9 release of the new-generation Backyard Baseball game on Steam, signaling a concerted effort by Playground Productions to reintroduce and revitalize the franchise across multiple platforms. The panel itself likely served as a platform for deeper dives into the creative process behind the animated series, offering fans insights into the show’s narrative direction, character design, and the overall vision for the Backyard brand’s future.
Production and Creative Vision
Backyard Sports: The Animated Series is spearheaded by Playground CEO Lindsay Barnett, who also serves as an executive producer. The showrunner for the series is Chris Waters, tasked with guiding the creative direction and ensuring a cohesive vision. Adam Aseraf and Sarah Nevada Smith are leading the writing team as head writers and are also co-executive producers. This team’s experience in children’s programming and animation will be crucial in translating the playful, adventurous spirit of the video games into a compelling visual narrative. The series is slated to comprise 20 episodes, each approximately 11 minutes in length. This format is well-suited for younger audiences, offering digestible and engaging installments that can be easily consumed.
The strategy behind the new Backyard Baseball game and its accompanying animated series is part of a broader initiative by Playground Productions to cultivate what they refer to as the "Backyardiverse." While the term itself may evolve, the underlying ambition is clear: to build a comprehensive entertainment ecosystem around the Backyard brand, encompassing not only video games and animation but potentially other forms of media and merchandise. This integrated approach aims to foster a deep and lasting connection with the audience, leveraging nostalgia while simultaneously creating new avenues for engagement.
Official Statements and Future Outlook
Lindsay Barnett, CEO of Playground Productions, expressed her enthusiasm for the project, stating, "I am beyond thrilled to announce our series today. The Backyard Sports characters have inspired imaginations for generations, and their stories have always felt bigger than the game itself." This sentiment underscores the enduring appeal of the Backyard characters and the potential for their narratives to transcend their original medium. Barnett further elaborated on the synergy between the new game and the animated series, noting, "As Backyard Baseball expands with the new game on Steam and soon consoles, bringing these characters into new forms of storytelling feels like a natural extension of the Backyard universe." This statement highlights a clear strategy of cross-platform synergy, where each element of the "Backyardiverse" is designed to support and enhance the others.
The release of the trailer for Backyard Sports: The Animated Series offers a visual preview of the show’s aesthetic and tone. While specific details about the trailer’s content are not provided in the original source, trailers for animated series typically showcase character designs, animation style, key plot points, and the overall atmosphere of the show. For Backyard Sports, the trailer would likely aim to evoke a sense of fun, camaraderie, and the inherent drama of childhood sports, all within the familiar setting of a neighborhood backyard. The inclusion of a trailer suggests that the series is in an advanced stage of production, with a release window likely to be announced in the near future.
Analysis of Implications and Broader Market Context
The revival of the Backyard franchise and its expansion into animation speaks to a larger trend in the media landscape: the successful adaptation of established video game intellectual properties into other entertainment formats. In recent years, titles like The Super Mario Bros. Movie, Sonic the Hedgehog, and The Last of Us have demonstrated the significant commercial potential and audience appetite for high-quality game-to-screen adaptations. Playground Productions appears to be strategically capitalizing on this trend, leveraging the built-in fanbase and nostalgic appeal of Backyard Baseball.
The decision to focus on an animated series format is particularly astute. Animation offers a versatile medium that can capture the whimsical and often exaggerated nature of the Backyard games, allowing for creative freedom in character animation, environmental design, and visual storytelling. Furthermore, the episodic nature of animated series aligns well with the digital distribution models prevalent today, facilitating accessibility for a global audience.
The creation of a "Backyardiverse" suggests an ambition to build a franchise that can sustain multiple projects and storylines. This approach mirrors the strategies employed by major entertainment studios that have successfully built interconnected universes, such as Marvel Cinematic Universe. By establishing a shared world and a cast of recognizable characters, Playground Productions aims to create a lasting brand that can continue to engage audiences across different media for years to come. The success of this endeavor will likely hinge on the quality of the animated series, its ability to resonate with both original fans and new audiences, and Playground’s capacity to effectively manage and expand its "Backyardiverse" in a cohesive and compelling manner. The inclusion of a new Backyard Baseball game concurrently with the animated series announcement indicates a multi-pronged strategy designed to maximize the brand’s reach and impact. This integrated approach is a key indicator of Playground’s commitment to not just reviving a beloved franchise, but to building it into a sustainable entertainment property.

