DIY makeup setting spray is a game-changer for anyone looking to extend the wear of their makeup and achieve a flawless finish. By creating your own setting spray, you can customize the ingredients to suit your skin type and preferences, ensuring a personalized touch that commercial sprays simply can’t offer.
This blog post will guide you through the process of crafting your own DIY setting spray, from choosing the right ingredients to mastering the application techniques. We’ll delve into the benefits of using a DIY setting spray, explore various recipes for different skill levels, and address common concerns regarding safety and shelf life.
Introduction to DIY Makeup Setting Spray
A makeup setting spray is a must-have for anyone who wants their makeup to last all day. It helps to lock in your makeup, prevent it from fading or smudging, and give you a flawless finish. While there are many great setting sprays available on the market, you can also easily make your own at home with a few simple ingredients.
I’ve been experimenting with DIY makeup setting sprays lately, trying to find the perfect balance of ingredients. It’s amazing how simple things like rose water and aloe vera can create such a refreshing mist. It reminds me of exploring the Forzieri Taoist Treasures in Taipei – those ancient practices of using natural elements for wellness.
Perhaps there’s a connection between those ancient traditions and my DIY beauty concoctions!
Benefits of Using a DIY Setting Spray
Creating your own makeup setting spray has several advantages:
- Cost-Effective:You can save money by making your own setting spray instead of buying it from a store.
- Customization:You can customize the ingredients to suit your skin type and needs. For example, if you have oily skin, you can add ingredients that help to control shine.
- Natural Ingredients:You can use all-natural ingredients, which are gentler on your skin than some commercial products.
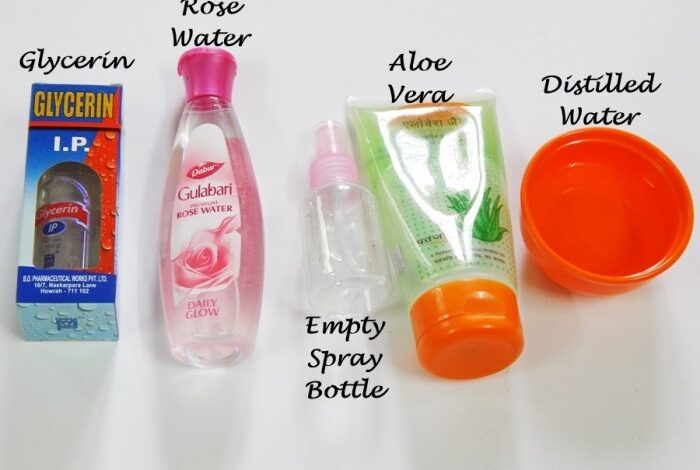
Common Ingredients in DIY Setting Spray
The most common ingredients in DIY makeup setting sprays are:
- Water:The base of most setting sprays is water, which helps to hydrate the skin and create a smooth finish.
- Glycerin:Glycerin is a humectant, which means it attracts and retains moisture. This helps to keep your skin hydrated and prevent your makeup from drying out.
- Witch Hazel:Witch hazel is an astringent that helps to tighten pores and control oil production. It also has anti-inflammatory properties, which can help to soothe the skin.
- Essential Oils:Essential oils can be added to your setting spray for fragrance and other benefits. For example, lavender oil is known for its calming properties, while tea tree oil is an effective antimicrobial agent.
- Alcohol:Alcohol can be used as a preservative in setting sprays. However, it can be drying to the skin, so it’s important to use it sparingly or avoid it altogether if you have sensitive skin.
DIY Setting Spray Recipes

Now that you’ve got the basics down, let’s dive into some DIY setting spray recipes! These recipes offer different levels of complexity, so you can choose the one that best suits your experience and needs.
DIY Setting Spray Recipes, Diy makeup setting spray
Here are three DIY setting spray recipes, ranging from beginner-friendly to more advanced:
| Recipe Name | Ingredients | Steps | Notes |
|---|---|---|---|
| Beginner’s Bliss |
|
|
|
| Intermediate Magic |
|
|
|
| Advanced Alchemy |
|
|
|
Essential Ingredients and Their Properties
Creating a DIY makeup setting spray is a fun and cost-effective way to achieve a flawless and long-lasting makeup look. The success of your homemade spray depends on carefully selecting and understanding the properties of each ingredient. Let’s delve into the essential ingredients that form the foundation of your DIY setting spray.
Alcohol
Alcohol plays a crucial role in setting sprays, acting as a solvent and a drying agent. It helps to quickly evaporate, leaving behind a thin film that sets your makeup in place.
DIY makeup setting spray is a great way to make your makeup last longer and look flawless all day. I recently saw a tutorial on at home with shailey murphy that used a simple mixture of rosewater and witch hazel, and I was so impressed with the results! Now I’m experimenting with different essential oils to find the perfect blend for my skin type.
- Benefits:Alcohol’s quick evaporation ensures a fast-drying effect, preventing makeup from smudging or transferring. It also helps to minimize shine by absorbing excess oil from the skin.
- Types:
- Witch Hazel:A natural astringent with anti-inflammatory properties, it helps to minimize pores and soothe the skin.
- Rubbing Alcohol (Isopropyl Alcohol):A strong drying agent, it should be diluted with water before use to avoid irritation.
- Vodka:A less harsh option, it’s a good alternative for sensitive skin.
- Tips:
- Dilute:If using rubbing alcohol, always dilute it with water to prevent skin irritation. A 50/50 ratio is a good starting point.
- Patch Test:Before applying any new ingredient to your face, perform a patch test on a small area of skin to check for any allergic reactions.
Glycerin
Glycerin is a humectant, meaning it attracts and retains moisture. This property makes it a valuable addition to setting sprays, as it helps to keep the skin hydrated and prevent dryness.
- Benefits:Glycerin helps to create a dewy and healthy-looking finish. It also acts as a barrier, preventing moisture loss from the skin and keeping makeup looking fresh.
- Tips:
- Vegetable Glycerin:Choose vegetable glycerin, which is derived from plant sources, for a natural and gentle option.
- Avoid Overuse:Glycerin can be sticky in high concentrations. Start with a small amount and gradually increase if needed.
Aloe Vera
Aloe vera is a natural soothing agent with anti-inflammatory and moisturizing properties. It helps to calm and nourish the skin, while also providing a refreshing feel.
- Benefits:Aloe vera helps to reduce redness and irritation, leaving the skin feeling soft and supple. It also adds a touch of hydration to the setting spray.
- Tips:
- Pure Aloe Vera Gel:Use pure aloe vera gel, preferably organic, for the best results.
- Fresh Aloe:If you have an aloe vera plant, you can extract fresh gel for a more potent and natural solution.
DIY Setting Spray Application Techniques
Applying your DIY setting spray correctly is essential for maximizing its effectiveness and ensuring a flawless, long-lasting makeup look. Different application methods cater to individual preferences and desired results.
Setting Spray Application Methods
The application method you choose for your DIY setting spray can significantly impact the final outcome. Here’s a comparison of the most popular techniques:
- Spraying:This method involves holding the bottle a few inches away from your face and misting the spray evenly over your entire makeup. It’s a quick and efficient way to apply the setting spray, but it’s crucial to avoid over-spraying, which can lead to streaking or smudging.
- Misting:Similar to spraying, misting involves holding the bottle closer to your face and applying the setting spray in a fine, delicate mist. This method is ideal for those with sensitive skin or who prefer a lighter application.
- Blotting:This method involves applying the setting spray to a clean makeup sponge or brush and then gently blotting it onto your face. Blotting is a more controlled technique that allows you to target specific areas of your makeup. It’s particularly effective for setting eyeshadow or contouring.
Tips for Achieving an Even Application
To achieve a flawless and even application of your DIY setting spray, consider these helpful tips:
- Shake Well:Before applying, shake the bottle well to ensure the ingredients are thoroughly mixed.
- Maintain a Distance:When spraying or misting, hold the bottle 6-8 inches away from your face to avoid over-spraying and ensure an even application.
- Close Your Eyes:It’s always a good idea to close your eyes while applying the setting spray to prevent any potential irritation or stinging.
- Avoid Direct Contact:If you’re using the blotting method, avoid applying the setting spray directly to your skin. Instead, apply it to a clean makeup sponge or brush and then gently blot it onto your face.
Tips for Avoiding Over-Spraying
Over-spraying can lead to streaking, smudging, and a heavy makeup look. To avoid this, try these techniques:
- Practice:Before applying to your face, practice spraying or misting the setting spray into the air to get a feel for the spray pattern and the appropriate distance.
- Less is More:Apply the setting spray in light layers, allowing each layer to dry before applying the next.
- Targeted Application:If you’re concerned about over-spraying, focus on applying the setting spray to specific areas of your face, such as your T-zone, rather than your entire face.
DIY Setting Spray Storage and Shelf Life
Just like any other homemade beauty product, your DIY setting spray needs proper storage to maintain its effectiveness and prevent spoilage. The storage method and shelf life of your homemade setting spray depend largely on the ingredients used. Here’s a guide to storing and extending the shelf life of your DIY setting spray.
Storing DIY Setting Spray
Proper storage is crucial to ensure the longevity and safety of your homemade setting spray. Here are some key guidelines:
- Clean and Sterile Container:Always use a clean and sterilized spray bottle. This prevents contamination and helps maintain the quality of your setting spray.
- Airtight Container:Opt for a spray bottle with a tight-fitting lid or pump to prevent air exposure, which can oxidize ingredients and reduce their effectiveness.
- Cool and Dark Place:Store your setting spray in a cool, dark place, away from direct sunlight and heat. This helps prevent the ingredients from degrading and preserves their efficacy.
- Avoid Extreme Temperatures:Avoid storing your setting spray in extreme temperatures, whether hot or cold. This can affect the consistency and effectiveness of the ingredients.
Shelf Life of Homemade Setting Spray
The shelf life of a homemade setting spray typically ranges from 2 to 4 weeks. This is significantly shorter than commercially available setting sprays due to the lack of preservatives.
Extending the Shelf Life
While homemade setting sprays have a shorter shelf life, there are ways to extend their lifespan:
- Use Fresh Ingredients:Start with fresh, high-quality ingredients. Avoid using expired or near-expiry ingredients, as they can contribute to spoilage.
- Add Preservatives:Consider adding a small amount of natural preservatives like grapefruit seed extract or rosemary extract to your DIY setting spray. This can help inhibit microbial growth and extend the shelf life.
Note:Use preservatives sparingly, as excessive amounts can irritate the skin.
- Store in the Refrigerator:Refrigerating your setting spray can help slow down the degradation process and extend its shelf life. However, ensure the container is tightly sealed to prevent absorbing other smells from the refrigerator.
Identifying Signs of Spoilage
It’s important to be able to identify signs of spoilage in your homemade setting spray to avoid using a product that may be harmful to your skin. Here are some common indicators:
- Change in Color or Odor:A change in color or odor from the original, such as discoloration, cloudiness, or a strong, unpleasant smell, indicates potential spoilage.
- Separation:If the ingredients separate or form layers, it’s a sign that the setting spray has started to break down and is no longer effective.
- Mold or Bacteria Growth:Visible mold or bacterial growth is a clear indication of spoilage and should be discarded immediately.
Safety Precautions and Considerations
While crafting your own setting spray can be a fun and rewarding experience, it’s crucial to prioritize safety. DIY beauty products involve working with ingredients that might not always be familiar, so taking precautions is essential to avoid any potential risks.
Ingredient Safety and Handling
When handling the ingredients for your DIY setting spray, it’s important to take specific precautions to minimize the risk of irritation, allergic reactions, or other adverse effects.
DIY makeup setting spray is all about finding the perfect balance of ingredients to keep your look fresh all day. It’s a bit like finding the perfect pairing for a delicious dessert – like a basil cheesecake with chocolate sauce ! Just as the chocolate sauce enhances the creamy cheesecake, a well-formulated setting spray complements your makeup, locking in the colors and preventing any unwanted smudging.
So, grab your favorite ingredients and experiment with your own DIY spray – you might just discover your new makeup must-have!
- Always wear gloves when handling any potentially irritating ingredients, such as essential oils or alcohol.
- Ensure proper ventilation in the area where you are preparing your setting spray, as some ingredients can release fumes.
- Avoid contact with eyes and skin. If contact occurs, rinse thoroughly with water.
- Store all ingredients in their original containers, labeled properly, and out of reach of children and pets.
Allergy Considerations
One of the most important safety considerations for DIY setting spray is potential allergies. Everyone’s skin is unique, and what works for one person might not work for another.
- Before incorporating any new ingredient into your DIY setting spray, it’s always advisable to perform a patch test on a small area of your skin. Apply a small amount of the diluted ingredient to your inner arm or behind your ear, and wait 24-48 hours to observe for any signs of irritation or reaction.
- If you have known allergies to certain ingredients, such as essential oils, alcohol, or fragrances, avoid using them in your DIY setting spray.
- Be mindful of potential cross-contamination. If you have sensitive skin or a history of allergies, use separate tools and containers for your DIY setting spray to prevent any accidental contamination from other products.
Potential Skin Reactions
While most DIY setting spray recipes are designed to be gentle on the skin, it’s important to be aware of potential skin reactions that might occur.
- If you experience any irritation, redness, burning, itching, or discomfort after using your DIY setting spray, discontinue use immediately and consult with a dermatologist.
- Some individuals may experience a reaction to certain ingredients, such as alcohol or essential oils, even if they have not had a previous allergy. If you notice any unusual reaction, it’s best to discontinue use and consult with a medical professional.
- Remember that DIY setting sprays are not regulated by the FDA, so it’s crucial to be cautious and to discontinue use if you experience any adverse reactions.
DIY Setting Spray Variations and Customization: Diy Makeup Setting Spray
The beauty of DIY setting sprays lies in their flexibility. You can easily tailor them to your specific skin type, makeup preferences, and even your mood! Let’s explore the exciting world of customization options.
Customization Options
You can customize your DIY setting spray by adjusting its scent, color, and texture. These modifications not only enhance the spray’s appeal but also cater to your individual needs. Here’s a table showcasing some common customization options:
| Customization Category | Specific Ingredients | Effects |
|---|---|---|
| Scent | Essential oils (lavender, rose, tea tree, etc.) | Adds a pleasant fragrance and potential aromatherapy benefits. |
| Floral waters (rose water, lavender water) | Provides a subtle, natural fragrance and adds a touch of hydration. | |
| Vanilla extract | Imparts a warm, comforting scent. | |
| Color | Food coloring (natural or artificial) | Adds a tint to the spray, but use sparingly to avoid staining clothes. |
| Micronized pigments (mica, iron oxides) | Provides a subtle shimmer or color payoff, but use with caution as it can affect the spray’s texture. | |
| Texture | Glycerin | Increases the spray’s moisturizing properties, leaving skin feeling soft and supple. |
| Aloe vera gel | Soothes and hydrates the skin, reducing any potential irritation from the spray. | |
| Hyaluronic acid | Draws moisture to the skin, promoting a dewy and hydrated look. |
Customized DIY Setting Spray Recipes
Here are a few customized DIY setting spray recipes to get you started:
For Oily Skin
- 1/2 cup distilled water
- 1 tablespoon witch hazel
- 1 teaspoon aloe vera gel
- 5 drops tea tree oil
- 2 drops lavender essential oil
This recipe combines the astringent properties of witch hazel with the soothing benefits of aloe vera and tea tree oil to control oil production and prevent shine. Lavender oil adds a calming scent.
For Dry Skin
- 1/2 cup distilled water
- 1 tablespoon glycerin
- 1 teaspoon rose water
- 5 drops rose essential oil
This recipe features glycerin for intense hydration and rose water for a gentle, floral scent. Rose essential oil adds a touch of luxury and helps to balance the skin’s moisture levels.
For Sensitive Skin
- 1/2 cup distilled water
- 1 tablespoon chamomile tea (cooled)
- 1 teaspoon aloe vera gel
- 5 drops chamomile essential oil
This recipe utilizes the soothing properties of chamomile tea and aloe vera gel to calm and protect sensitive skin. Chamomile essential oil further enhances the calming effect.
For a Dewy Finish
- 1/2 cup distilled water
- 1 tablespoon hyaluronic acid
- 1 teaspoon glycerin
- 5 drops grapefruit essential oil
This recipe incorporates hyaluronic acid and glycerin to draw moisture to the skin, creating a dewy and radiant finish. Grapefruit essential oil adds a refreshing and uplifting scent.
Comparison with Commercial Setting Sprays
The world of makeup setting sprays is vast, offering a range of options from budget-friendly to luxury brands. But how do DIY setting sprays compare to these commercially available options? Let’s delve into the pros and cons of each type to help you make an informed decision.
Pros and Cons of DIY Setting Sprays
DIY setting sprays offer a unique advantage: customization. You have complete control over the ingredients, allowing you to tailor the spray to your specific skin type and needs. However, there are also potential downsides to consider.
- Pros:
- Customization:You can adjust the formula to suit your skin type, sensitivities, and preferences, including adding specific ingredients like aloe vera for hydration or essential oils for fragrance.
- Cost-effectiveness:DIY setting sprays are often cheaper than commercial options, especially if you already have some of the ingredients on hand.
- Ingredient Control:You can choose natural and organic ingredients, avoiding potential irritants or harsh chemicals found in some commercial sprays.
- Cons:
- Potential for Contamination:If not properly prepared and stored, DIY setting sprays can be prone to bacterial growth.
- Limited Shelf Life:Homemade sprays generally have a shorter shelf life compared to commercial options due to the lack of preservatives.
- Consistency and Effectiveness:Achieving the desired consistency and effectiveness can be challenging without the right knowledge and equipment.
Pros and Cons of Commercial Setting Sprays
Commercial setting sprays offer convenience and often come with a longer shelf life due to the inclusion of preservatives. However, these advantages come with trade-offs.
- Pros:
- Convenience:Readily available at drugstores and online retailers, eliminating the need for sourcing and mixing ingredients.
- Longer Shelf Life:Preservatives extend the shelf life, reducing the risk of contamination and spoilage.
- Consistent Quality:Commercial sprays are manufactured in controlled environments, ensuring consistent quality and effectiveness.
- Cons:
- Cost:Commercial setting sprays can be expensive, especially for high-end brands.
- Potential Irritants:Some commercial sprays contain fragrances, alcohol, or other ingredients that can irritate sensitive skin.
- Limited Customization:You have no control over the ingredients or formula.
Factors to Consider When Choosing Between DIY and Commercial Options
When deciding between DIY and commercial setting sprays, consider these factors:
- Skin Type and Sensitivities:If you have sensitive skin, a DIY spray allows you to control the ingredients and avoid potential irritants.
- Budget:DIY setting sprays are often more budget-friendly, especially if you already have some of the ingredients.
- Time and Effort:Commercial sprays offer convenience, eliminating the need for sourcing ingredients and mixing.
- Desired Outcome:Consider the specific benefits you’re seeking, such as hydration, shine control, or long-lasting wear.
- Storage and Shelf Life:If you’re concerned about storage and shelf life, a commercial spray might be a better option.
Tips for Achieving Long-Lasting Makeup
Want your makeup to stay put all day long? We’ve all been there – a perfectly applied face that starts to fade, crease, or slide off as the day goes on. But fret not! With a few key tips and tricks, you can achieve long-lasting makeup that looks fresh and flawless from morning till night.
Proper Skincare for Long-Lasting Makeup
A smooth, well-hydrated canvas is essential for makeup to adhere properly and last longer. Start with a gentle cleanser to remove impurities and excess oil. Follow with a lightweight moisturizer that won’t clog pores. Don’t forget to exfoliate a couple of times a week to remove dead skin cells and create a smoother surface for makeup application.
Makeup Application Techniques for Lasting Makeup
The way you apply your makeup plays a crucial role in its longevity. Here are some key techniques to keep in mind:
- Start with a Primer:A primer helps create a smooth, even surface for makeup application and prevents it from settling into fine lines and pores. Apply a thin layer all over your face before foundation.
- Choose the Right Foundation:Opt for a long-wearing foundation formula that matches your skin tone perfectly. Use a brush or beauty blender to blend it seamlessly into your skin.
- Set with Powder:After applying your foundation, use a translucent powder to set your makeup and prevent it from creasing. Apply a light dusting all over your face, focusing on areas that tend to get oily, like your T-zone.
- Layer Carefully:Build your makeup in thin, even layers. Too much product can lead to creasing and caking.
- Use a Setting Spray:A setting spray is a must-have for long-lasting makeup. It helps lock everything in place and prevents your makeup from fading or smudging.
Choosing the Right Makeup Products for Long-Lasting Wear
Selecting the right makeup products is crucial for achieving a long-lasting look. Look for products specifically formulated for long wear, such as:
- Long-Wear Foundation:Long-wear foundations are designed to stay put for hours without fading or creasing. They often have a matte finish that helps control shine.
- Waterproof Mascara and Eyeliner:Waterproof mascara and eyeliner are essential for preventing smudging and running, especially during hot weather or humid conditions.
- Long-Lasting Lipstick or Lip Stain:Choose a long-lasting lipstick or lip stain that won’t feather or bleed.