The Enchanting World of Mermaid Plush Dolls: A Guide to Creation and Downloadable Patterns
Mermaid plush dolls have captured the imagination of children and adults alike, their whimsical tails and flowing hair evoking dreams of underwater adventures and mythical kingdoms. These soft, huggable companions are more than just toys; they are often cherished collectibles, props for imaginative play, and even comforting presences. The appeal lies in their unique blend of human and aquatic elements, offering a touch of magic and fantasy to everyday life. Creating your own mermaid plush doll can be an incredibly rewarding experience, allowing for personalization and the satisfaction of crafting something truly unique. This article will delve into the fascinating world of mermaid plush dolls, exploring their appeal, the materials and techniques involved in their creation, and crucially, providing you with valuable insights and a downloadable pattern to embark on your own plush mermaid journey. Whether you’re a seasoned crafter or a curious beginner, the allure of bringing these mythical creatures to life is undeniable.
The popularity of mermaid plush dolls stems from several interconnected factors. Firstly, the enduring fascination with mermaids in folklore and popular culture plays a significant role. From ancient myths to modern cinematic interpretations, mermaids have consistently represented a blend of beauty, mystery, and the allure of the unknown ocean depths. This cultural resonance translates directly into a desire for tangible representations of these beloved characters. Secondly, the tactile appeal of plush toys is universally recognized. Soft, squishy, and comforting, plush dolls offer a sensory experience that is both soothing and engaging. The combination of the fantastical mermaid design with the comforting nature of plush fabric creates an irresistible product. Thirdly, the trend towards handmade and personalized items has propelled the popularity of DIY crafts, including plush doll making. Consumers are increasingly seeking out unique items that reflect their personal style and that offer a connection to the creation process. A handmade mermaid plush doll is not just an object; it’s a story, a labor of love, and a personalized treasure. Finally, the visual appeal of mermaid dolls is undeniable. The vibrant colors, shimmering fabrics, and intricate details often incorporated into their design make them visually striking and highly collectible. The ability to customize these elements further enhances their desirability.
The journey of creating a mermaid plush doll begins with understanding the essential components and materials. The foundation of any plush doll is the fabric. For mermaid tails, fabrics with a slight sheen or shimmer are ideal, such as satin, lamé, or even iridescent quilting cottons. These materials mimic the scales and fluidity of a mermaid’s tail. For the upper body, soft, cuddly fabrics like minky, fleece, or velboa are excellent choices, providing a pleasant tactile experience. The choice of stuffing is also crucial. Polyester fiberfill is the standard, offering a soft, resilient fill that maintains its shape. For a firmer doll, you might consider using a blend of fiberfill and cotton batting. Thread is another essential. High-quality polyester thread is recommended for its durability and ability to withstand repeated washing and play. You’ll also need sewing needles, either by hand or for a sewing machine. Sharp pins are vital for holding pattern pieces in place. For detail work, such as eyes, mouths, and decorative elements, you might opt for embroidery floss, fabric paint, or small buttons. If you’re aiming for a more professional finish, fusible interfacing can be used to add structure to certain fabric pieces, particularly for the tail fins.
Understanding basic sewing techniques is fundamental to creating a successful mermaid plush doll. For beginners, hand-sewing can be a satisfying and accessible method. Key stitches to master include the running stitch for gathering or basting, the whipstitch for joining seams, and the ladder stitch (also known as the invisible stitch) for closing openings neatly. A sewing machine significantly speeds up the process and creates stronger seams. Familiarity with straight stitching, backstitching for securing ends, and edge finishing techniques like zig-zag stitching or serging (if you have a serger) will be beneficial. Pattern reading is also important. Patterns are typically printed with seam allowances already included. Understanding how to transfer the pattern pieces onto fabric, cut them accurately, and sew them together with the correct seam allowance is crucial for achieving the desired shape and size of your mermaid. For more advanced crafters, techniques like applique for adding decorative elements, or even needle felting for adding facial features or hair texture, can elevate the design of your plush mermaid.
The heart of any DIY plush project is the pattern. A well-designed pattern provides the blueprint for your creation, dictating the shape, size, and construction of each component. For a mermaid plush doll, a pattern will typically include pieces for the head, body, arms, and a distinctive tail. The tail piece itself is often the most intricate, comprising two halves that are sewn together and then potentially attached to the body. Fin patterns, for the tail and sometimes arms, add the characteristic mermaid aesthetic. Eye and mouth details will also be included, either as separate pattern pieces to be appliqued or as guidelines for embroidery. When choosing or designing a pattern, consider the desired size of your finished doll. Larger dolls are often more suitable for younger children, while smaller, more detailed mermaids can be appealing as decorative items or keychains. The complexity of the pattern will also dictate the difficulty level. Simple, blocky shapes are easier to sew than intricate curves and detailed fins. For a downloadable pattern, look for clear instructions, accurate seam allowances, and readily available sizing. Many online crafting communities and blogs offer free downloadable patterns, often with accompanying tutorials. When downloading, ensure the file format is compatible with your needs (e.g., PDF) and that the print scale is accurate. Printing the pattern at 100% scale is essential.
Downloadable Mermaid Plush Doll Pattern
This is a simplified, beginner-friendly pattern for a charming mermaid plush doll. It’s designed to be cut from fabric and sewn together. Please ensure you print this pattern at 100% scale.
Materials Needed:
- Fabric for mermaid body (e.g., minky, fleece)
- Fabric for mermaid tail (e.g., satin, lamé, shimmery cotton)
- Fabric for fins (can match tail or be contrasting)
- Polyester fiberfill stuffing
- Thread to match fabrics
- Sewing needles (hand or machine)
- Sharp pins
- Scissors for fabric
- Embroidery floss or fabric markers for facial features
- Optional: small ribbon for hair embellishment
Pattern Pieces (Print at 100% Scale):
Piece A: Head and Upper Body (Cut 2)
This piece forms the head and the torso of the mermaid. It’s a single piece for ease of sewing.
[Imagine a slightly rounded rectangle with a curved top for the head and a straight bottom edge.]
Piece B: Arms (Cut 4 – 2 for each arm)
These are simple, elongated oval shapes.
[Imagine two small, elongated oval shapes.]
Piece C: Mermaid Tail (Cut 2)
This is the main tail shape. It will be a long, slightly tapered piece.
[Imagine a long, slightly curved shape, wider at the top and tapering towards the bottom, with a slightly wider end for the tail fin.]
Piece D: Tail Fin (Cut 2)
These will be the decorative fins at the end of the tail. They can be simple half-moon shapes or more elaborate designs.
[Imagine two symmetrical, fin-like shapes that will attach to the bottom of Piece C.]
Piece E: Eye Detail (Cut 2 – if applique)
Small circles or ovals for the eyes.
[Imagine two small circles.]
Piece F: Mouth Detail (Cut 1 – if applique)
A simple curved line for the mouth.
[Imagine a small, curved line.]
(Note: For embroidery, these pieces are not needed. Use them as guides for stitching.)
Assembly Instructions:
- Prepare Pattern Pieces: Print all pattern pieces at 100% scale. Cut out the paper pattern pieces.
- Cut Fabric:
- Lay your chosen body fabric flat and pin Piece A onto it. Cut out two mirror-image pieces of Piece A.
- Lay your chosen tail fabric flat and pin Piece C onto it. Cut out two mirror-image pieces of Piece C.
- Lay your fin fabric flat and pin Piece D onto it. Cut out two mirror-image pieces of Piece D.
- If using applique for eyes and mouth, cut out Piece E and Piece F.
- Sew the Body:
- Place the two Piece A pieces right sides together.
- Starting from the bottom edge, sew around the head and down one side, leaving the bottom edge open for attaching the tail. Use a 1/4 inch (0.6 cm) seam allowance.
- Clip curves if necessary, being careful not to cut through the stitching.
- Turn the body right side out.
- Sew the Arms:
- Take two of the Piece B pieces and place them right sides together. Sew around the edges, leaving a small opening for turning and stuffing. Repeat for the other arm.
- Clip curves and turn right side out.
- Sew the Tail:
- Place the two Piece C pieces right sides together.
- Starting from the top edge (where it will attach to the body), sew down one side of the tail, then sew the two Piece D (fin) pieces together along their outer edges, leaving the straight edge open.
- Attach the sewn fins to the bottom edge of one of the tail pieces (Piece C) right sides together, aligning the raw edges.
- Now, place the other Piece C onto the assembly, right sides together with the first tail piece and the fins sandwiched in between.
- Sew around the entire tail and fins, leaving the top edge (where it connects to the body) open. Use a 1/4 inch (0.6 cm) seam allowance.
- Clip curves and notches in the fins.
- Stuffing:
- Gently stuff the arms with fiberfill until firm but still squishy.
- Stuff the tail firmly with fiberfill.
- Stuff the body with fiberfill, paying attention to filling out the head and torso evenly.
- Attaching Arms and Body to Tail:
- Insert the stuffed arms into the openings left in the body piece. Hand-stitch them securely in place using a ladder stitch or whipstitch, ensuring they are positioned symmetrically.
- Align the raw, open edge of the stuffed body with the open top edge of the stuffed tail, right sides together. Pin securely.
- Sew around the entire opening to attach the body to the tail.
- Finishing Touches:
- Use embroidery floss to stitch on the eyes and mouth, or use fabric markers to draw them on. You can also applique the cut-out eye and mouth pieces.
- Add any other decorative elements, such as a ribbon for hair, buttons, or sequins.
- If any openings remain, use a ladder stitch to close them invisibly.
This downloadable pattern provides a foundational design. Feel free to adapt it! You can make the tail wider or narrower, add more elaborate fins, or use different fabric combinations. The world of mermaid plush dolls is your oyster – or rather, your ocean!
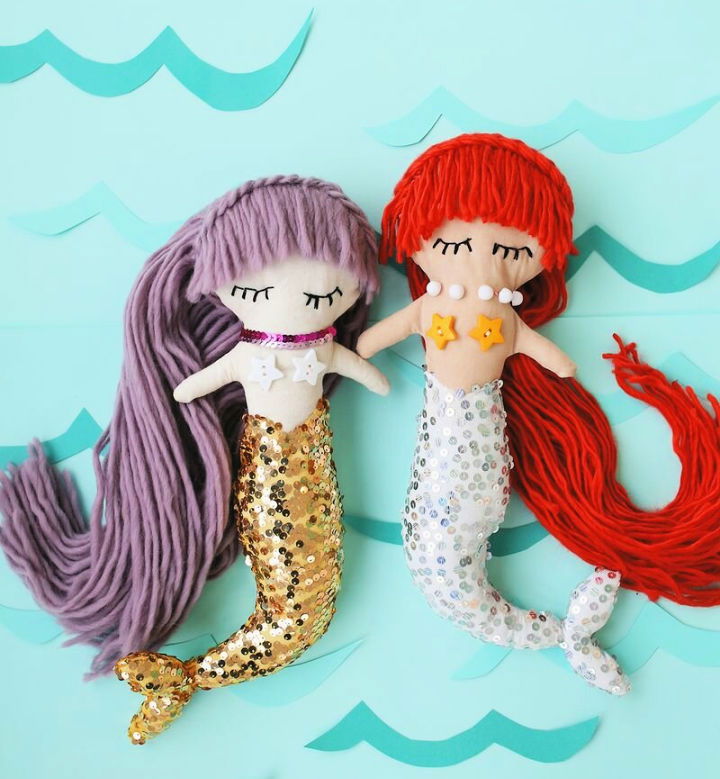
The creation of mermaid plush dolls extends beyond simple construction; it encompasses artistic choices that define the character and appeal of each individual doll. The selection of fabrics is paramount. For the upper body, soft, touchable materials like minky or fleece are preferred for their comfort and cuddliness. These fabrics provide a warm, inviting texture that is ideal for a huggable toy. The tail, however, often calls for something more exotic. Fabrics with a natural shimmer, such as satin, lamé, or iridescent quilting cotton, are excellent choices to mimic the glistening scales of a mermaid’s tail. The interplay of textures between the soft body and the shimmering tail creates a visually and tactilely engaging contrast. Beyond fabric, color palettes play a significant role. Traditional mermaid colors often evoke oceanic hues: blues, greens, teals, and purples. However, there’s immense creative freedom to explore beyond these norms. Vibrant pinks, fiery oranges, or even monochromatic designs can result in unique and striking mermaids. The addition of embellishments further enhances the visual appeal. Sequins, glitter glue, small beads, or delicate lace can be used to represent scales, add sparkle, or create decorative patterns on the tail or fins. Hair can be made from yarn, felt strips, or even faux fur, allowing for a wide range of styles and colors, from long, flowing locks to braided styles.
The assembly process itself offers opportunities for personalization. The placement of limbs, the articulation of the tail, and the overall posture of the mermaid can be adjusted to create different personalities. For instance, a mermaid with arms outstretched might appear as if in mid-dance, while one with arms held to its sides could convey a more serene demeanor. The fin design is another area where creativity can flourish. Simple half-moon shapes are classic, but more elaborate designs, such as dolphin-shaped fins, multi-lobed fins, or even flowing, ribbon-like appendages, can dramatically alter the mermaid’s aesthetic. The eyes and mouth are crucial for conveying expression. Simple embroidered dots can give a sweet, innocent look, while more detailed embroidered features, or even button eyes, can create a more distinct personality. Fabric paint can be used for more subtle shading or detailed facial features. For experienced crafters, techniques like needle felting can be employed to sculpt more three-dimensional facial features, adding a remarkable level of detail and realism.
The process of downloading and utilizing a pattern is straightforward, but requires attention to detail to ensure a successful outcome. First, ensure you have a PDF reader installed on your device. Once downloaded, open the pattern file. It is imperative to print the pattern at 100% scale. Many printers default to scaling to fit the page, which will distort the pattern and result in an incorrectly sized doll. Look for the print settings and explicitly select "Actual Size" or "100% Scale." After printing, carefully cut out the paper pattern pieces. The seam allowance, the extra fabric around the edge of each piece that is used for sewing, is typically already incorporated into the pattern lines. When transferring the pattern to fabric, pin the paper pieces securely to the wrong side of your chosen fabric. Use a fabric marker or chalk to trace around the edges of the pattern pieces. Cut along the traced lines. When sewing, it’s essential to maintain a consistent seam allowance, usually indicated on the pattern or a standard 1/4 inch (0.6 cm) for plush toys. Following these steps meticulously will ensure that your cut fabric pieces fit together perfectly, leading to a well-formed and proportionate mermaid plush doll.
The emotional and developmental benefits of mermaid plush dolls are also worth noting, especially for children. These dolls serve as powerful tools for imaginative play. Children can create elaborate underwater narratives, act out stories, and explore themes of friendship, adventure, and belonging. The mermaid, with its unique duality of human and aquatic, can be a catalyst for discussions about diversity, acceptance, and the wonders of the natural world. For some children, a plush doll can also be a source of comfort and security, a soft companion to hold during times of stress or loneliness. The tactile experience of hugging a soft doll can be incredibly calming, providing a sense of grounding and emotional regulation. The act of creating a mermaid doll, whether by a child with adult supervision or by an adult for a child, fosters a sense of accomplishment and pride. It teaches valuable skills, encourages creativity, and strengthens bonds between the crafter and the recipient. In a world increasingly dominated by screens, the tangible, hands-on creation of a beloved toy offers a valuable counterpoint, fostering a deeper connection to the physical world and the satisfaction of making something with one’s own hands.
The ongoing popularity of mermaid plush dolls can be attributed to their timeless appeal, the inherent charm of mythical creatures, and the growing interest in handmade and personalized items. From a crafting perspective, the accessibility of materials and the availability of resources like downloadable patterns make it easier than ever for individuals to embark on their own plush mermaid creations. The ability to customize every aspect, from fabric choice to embellishments, ensures that each finished doll is a unique expression of the crafter’s vision. Whether intended as a gift, a decorative item, or a treasured toy, a handmade mermaid plush doll carries a special kind of magic, a testament to the joy of creation and the enduring allure of the underwater world. The downloadable pattern provided offers a starting point for this enchanting journey, inviting crafters of all levels to bring their own shimmering, fantastical mermaids to life.
