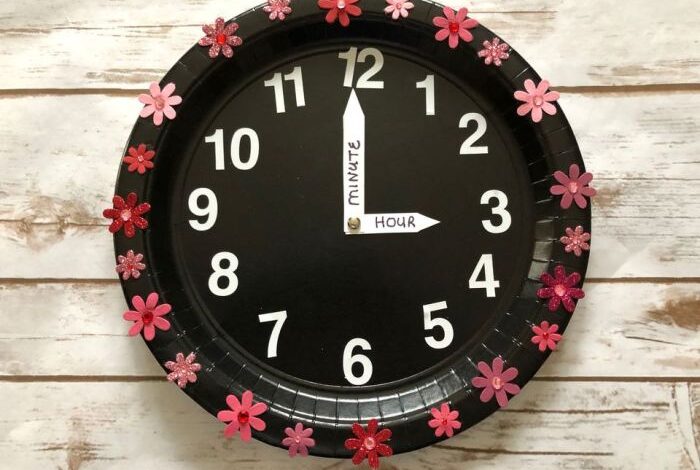
Colorful Kitchen Clock DIY: Add a Pop of Personality. Imagine walking into your kitchen and being greeted by a vibrant, custom-made clock that reflects your unique style. Not only does a kitchen clock keep you on track, but it can also be a statement piece that adds a touch of personality to your space.
DIY projects offer a fantastic way to express creativity and make your kitchen truly your own.
Creating a colorful kitchen clock is a fun and rewarding project that can be tailored to your specific tastes and preferences. Whether you’re a seasoned crafter or a beginner, this project is accessible to everyone. You’ll be surprised at how easy it is to transform a simple clock into a beautiful and functional work of art.
Colorful Kitchen Clocks: A DIY Delight
A splash of color can instantly transform a kitchen from mundane to vibrant, and what better way to add a touch of personality than with a colorful kitchen clock? A kitchen clock is more than just a timekeeper; it’s a vital element that sets the rhythm of your daily life.
From keeping track of meal prep to reminding you of appointments, a functional and stylish clock is an indispensable part of any kitchen. DIY projects offer a wonderful opportunity to unleash your creativity and add a personal touch to your home, and the kitchen is a perfect canvas for these endeavors.
Benefits of DIY Kitchen Clocks
DIY kitchen clocks offer a multitude of benefits, allowing you to personalize your space and save money while learning a new skill.
- Unique and Personalized:A DIY kitchen clock is a reflection of your individual style, allowing you to create a piece that perfectly complements your kitchen decor. You can choose colors, patterns, and materials that resonate with your taste and personality, making your clock truly one-of-a-kind.
- Cost-Effective:DIY projects often require minimal investment, especially when utilizing repurposed materials or thrifted finds. You can create a stunning clock for a fraction of the cost of a store-bought option, making it a budget-friendly way to enhance your kitchen.
- Creative Outlet:Crafting a DIY kitchen clock is a fun and engaging project that allows you to explore your artistic side. It provides an opportunity to experiment with different techniques, materials, and designs, fostering a sense of accomplishment and creativity.
- Sense of Pride:Creating something with your own hands is incredibly rewarding. A DIY kitchen clock serves as a tangible reminder of your creativity and craftsmanship, adding a sense of pride and satisfaction to your kitchen space.
Materials and Tools

This DIY project is about transforming a basic clock into a vibrant centerpiece for your kitchen. The materials and tools you need are readily available, making it a fun and accessible craft. Let’s delve into the specific items you’ll require to bring your colorful kitchen clock to life.
Materials
The materials for this project are easy to find and will give you a lot of creative freedom.
- Clock Mechanism:The heart of your clock, this is what keeps time. You can find these at craft stores or online.
- Clock Hands:These are the hands that move to indicate the time. Choose hands that are compatible with your clock mechanism.
- Base Material:This is what your clock will be mounted on. Options include wood, canvas, cardboard, or even an old plate.
- Paint:Choose colors that complement your kitchen decor. Acrylic paints are a good choice because they dry quickly and are easy to work with.
- Paintbrushes:Select a variety of sizes for different areas of your clock.
- Stencils or Templates (Optional):These can help you create intricate designs or numbers on your clock.
- Decorative Elements (Optional):These can be anything from glitter and sequins to buttons and beads.
Tools
The tools you’ll need for this project are simple and likely already in your home.
- Scissors:For cutting stencils or templates.
- Pencil:For marking the placement of the clock mechanism and hands.
- Ruler:For ensuring precise measurements.
- Glue Gun:For securing the clock mechanism and decorative elements.
- Sandpaper (Optional):For smoothing out rough edges on your base material.
- Protective Gloves (Optional):For working with paint and glue.
Materials and Tools
Here’s a table summarizing the materials and tools:
| Materials | Tools |
|---|---|
| Clock Mechanism | Scissors |
| Clock Hands | Pencil |
| Base Material | Ruler |
| Paint | Glue Gun |
| Paintbrushes | Sandpaper (Optional) |
| Stencils or Templates (Optional) | Protective Gloves (Optional) |
| Decorative Elements (Optional) |
Design Ideas
Designing a colorful kitchen clock is an opportunity to express your personality and bring a splash of vibrancy to your culinary space. Let’s explore some creative ideas to inspire your next DIY project.
Color and Pattern Combinations
Choosing the right color palette and patterns is crucial for a visually appealing clock.
- Classic and Contemporary:Consider a timeless combination of white, black, and a bright accent color like red or yellow. This creates a classic look with a modern twist. For example, a white clock face with black numerals and a bold red second hand would be a stylish choice.
- Nature-Inspired:Embrace the beauty of nature with earthy tones like green, brown, and blue. Incorporate natural elements like leaves, flowers, or wood grain patterns for a rustic charm. For example, a wooden clock face with painted green leaves and a blue hour hand would evoke a sense of tranquility.
- Bold and Geometric:Experiment with bold colors and geometric patterns. A clock with a black background, neon green numerals, and a yellow second hand would make a statement. You could also use geometric shapes like triangles, squares, or circles to create a modern and eye-catching design.
Clock Shapes and Sizes
The shape and size of your clock can significantly impact its overall look and feel.
- Round Clocks:Round clocks are classic and timeless. They fit seamlessly into any kitchen decor and offer a wide range of design possibilities.
- Square or Rectangular Clocks:Square or rectangular clocks offer a more modern and contemporary look. They can be particularly effective in kitchens with clean lines and minimalist designs.
- Unique Shapes:Get creative with unusual shapes like hearts, stars, or even animal silhouettes. A heart-shaped clock with a red border and white numerals would add a touch of whimsy to your kitchen.
Design Concepts
Let’s explore some design concepts that combine color, pattern, and shape for a truly unique kitchen clock.
A colorful kitchen clock DIY project can be a fun way to personalize your space. While you’re adding a splash of color to your kitchen, maybe you’d also like to check out hunkemoller uk new and upcoming offers for some stylish additions to your wardrobe.
Once you’ve got your kitchen looking great and you’re feeling confident in your new outfit, you’ll be ready to tackle any task, from baking a delicious cake to creating more DIY projects.
- Rustic Charm:Imagine a wooden clock face with a distressed finish, painted with a pale green background and brown numerals. The clock hands could be made of reclaimed metal with a touch of rust, adding to the rustic appeal.
- Modern Minimalism:A sleek, square clock face with a black background and white numerals would embody modern minimalism. The clock hands could be thin and silver, creating a clean and uncluttered look.
- Tropical Paradise:A round clock face with a vibrant blue background and yellow numerals would evoke a tropical paradise. The clock hands could be made of colorful plastic or wood, and you could add a touch of whimsy with small, painted palm trees or flowers around the clock face.
Step-by-Step Instructions: Colorful Kitchen Clock Diy
This section will guide you through the process of creating your colorful kitchen clock, providing detailed instructions and safety tips to ensure a successful and enjoyable DIY project.
Adding a pop of color to your kitchen with a DIY clock is a fun and affordable project. While you’re busy crafting, don’t forget to treat yourself to a nice bottle of wine – you can discover the latest best priced wines for your collection with bbx and enjoy a glass while your clock dries.
Once your new clock is hanging proudly in your kitchen, it will be the perfect reminder to enjoy your favorite beverage and unwind after a day of creativity.
Preparing the Clock Base
Before starting the creative process, prepare the clock base. This is the foundation upon which your colorful clock will be built.
I’m always looking for ways to add a little personality to my kitchen, and a colorful DIY clock is a fun and easy project. I’m also a sucker for a good wedding video, and the emma trey wedding video is definitely one of my favorites.
The way they captured the joy and love of the day is just beautiful. Anyway, back to the clock – I’m thinking of using vintage plates and some bright paint to create a unique piece. I’ll let you know how it turns out!
- Select a base material:Choose a material that is sturdy, lightweight, and easy to work with. Common options include wood, cardboard, or even an old vinyl record.
- Measure and cut:Determine the desired size of your clock face and carefully cut the base material to fit. Use a ruler, pencil, and a saw or craft knife for precise cuts.
- Sand and smooth:Sand the edges of the base material to ensure a smooth and polished finish. This will prevent any potential splinters or rough edges.
- Prepare the clock mechanism:Attach the clock mechanism to the back of the base material. Use screws or glue to secure it firmly in place.
Designing and Creating the Clock Face
This is where your creativity takes center stage! You’ll transform the clock base into a vibrant and eye-catching work of art.
- Choose your colors:Select a color scheme that complements your kitchen décor or reflects your personal style. Consider using bright and bold colors for a cheerful and energetic vibe.
- Apply paint or other decorative techniques:You can paint the clock face directly, use stencils, or employ other creative techniques like decoupage or collage.
- Add embellishments:Embellish the clock face with decorative elements like buttons, beads, glitter, or fabric scraps. This adds texture and dimension to your design.
- Incorporate a unique theme:Consider a specific theme for your clock, such as fruits, vegetables, flowers, or even a whimsical abstract design.
Safety Precautions
Safety is paramount when working with tools and materials. Here are some essential precautions to take:
- Wear protective gear:Always wear safety glasses to protect your eyes from flying debris, and a dust mask to prevent inhaling dust particles.
- Use sharp tools carefully:When using saws or craft knives, handle them with care and keep your fingers away from the blades.
- Work in a well-ventilated area:Ensure proper ventilation when using paints, glues, or other materials that release fumes.
- Keep children and pets away:Keep young children and pets away from the work area to prevent accidents.
Assembling the Clock
Once you’ve created your colorful clock face, it’s time to bring everything together.
- Attach the hands:Carefully attach the clock hands to the clock mechanism. Make sure they are securely fastened.
- Install the battery:Insert the battery into the clock mechanism.
- Hang or stand the clock:Depending on your base material and design, you can hang the clock on the wall or place it on a shelf.
Customization and Personalization
Your kitchen clock is a blank canvas, ready to reflect your unique style and personality. Beyond the vibrant colors, you can add personal touches that make it truly yours.Adding personal elements transforms your DIY kitchen clock into a cherished piece that tells a story.
Here’s how to infuse your creativity and create a clock that’s as individual as you are.
Incorporating Unique Elements
Adding unique elements like family photos or quotes adds a personal touch to your kitchen clock. These additions make it more than just a timekeeper; they create a conversation piece and a reminder of what’s important.
- Family Photos:Use a small photo collage or a single favorite picture. For a collage, select photos that represent important moments or family members. A single photo could be a cherished memory or a portrait of a loved one. Ensure the photos are printed on photo paper and protected with a clear sealant to prevent damage.
- Inspirational Quotes:Choose a quote that resonates with you or reflects your family values. It could be a favorite saying, a line from a book, or a song lyric. Print the quote on cardstock or fabric, using a calligraphy pen for an elegant touch.
Consider adding a small embellishment like a ribbon or a flower to complement the quote.
Customizing Finishes and Textures, Colorful kitchen clock diy
Experimenting with different finishes and textures allows you to create a clock that perfectly complements your kitchen’s decor.
- Painted Finishes:Use acrylic paints to add a splash of color or create a distressed look. Consider using metallic paints for a touch of elegance or chalkboard paint to create a personalized message area.
- Textured Surfaces:Apply textured paint or create your own textures using materials like sand, glitter, or fabric scraps. This adds dimension and visual interest to the clock.
- Decoupage:Use decoupage techniques to add patterns, images, or even vintage maps to the clock. This creates a unique and personalized look.
Inspiration and Resources
Looking for inspiration and resources to fuel your colorful kitchen clock DIY project? You’ve come to the right place! This section is packed with ideas, tutorials, and even book recommendations to help you bring your vision to life.
Online Tutorials and Resources
Online tutorials and resources are a treasure trove of inspiration and guidance for your colorful kitchen clock project. Here are a few platforms to explore:
- YouTube:YouTube is a goldmine for DIY projects, with countless videos demonstrating various techniques and designs for kitchen clocks. Search for terms like “DIY kitchen clock,” “colorful clock,” or “upcycled clock” to discover a wealth of tutorials.
- Pinterest:Pinterest is a visual feast of inspiration, featuring a vast collection of colorful kitchen clock ideas. Use s like “colorful kitchen clock,” “DIY clock,” or “vintage clock makeover” to browse through a wide range of designs and styles.
- Blogs and Websites:Many DIY blogs and websites offer step-by-step instructions, tips, and tricks for creating colorful kitchen clocks. Popular websites like “Instructables,” “DIY Projects,” and “Craftster” are excellent resources for finding unique and creative projects.