Emmas master bathroom renovation – Emma’s master bathroom renovation sets the stage for this enthralling narrative, offering readers a glimpse into a story that is rich in detail and brimming with originality from the outset. Imagine a space where relaxation and luxury intertwine, where every detail has been carefully considered to create a sanctuary of tranquility.
This is the vision Emma has for her master bathroom, and her journey to transform this space is one that we’ll be following closely. From planning the perfect layout to selecting the most exquisite materials, every step of the renovation process is a chance to bring Emma’s dream bathroom to life.
We’ll delve into the intricacies of her design choices, exploring everything from the luxurious soaking tub to the elegant vanity and the carefully curated lighting fixtures. We’ll also discuss the importance of sustainability and how Emma is incorporating eco-friendly practices throughout the project.
This renovation is not just about creating a beautiful space; it’s about creating a bathroom that reflects Emma’s personality and her commitment to mindful living.
Emma’s Master Bathroom Vision: Emmas Master Bathroom Renovation

Emma’s vision for her master bathroom is a haven of relaxation and rejuvenation. She desires a space that is both functional and stylish, reflecting her personal taste and creating a serene ambiance. She wants her bathroom to be a sanctuary where she can unwind after a long day and start her mornings feeling refreshed.
Emma’s master bathroom renovation is coming along nicely. The new tile is in, and the shower is almost finished. The only thing left is to find a place to store all of her old towels and bath supplies. I’m thinking about building her a custom storage cabinet, and maybe even a small toy box for her grandkids.
I’ve always wanted to build a toy box, and I think it would be a great way to get the kids involved in the renovation. There are some great resources online for learning how to build a toy box, like this one: how to build a toy box.
Once the toy box is done, I can move on to finishing the bathroom.
Key Features of Emma’s Dream Bathroom
Emma has a clear vision for her dream bathroom, incorporating features that prioritize both functionality and aesthetic appeal. These features will contribute to creating a truly personalized and luxurious space.
Emma’s master bathroom renovation is finally coming to an end! It’s been a whirlwind of tile choices, fixture selections, and endless trips to the hardware store. But I have to say, it’s all been worth it. Now that the space is almost complete, I’m already thinking about the perfect vacation bag to pack for my first trip to the beach.
I recently discovered this amazing DIY project for turning a simple straw clutch into the perfect vacation bag, and it’s a must-try! Check out this tutorial – I’m sure you’ll love it! And speaking of Emma’s bathroom, I’m planning to share a full reveal of the space soon, so stay tuned!
- A Large Walk-in Shower:Emma envisions a spacious walk-in shower with multiple showerheads, providing a luxurious and invigorating showering experience. She wants to feel pampered and refreshed with every shower.
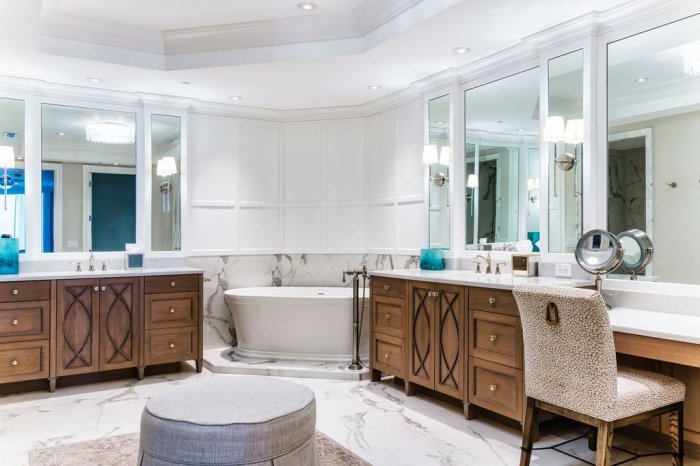
- Freestanding Soaking Tub:A freestanding soaking tub is a must-have for Emma. She envisions a deep, luxurious tub where she can relax and unwind with a good book or a glass of wine. This will be her personal sanctuary for relaxation and stress relief.
Emma’s master bathroom renovation is coming along nicely, and I’m so excited to see the final result! The new shower is a work of art, and the sleek, modern vanity is a dream come true. I’m even thinking about making a custom pet bed for her furry friend, inspired by the Sadie Bed tutorial I found online.
I think it would look great in the bathroom, adding a touch of whimsy to the space. After all, even pets deserve a little luxury, right?
- Double Vanity with Ample Storage:Emma desires a double vanity with ample storage space to accommodate her skincare and makeup products. She wants to have everything organized and within easy reach, creating a clutter-free and functional space.
- Heated Floors:Emma envisions the warmth and comfort of heated floors throughout her bathroom, creating a spa-like experience. This feature will add a touch of luxury and make her bathroom feel even more inviting.
Budget Constraints
Emma is mindful of her budget for this renovation. She understands the importance of balancing her dream features with financial constraints. She has allocated a specific budget for the project and will be working closely with her contractor to ensure all her desired features are incorporated within this budget.
“I want to create a bathroom that is both luxurious and functional, but I also need to be realistic about my budget. I’m looking for creative solutions and smart choices to make my dream bathroom a reality.”
Emma
Space Planning and Layout
Before we dive into the exciting world of fixtures and finishes, let’s first consider the most important aspect of any bathroom renovation: the layout. A well-planned layout ensures both functionality and aesthetic appeal.
Existing Layout Analysis
Emma’s current master bathroom is a bit cramped, with a layout that doesn’t maximize space. The existing layout is typical for older homes, with a separate bathtub and shower, a vanity with limited storage, and a toilet tucked away in a corner.
The small size of the room makes it feel cluttered and inefficient.
New Bathroom Layout Design
To address these issues, we’ll design a new layout that maximizes space and flow, incorporating features that cater to Emma’s needs and preferences. We’ll be focusing on creating a spa-like retreat with a luxurious feel.
Floor Plan with Measurements and Specifications
Here’s a detailed floor plan with measurements and specifications for the new bathroom layout:
- Shower Area:We’ll combine the existing bathtub and shower into a spacious walk-in shower, creating a luxurious experience. The shower will be 5′ x 5′ with a seamless glass enclosure. The shower head will be a rain shower, and we’ll install a bench for added comfort.
- Vanity Area:A large double vanity will be placed opposite the shower, maximizing countertop space and providing ample storage. The vanity will be 8′ x 3′ with a quartz countertop and two large undermount sinks.
- Toilet Area:The toilet will be positioned to the side of the vanity, allowing for easy access and creating a separate zone for privacy. We’ll select a sleek, modern toilet with a soft-close seat.
- Storage:We’ll incorporate additional storage options throughout the bathroom, including a medicine cabinet, a linen closet, and open shelving for decorative items.
This layout allows for a spacious and luxurious feel, maximizing functionality and storage while creating a calming and inviting atmosphere. The open shower area with a rain shower head and bench provides a spa-like experience. The double vanity ensures ample space for two people to get ready simultaneously, and the separate toilet area provides privacy.
The additional storage solutions address Emma’s need for a clutter-free bathroom.
Bathroom Features
Now that we have a clear vision for Emma’s master bathroom and have planned out the space, it’s time to delve into the exciting details of the features themselves. We’ll explore luxurious soaking tubs, different shower options, stylish vanity styles, and how to illuminate the space with the perfect lighting and fixtures.
Soaking Tub Design Ideas
A luxurious soaking tub is a must-have for a master bathroom. There are many different styles and materials to choose from, so you can find the perfect tub to fit your aesthetic and needs.
- Freestanding Tubs: These tubs are a popular choice for their elegant and modern look. They can be placed anywhere in the room, and they often come with a variety of features, such as built-in jets or a heated back. For example, the “Kohler Underscore Freestanding Soaking Tub” features a sleek, minimalist design and a comfortable, ergonomic shape, perfect for a modern bathroom.
- Clawfoot Tubs: These tubs have a classic and romantic look. They are often made of cast iron or porcelain, and they can be found in a variety of styles, from traditional to modern. For example, the “American Standard Heritage Clawfoot Tub” embodies classic elegance with its traditional design and durable construction.
- Drop-In Tubs: These tubs are installed into a platform, which can be made of a variety of materials, such as tile or wood. This style is a versatile option, as it can be customized to fit any bathroom layout. For example, the “Moen Align Drop-In Soaking Tub” offers a sleek, contemporary design and a comfortable soaking experience, with the option to personalize the platform for a unique look.
Shower Options
Showers are another essential part of any bathroom. They come in a variety of styles and sizes, so you can choose the best option for your needs.
- Walk-In Showers: These showers are a popular choice for people with mobility issues. They have a low threshold, which makes it easy to step in and out. For example, a “Kohler Walk-In Shower” with a built-in seat and grab bars provides accessibility and safety for all users.
- Curbless Showers: These showers have no threshold, which creates a seamless transition from the bathroom floor to the shower floor. This option is stylish and modern, and it’s also a great choice for people with mobility issues. For example, a “Moen Curbless Shower” with a large, open design and a tiled floor creates a luxurious and accessible showering experience.
- Enclosed Showers: These showers are enclosed by a door or curtain, which helps to contain the water and prevent it from splashing onto the bathroom floor. This option is a good choice for people who want a more traditional shower experience.
For example, a “Delta Enclosed Shower” with a glass door and a stylish showerhead provides a traditional yet elegant showering experience.
Vanity Styles and Storage Solutions, Emmas master bathroom renovation
The vanity is a focal point of any bathroom, and it’s also an important storage solution. There are many different styles and sizes to choose from, so you can find the perfect vanity to fit your aesthetic and storage needs.
- Traditional Vanities: These vanities have a classic and elegant look. They are often made of wood, and they feature intricate details, such as carvings or raised panels. For example, a “Restoration Hardware Traditional Vanity” with a distressed wood finish and ornate hardware creates a timeless and elegant look.
- Modern Vanities: These vanities have a sleek and minimalist look. They are often made of materials like metal or glass, and they feature clean lines and simple details. For example, a “West Elm Modern Vanity” with a sleek, rectangular design and chrome hardware creates a modern and minimalist aesthetic.
- Contemporary Vanities: These vanities combine elements of traditional and modern design. They are often made of a combination of materials, such as wood and metal, and they feature unique details, such as geometric shapes or contrasting finishes. For example, a “Crate & Barrel Contemporary Vanity” with a combination of wood and metal and a unique geometric design creates a stylish and contemporary look.
Lighting and Fixtures
Lighting is an important aspect of any bathroom, as it can affect the overall ambiance and functionality of the space. There are many different lighting options to choose from, so you can create the perfect atmosphere for your master bathroom.
- Recessed Lighting: Recessed lighting is a popular choice for bathrooms because it provides even and diffused lighting. It can be installed in the ceiling or in the walls, and it can be used to highlight specific areas of the bathroom.
For example, recessed lighting installed around the perimeter of the ceiling creates a bright and evenly lit space, while recessed lighting placed above the vanity provides targeted illumination for grooming tasks.
- Pendant Lights: Pendant lights are a stylish and decorative option for bathrooms. They can be hung from the ceiling or from the walls, and they can be used to create a focal point in the bathroom. For example, a large pendant light hung above the bathtub creates a dramatic and elegant focal point, while a smaller pendant light hung above the vanity adds a touch of style and functionality.
- Sconces: Sconces are wall-mounted lights that are a great option for adding ambiance to a bathroom. They can be used to illuminate specific areas of the bathroom, such as the vanity or the tub area. For example, a pair of sconces placed on either side of the vanity provides focused lighting for grooming tasks, while sconces placed above the bathtub create a relaxing and inviting atmosphere.