Hardwiring a Light Fixture: A Comprehensive Guide for DIYers
Hardwiring a light fixture is a fundamental electrical task that empowers homeowners to upgrade their lighting, replace outdated fixtures, or install new ones in locations without existing outlets. This process involves directly connecting a light fixture to the building’s electrical wiring, bypassing plug-in cords. While seemingly daunting, a systematic approach and adherence to safety protocols make this a manageable DIY project. The core of hardwiring involves establishing a secure and insulated electrical connection between the power source (usually from a junction box or existing wiring) and the light fixture’s internal wiring. This direct connection ensures a permanent and reliable power supply, essential for the safe and efficient operation of the fixture. Understanding the basic components of electrical circuits – hot, neutral, and ground wires – is paramount before embarking on this project. The hot wire carries the electrical current from the power source, the neutral wire completes the circuit by returning the current, and the ground wire serves as a safety measure, providing a path for electricity to flow to the ground in case of a fault.
Essential Tools and Materials for Hardwiring a Light Fixture
Before beginning the installation, gather the necessary tools and materials to ensure a smooth and safe process. This includes a voltage tester (non-contact or multimeter) to confirm the absence of power, a wire stripper for preparing wires, wire nuts for making secure connections, a screwdriver set (Phillips and flathead) for mounting and tightening, electrical tape for added insulation, a ladder or step stool for accessing the fixture location, safety glasses to protect your eyes, and a suitable replacement light fixture. It is crucial to select a fixture that is compatible with your home’s electrical system, typically 120-volt in North America. Ensure the fixture is rated for its intended location (e.g., damp-rated for bathrooms). If the existing wiring or junction box is inadequate, you may need to consult an electrician for upgrades, such as installing a new junction box or running new wiring. Always prioritize safety by turning off the power at the breaker box before commencing any work.
Safety First: De-energizing the Circuit
The absolute first and most critical step in hardwiring any light fixture is to de-energize the circuit you will be working on. Locate your home’s electrical panel, often found in a basement, garage, or utility closet. Identify the circuit breaker that controls the area where you will be installing the light fixture. If the breakers are not clearly labeled, it may be necessary to test them by turning off one at a time and checking if the lights or outlets in the target area are powered off. Once you have identified the correct breaker, flip it to the "OFF" position. To double-check that the power is indeed off, use a non-contact voltage tester. Hold the tester near the existing wires or the area where the new fixture will be installed. If the tester indicates no voltage, you can proceed. Never assume the power is off based solely on flipping the breaker. Always test to confirm. If you are unsure about identifying the correct breaker or if the labeling is unclear, it is highly recommended to turn off the main breaker to your entire house to ensure safety, although this will temporarily cut power to all circuits.
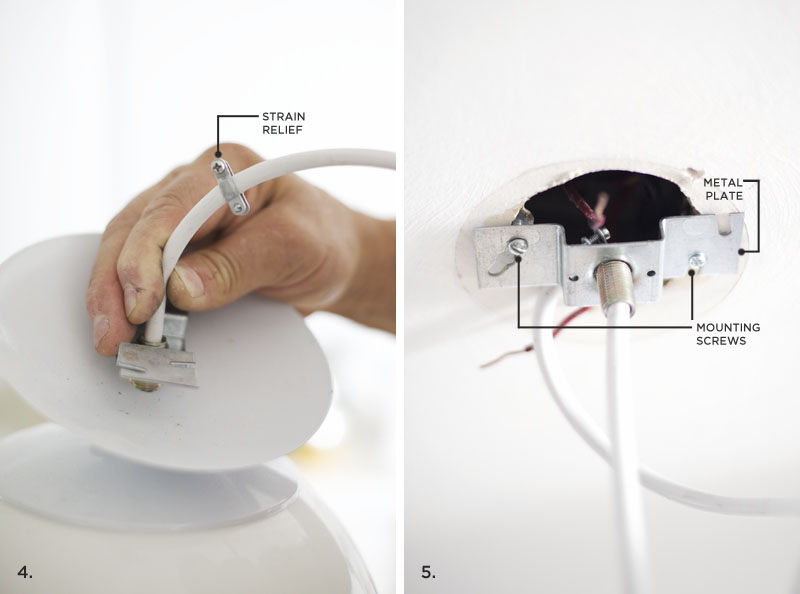
Locating and Preparing the Junction Box
The junction box is the critical point where the new fixture will connect to the house’s existing electrical wiring. If you are replacing an existing fixture, the junction box will likely already be present. Remove the old fixture carefully, ensuring you have turned off the power and confirmed it with your voltage tester. You will find wires protruding from the junction box. If you are installing a new fixture in a location without an existing box, you will need to install one. This typically involves cutting a hole in the ceiling or wall and mounting a new electrical box, ensuring it is securely fastened to the building’s structure to support the weight of the fixture. The junction box must be properly rated for the type of wiring and the weight of the fixture. For most residential light fixtures, a standard octagonal or circular metal or plastic junction box is sufficient. Ensure the box has knockouts that can be easily removed to accept the electrical cable. After removing the old fixture (if applicable), inspect the junction box for any damage, loose connections, or signs of overheating. If any issues are found, they must be addressed before proceeding.
Identifying the Wires: Hot, Neutral, and Ground
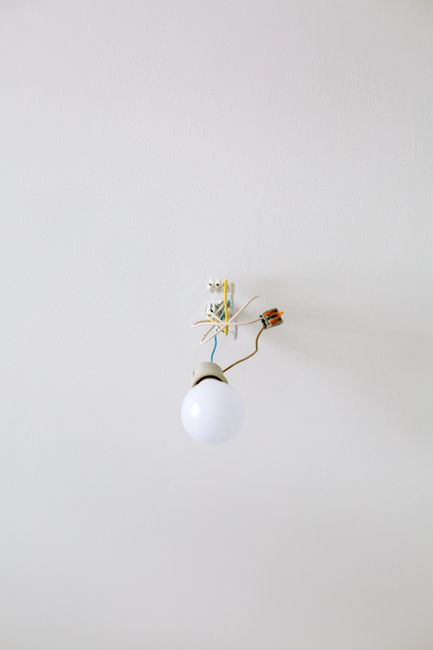
Within the junction box, you will typically find three types of wires: hot, neutral, and ground. Understanding their colors and functions is crucial for making correct connections. The hot wire (also known as the live or current-carrying wire) usually appears black or red in North American wiring. It carries the electrical current from the power source. The neutral wire is typically white and serves to complete the electrical circuit, returning the current to the power source. The ground wire is usually bare copper or green and acts as a safety feature, providing a path for fault current to flow to the earth, preventing electric shock. Some older homes might have different wire color conventions, so always use a voltage tester to confirm the function of each wire if you are unsure. When working with a new installation, you will be running a new cable from a power source (e.g., another junction box, a switch box) to your new fixture. This cable will contain these three wires. The wire colors are standardized for safety and ease of identification. Always refer to local electrical codes and manufacturer instructions for specific wiring color conventions if you are working outside of typical North American residential standards.
Connecting the Fixture Wires to the House Wiring
This is the core of the hardwiring process. Begin by stripping a small amount of insulation (about ½ inch) from the ends of both the house wires and the fixture wires using your wire stripper. This exposes the copper conductors. Match the wires according to their function: connect the hot wire from the house to the hot wire of the fixture (usually black or red). Connect the neutral wire from the house to the neutral wire of the fixture (usually white). Finally, connect the ground wire from the house to the ground wire of the fixture (bare copper or green). Use wire nuts to secure these connections. Twist the wire nut clockwise onto the stripped ends of the wires until it is snug and secure. Ensure that no bare copper is exposed outside of the wire nut. Gently tug on each connection to ensure it is firm. For added security and insulation, you can wrap electrical tape around the base of each wire nut, extending slightly onto the insulated portion of the wires.
Mounting the Light Fixture and Completing the Installation
Once the wiring connections are made and secured, the next step is to mount the light fixture. Most fixtures come with a mounting bracket that attaches to the junction box. Secure the bracket to the junction box using the provided screws. Carefully tuck the connected wires back into the junction box, ensuring they are not pinched or damaged. Then, align the fixture with the mounting bracket and secure it in place according to the manufacturer’s instructions. This often involves screwing the fixture canopy to the bracket or using decorative nuts. Install the light bulb(s) into the fixture, ensuring they are the correct wattage and type specified for the fixture to avoid overheating or damage.
Testing the Hardwired Fixture
After the fixture is securely mounted and the bulb is installed, it’s time to test your work. Return to the electrical panel and flip the circuit breaker you previously turned off back to the "ON" position. Go to the light fixture and flip its switch. If everything was connected correctly, the light should illuminate. If the light does not turn on, immediately turn off the circuit breaker at the electrical panel. Revisit your connections, ensuring all wire nuts are secure and the wires are properly matched. Double-check that the circuit breaker is indeed the correct one and that it is fully engaged. If you encounter persistent issues or are uncomfortable troubleshooting electrical problems, it is always best to consult a qualified electrician. The process of testing is critical to confirm functionality and to identify any potential faults in the wiring or installation before relying on the fixture.
Troubleshooting Common Issues
Several common issues can arise when hardwiring a light fixture. If the light doesn’t turn on, the most frequent culprits are loose wire connections or an incorrectly set circuit breaker. Re-examine all wire nut connections for tightness and ensure the correct wires are paired. Confirm that the breaker is fully in the "ON" position. Another possibility is a faulty light bulb or a problem with the switch itself. If the light flickers, it could indicate a loose connection at the fixture, the switch, or even at the breaker panel. In older homes, outdated wiring or a lack of a proper ground wire can also lead to problems; in such cases, an electrician should be consulted for upgrades. If you notice any signs of overheating, such as discolored wires or a burning smell, immediately shut off the power at the breaker and call a qualified electrician. Do not attempt to operate a fixture with signs of overheating.
When to Call a Professional Electrician
While hardwiring a light fixture is a common DIY task, there are instances where calling a professional electrician is not only advisable but essential for safety and compliance. If you are uncomfortable with any part of the process, lack the necessary tools, or are unsure about the existing wiring’s condition, it’s best to err on the side of caution. Situations such as dealing with aluminum wiring (common in homes built between the mid-1960s and mid-1970s), which requires specialized connectors and techniques, or if you discover damaged, old, or ungrounded wiring, necessitate professional intervention. Furthermore, if the new fixture requires more power than the existing circuit can safely provide, or if you are installing a fixture in a location that lacks a suitable junction box, an electrician can safely upgrade the wiring or install a new circuit. Electrical work can be dangerous, and incorrect installations can lead to fires or electric shock. Prioritizing safety and understanding your limits will ensure a successful and secure outcome for your lighting project.
