How to sew your own leggings? It’s a question that many have pondered, a desire to create something personal and comfortable. The journey begins with choosing the right fabric, each type offering a unique feel and drape. From stretchy spandex for a snug fit to cozy fleece for winter warmth, the possibilities are endless.
Beyond fabric selection, the key lies in mastering the fundamentals of sewing. This includes acquiring essential tools, like a sewing machine and fabric scissors, and learning to take precise measurements. With a little practice and patience, you’ll be well on your way to crafting your own leggings that are not only stylish but also perfectly tailored to your body.
Creating a Sewing Pattern

Creating a sewing pattern for leggings is a straightforward process, especially when starting with a simple rectangle shape. This method allows for flexibility in adjusting the fit and length to your preferences.
Designing a Basic Leggings Pattern
To begin, measure your waist, hip, and inseam. These measurements will be crucial for determining the dimensions of your pattern.
- Cut a rectangle of fabric that is the width of your hips plus 2 inches (for seam allowance) and the length of your inseam plus 2 inches (for seam allowance). This will be the main panel of your leggings.
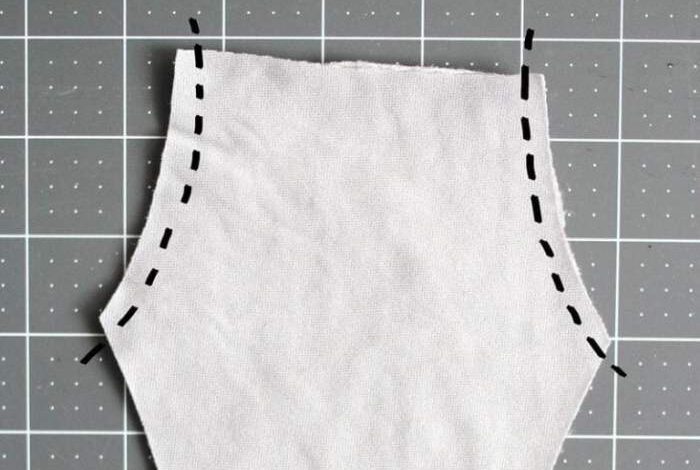
- Fold the rectangle in half lengthwise and mark the center point. This will be the crotch seam of your leggings.
- From the center point, measure out half of your waist measurement and mark it on both sides of the fabric. These points will be the side seams of your leggings.
- Connect the side seam points to the bottom corners of the rectangle to form the legs of your leggings.
Creating a High-Waisted or Low-Waisted Style
The waistline of your leggings can be easily adjusted to achieve a high-waisted or low-waisted look.
- For a high-waisted style, simply add extra length to the top of the rectangle before folding it in half. This extra length will be folded down to create the high waist.
- For a low-waisted style, reduce the length of the top of the rectangle. This will result in a lower waistline on your leggings.
Customizing the Pattern
You can add pockets, a waistband, or other features to personalize your leggings.
- Pockets: To add pockets, cut out two rectangles of fabric that are the desired size and shape of your pockets. Place the pockets on the front panel of your leggings, aligning the top edge of the pockets with the waistline.
Sew the pockets in place.
- Waistband: To create a waistband, cut a rectangle of fabric that is the width of your waist plus 2 inches (for seam allowance) and the desired width of your waistband. Fold the waistband in half lengthwise and sew the raw edges together.
Sewing your own leggings is a fun and rewarding project, allowing you to customize the fit and style to your liking. While you’re working on your new leggings, why not take a break and try out a refreshing Moscow Mule?
Check out 3 fun twists on the Moscow mule for some creative variations on this classic cocktail. Once you’ve had a sip, you’ll be ready to tackle those leggings again with renewed energy!
Attach the waistband to the top edge of the leggings, aligning the raw edges.
Cutting and Sewing the Leggings
Now that you have your pattern pieces, it’s time to get cutting and sewing! This is where your sewing skills come into play. You’ll be using a variety of techniques, from basic straight stitches to more intricate seams, to bring your leggings to life.
Sewing your own leggings is a rewarding project, especially when you get to choose the perfect fabric and design. I’m currently dreaming of a cozy pair with a fun star print, just like the ones I saw on that amazing star garland advent calendar I found online.
Speaking of stars, maybe I’ll incorporate some star-shaped embellishments into my leggings for a little extra flair!
Cutting the Fabric
Before you start cutting, make sure your fabric is flat and smooth. You can use a cutting mat and rotary cutter for precision, or a ruler and fabric shears.
Sewing your own leggings can be a fun and rewarding project. It allows you to customize the fit and style to your liking. If you’re looking for a creative way to showcase your family photos, why not create a family photo board book?
Make a family photo board book to capture those special moments and display them in a unique and personalized way. Once you’ve mastered the art of sewing leggings, you can even incorporate some of your favorite family photos into your designs!
- Place your pattern pieces on the fabric, making sure they are aligned with the grain of the fabric.
- Pin the pattern pieces in place. This will prevent them from shifting while you cut.
- Use a sharp pair of fabric shears to cut out the pattern pieces.
- Be sure to cut along the lines of the pattern, and not through the fabric.
- For a professional finish, use a rotary cutter and a cutting mat. This will give you straight, precise cuts.
Sewing the Legs and Crotch Seams
Once you have all of your fabric pieces cut out, it’s time to start sewing.
- Sew the leg seams first. These are the seams that run along the outside of the legs.
- Use a straight stitch or a zigzag stitch for added durability.
- Make sure to backstitch at the beginning and end of each seam to secure it.
- Next, sew the crotch seam. This seam runs between the legs.
- Again, use a straight stitch or a zigzag stitch.
- Backstitch at the beginning and end of the seam.
Sewing the Waistband
The waistband is the final step in making your leggings.
- Fold the waistband in half lengthwise, wrong sides together.
- Sew the short ends together, using a straight stitch.
- Turn the waistband right side out.
- Pin the waistband to the top edge of the leggings, right sides together.
- Sew the waistband to the leggings, using a straight stitch.
- Fold the waistband down to the inside of the leggings, and topstitch along the top edge of the waistband to secure it.
Adding Elastic to the Waistband
Adding elastic to the waistband will give your leggings a comfortable fit.
- Measure the circumference of your waist.
- Cut a piece of elastic that is 1 inch shorter than your waist measurement.
- Pin the elastic to the inside of the waistband, leaving a 1/2 inch allowance on each side.
- Sew the elastic to the waistband, using a zigzag stitch.
- Make sure to stretch the elastic as you sew it to ensure a snug fit.
- Remove the pins and turn the waistband right side out.
- You can adjust the tension of the elastic by pulling it tighter or looser until you get the desired fit.
Finishing Touches: How To Sew Your Own Leggings
Now that you’ve sewn your leggings together, it’s time to give them a polished and professional look. This is where finishing touches come into play, ensuring your leggings are durable, comfortable, and stylish. Let’s dive into the essential steps to elevate your DIY leggings.
Seams Finishing
Seams are the backbone of any garment, and finishing them correctly ensures durability and a neat appearance. Here’s a breakdown of popular techniques:
- Serging: This technique uses a serger machine to create a secure and decorative stitch that encases raw edges. Serging is ideal for stretchy fabrics like leggings, preventing fraying and adding a professional touch.
- Overlocking: Similar to serging, overlocking uses a special machine to create a secure stitch that encases raw edges. This method is commonly used for knit fabrics and provides a neat and durable finish.
- Zig-zag stitch: This technique uses a zig-zag stitch on a regular sewing machine to enclose raw edges. While less decorative than serging or overlocking, it’s a practical option for finishing seams when you don’t have a serger.
Creating a Professional Waistband
The waistband is a prominent feature of leggings, so creating a clean and well-finished waistband is crucial. Here’s how to achieve a professional look:
- Pressing Seams: Before finishing the waistband, press all seams flat to ensure a smooth and even surface. This step helps create a crisp and professional look.
- Finishing Edges: Use a serger, overlocker, or zig-zag stitch to finish the raw edges of the waistband. This prevents fraying and adds a polished touch.
- Encasing Raw Edges: Consider encasing the raw edges of the waistband with a facing or binding. This method adds durability and a professional finish, particularly for knit fabrics.
Adding Embellishments
Personalize your leggings with decorative elements for a unique touch. Here are some ideas:
- Decorative Stitching: Use a decorative stitch on your sewing machine to add patterns or designs to the leggings. This technique can be applied to the waistband, seams, or even the entire garment.
- Fabric Patches: Apply fabric patches to the leggings for a personalized look. These patches can be simple shapes, embroidered designs, or even repurposed fabric scraps.
- Embroidery: Use an embroidery machine or hand embroidery to create intricate designs on the leggings. This technique can add a touch of elegance and sophistication.
Troubleshooting and Tips
Even the most experienced sewers can encounter challenges while creating leggings. This section provides guidance on addressing common issues and achieving a professional finish.
Common Sewing Errors and Solutions
Addressing common sewing errors is essential for a successful project.
- Uneven Seams: Uneven seams can occur due to inconsistent stitching speed or fabric slippage. To fix this, carefully remove the uneven stitching using a seam ripper. Re-stitch the seam, ensuring a consistent speed and using pins to secure the fabric.
- Loose Fit: A loose fit can result from inaccurate measurements or choosing the wrong size pattern. Adjust the pattern by adding or subtracting fabric in areas where the fit is too loose or tight. If necessary, consider creating a new pattern based on your measurements.
- Puckering: Puckering can occur when the fabric is stretched unevenly during stitching. Use a walking foot to evenly feed the fabric through the sewing machine. For delicate fabrics, use a special needle designed for knits.
Tips for a Professional Finish, How to sew your own leggings
A professional finish is achieved by paying attention to detail and employing specific techniques.
- Pressing Seams: Pressing seams is crucial for creating crisp lines and preventing fabric distortion. Use a pressing cloth to protect the fabric from heat damage.
- Using a Seam Ripper: A seam ripper is essential for removing mistakes or adjusting seams. Use it carefully to avoid damaging the fabric.
- Finishing Seams: Finishing seams prevents fraying and enhances the durability of the leggings. Consider using a serger or overlock machine for a professional finish.
Maintaining the Quality of Homemade Leggings
Proper care and maintenance ensure the longevity and quality of your homemade leggings.
- Washing and Drying: Always follow the care instructions on the fabric label. Wash leggings in cold water on a gentle cycle and tumble dry on low heat or hang to dry. Avoid using bleach or harsh detergents.
- Storage: Store leggings folded or rolled to prevent creases. Avoid storing them in direct sunlight or humid environments.