Wooden box hanging planter DIY sets the stage for this enthralling narrative, offering readers a glimpse into a story that is rich in detail and brimming with originality from the outset.
Are you looking for a unique and stylish way to add greenery to your home or garden? Building a wooden box hanging planter is a fantastic DIY project that allows you to unleash your creativity while creating a beautiful and functional piece.
This project is perfect for beginners, as it requires minimal tools and materials, and the results are incredibly rewarding.
Wooden Box Hanging Planters: A DIY Delight
In a world where creativity and self-sufficiency are increasingly valued, DIY projects have become a popular pastime. From furniture restoration to home decor, crafting your own creations brings a sense of accomplishment and allows you to personalize your living space.
Among the many DIY projects that have captured the hearts of home enthusiasts, wooden box hanging planters stand out as a unique and versatile option.
Wooden box hanging planters offer a charming and rustic appeal that complements various interior design styles. Their simple yet elegant design adds a touch of natural beauty to any room or outdoor space. Whether you prefer a modern minimalist aesthetic or a cozy farmhouse feel, these planters seamlessly blend into your surroundings.
Versatility of Wooden Box Hanging Planters
The beauty of wooden box hanging planters lies in their versatility. They can be adapted to suit a wide range of plants, from delicate herbs and vibrant flowers to lush greenery and even small succulents. This adaptability makes them ideal for various settings, including:
- Indoor Spaces:Wooden box hanging planters can brighten up living rooms, kitchens, bedrooms, and even bathrooms, adding a touch of nature and color to any space.
- Outdoor Patios and Balconies:They create a welcoming atmosphere on patios and balconies, bringing life and vibrancy to these outdoor havens.
- Gardens and Yards:Wooden box hanging planters can be incorporated into existing garden designs, adding a vertical element and creating visual interest.
Materials and Tools
Creating a wooden box hanging planter requires gathering the right materials and tools. This section will Artikel the essential components and tools needed for this project.
Wooden box hanging planters are such a versatile DIY project! You can customize them with paint, stain, or even stencils. Speaking of stencils, if you’re looking for some inspiration, check out our favorite stamped stenciled projects for some amazing ideas.
After you’ve picked your design, you can add some greenery and hang your planter wherever you like. It’s a great way to add a touch of nature to your home.
Materials
The materials you choose will determine the look and durability of your planter.
| Material | Description |
|---|---|
| Wooden box | The foundation of your planter. Choose a sturdy, weather-resistant wood like cedar, redwood, or treated pine. The size and shape of the box will dictate the size of your planter. |
| Potting soil | The medium that will support your plants. Choose a high-quality potting mix designed for the specific type of plants you plan to grow. |
| Hanging hardware | This includes chains, hooks, or wire to securely suspend the planter. The type of hardware will depend on the weight of the planter and your preferred hanging style. |
| Decorative elements (optional) | These can include paint, stain, stencils, or other embellishments to personalize your planter. |
Tools
The tools you need will depend on the specific design and construction of your planter. However, these are some common tools you’ll likely use:
| Tool | Description |
|---|---|
| Saw | Used to cut the wood to the desired size and shape. A circular saw or jigsaw is ideal for this purpose. |
| Drill | Needed to create holes for hanging hardware and drainage. |
| Screwdriver | Used to secure hanging hardware and any decorative elements. |
| Measuring tape | Essential for accurate measurements of the box and hanging hardware. |
| Level | Ensures that the planter hangs straight and evenly. |
| Sandpaper | Smooths out rough edges and prepares the wood for painting or staining. |
| Paintbrush or roller | Applies paint or stain to the wooden box. |
Construction Process
Now that you have all the necessary materials and tools, it’s time to get your hands dirty and build your very own wooden box hanging planter! The construction process is straightforward and doesn’t require any special skills, making it a perfect project for beginners.
Assembling the Box
The first step is to assemble the wooden box that will hold your plants.
- Start by laying out the four sides of the box on a flat surface, ensuring they are aligned. Use wood glue to secure the sides together, applying a thin layer along the edges where they meet.
- Once the glue is applied, clamp the sides together, ensuring they are firmly pressed against each other. Use clamps at each corner to hold the sides in place while the glue dries. This will create a strong and stable base for your planter.
- After the glue has dried, remove the clamps and reinforce the joints with screws. This will add extra strength and durability to your planter. Use a drill to pre-drill pilot holes before screwing the sides together. This will prevent the wood from splitting.
Adding the Bottom
Next, we need to add the bottom of the box to create a sealed container for your plants.
Building a wooden box hanging planter is a great weekend project! It’s satisfying to see your green thumb flourishing in a handcrafted creation. While you’re working on your planter, maybe whip up a batch of chocolate chip granola bagels for a tasty snack break.
Once your planter is complete, you’ll have a beautiful new spot to display your favorite plants and enjoy your homemade treats.
- Cut the bottom piece of wood to fit the dimensions of the box. Ensure the bottom is slightly smaller than the inside of the box, allowing for a small gap for drainage.
- Apply wood glue to the edges of the bottom piece and position it inside the box, aligning it with the sides. Clamp the bottom in place and allow the glue to dry completely.
- Once the glue has dried, reinforce the bottom with screws, pre-drilling pilot holes before screwing. This will ensure a secure and leak-proof bottom for your planter.
Creating the Hanging Mechanism
To hang your planter, we need to add a hanging mechanism.
- Attach two eye hooks to the top of the box, positioned on either side of the center. Use screws to secure the eye hooks firmly to the wood.
- Attach a length of sturdy rope or chain to the eye hooks. Make sure the rope or chain is long enough to hang the planter at the desired height. You can adjust the length of the rope or chain later to find the perfect hanging position.
Finishing Touches
To complete your planter, you can add some finishing touches to give it a professional look.
- Sand the entire surface of the box, including the edges, to create a smooth finish. Use progressively finer grit sandpaper to achieve a smooth, polished look.
- You can stain or paint the box to match your decor or personal preference. Use a quality wood stain or paint that is designed for outdoor use.
- Apply a sealant to protect the wood from moisture and the elements. This will help to prolong the life of your planter and prevent it from warping or rotting.
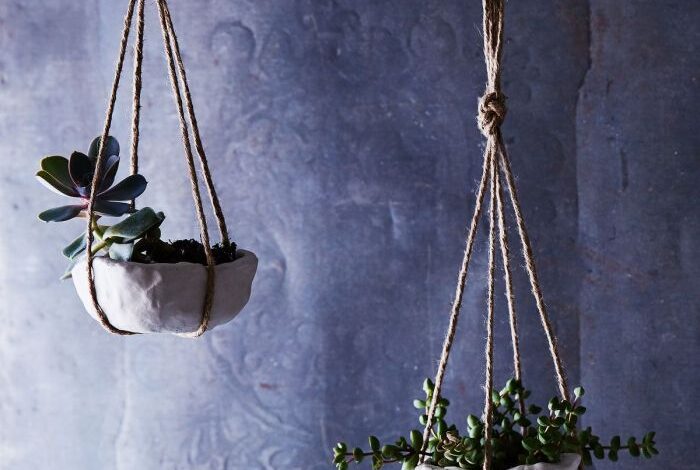
Hanging Mechanism
The hanging mechanism is crucial for displaying your wooden box planter and allowing it to gracefully sway in the breeze. Several options are available, each with its own advantages and drawbacks. This section will explore different methods for hanging your planter, their pros and cons, and provide creative hanging design examples.
Hanging Methods
The choice of hanging method depends on the weight of the planter, the style of your outdoor space, and your personal preference.
- Chains: Chains offer a robust and durable hanging solution. They are often used for heavier planters and provide a classic and elegant look.
- Pros: Strong and durable, versatile for various planter styles.
- Cons: Can be expensive, may require additional hardware for attachment.
- Ropes: Ropes are a lightweight and flexible option, ideal for smaller planters. They offer a rustic and bohemian aesthetic.
- Pros: Affordable, easy to adjust, adds a natural touch.
- Cons: May wear out faster than chains, not suitable for heavy planters.
- Brackets: Brackets are a secure and practical option, offering a clean and modern look. They are ideal for planters that are mounted against a wall.
- Pros: Easy to install, provides a stable and secure hanging solution.
- Cons: Limited flexibility in terms of positioning.
Creative Hanging Designs
Beyond the standard hanging methods, you can get creative with your planter’s display.
- Macrame Hangers: Macrame hangers add a touch of bohemian charm to your planter. They are handcrafted and come in various designs and sizes.
- Example: A macrame hanger with a geometric pattern can complement a modern wooden planter, while a more rustic design would pair well with a reclaimed wood planter.
- Metal Rings: Metal rings provide a simple and industrial look. They can be combined with chains or ropes for a unique hanging solution.
- Example: A large metal ring can be used to hang multiple small planters, creating a cascading effect.
- Hanging Planter Stand: A hanging planter stand allows you to display your planter at a specific height and angle. They are available in various materials and designs.
- Example: A wooden stand with a curved design can be used to create a whimsical look, while a metal stand with a geometric design can add a modern touch.
Planting and Care
Bringing your wooden box hanging planter to life with vibrant greenery is the final and most rewarding step in this DIY project. The success of your planter depends on choosing the right plants, providing them with suitable growing conditions, and maintaining them regularly.
Adding a wooden box hanging planter to your outdoor space is a simple way to bring a touch of greenery and charm. And while you’re sprucing up your home, why not elevate your dining experience too? This June, consider upgrading your silverware with Newbridge, elevate your lifestyle this june with newbridge silverware , for a touch of elegance that complements your new planter perfectly.
With a little DIY and a few stylish touches, you’ll have a beautiful and inviting space to enjoy both your garden and your meals.
Plant Selection
Selecting the right plants for your hanging planter is crucial. Consider factors like the size and shape of the box, the amount of sunlight it receives, and your personal preferences.
- Sunlight:Plants have different sunlight requirements. Choose plants that thrive in the amount of sunlight your planter receives. For example, succulents and cacti prefer full sun, while ferns and other shade-loving plants do well in partial shade.
- Size and Shape:Choose plants that will not outgrow the planter or become too heavy for the hanging mechanism. Consider trailing plants like ivy or cascading petunias for a beautiful cascading effect.
- Water Needs:Some plants need more frequent watering than others. Choose plants with similar water needs to avoid overwatering or underwatering.
Potting Soil, Drainage, and Watering, Wooden box hanging planter diy
Using the right potting soil and ensuring proper drainage are essential for plant health.
- Potting Soil:Use a well-draining potting mix specifically designed for container gardening. Avoid using garden soil, as it can compact and impede drainage.
- Drainage:Ensure the wooden box has drainage holes at the bottom to prevent water from accumulating and causing root rot. If your planter lacks drainage holes, you can create them with a drill.
- Watering:Water your plants thoroughly when the top inch of soil feels dry. Avoid overwatering, which can lead to root rot.
Plant Maintenance
Regular maintenance is key to keeping your plants healthy and thriving.
- Fertilization:Use a balanced liquid fertilizer diluted according to the manufacturer’s instructions to provide your plants with essential nutrients.
- Pruning:Regularly prune your plants to maintain their shape and encourage growth. Remove any dead or diseased leaves or stems.
- Pest and Disease Control:Inspect your plants regularly for pests or diseases. Treat any problems promptly to prevent them from spreading.
Design Variations: Wooden Box Hanging Planter Diy

Beyond the basic construction, your wooden box hanging planter offers a canvas for creativity. Explore different finishes, paints, and decorative techniques to personalize your planter and make it truly unique.
Finishes and Paints
The choice of finish and paint color can significantly impact the overall aesthetic of your planter. Here are some ideas to consider:
- Natural Wood Finish:Highlight the natural beauty of the wood with a clear sealant or oil. This option creates a rustic and elegant look.
- Stained Finish:Use wood stains in various shades to add depth and color to the wood. Consider earthy tones like brown, gray, or green for a natural feel, or bolder colors like red or blue for a more vibrant look.
- Painted Finish:Paint the box with your favorite color or use multiple colors to create a unique design. Consider using stencils or masking tape to create geometric patterns or lettering.
Decorative Techniques
Adding decorative elements can elevate your planter from functional to artistic. Explore these techniques:
- Wood Burning:Use a wood burning tool to create intricate patterns, designs, or even personalized messages on the wood surface.
- Decoupage:Apply decoupage medium to adhere decorative paper, fabric, or even pressed flowers to the surface of the planter. This technique allows for endless creative possibilities.
- Embellishments:Add embellishments like beads, buttons, or small decorative hardware to the planter for a touch of whimsy and personality.
Personalized Touches
Incorporate personal elements into your planter to make it truly special.
- Engraved Initials:Use a wood burning tool or an engraving machine to add your initials, a special date, or a meaningful quote to the planter.
- Family Crest:If you have a family crest, consider incorporating it into the design of your planter, either through wood burning, decoupage, or painting.
- Personalized Message:Paint or wood-burn a special message on the planter, such as a loved one’s name, a favorite quote, or a heartfelt sentiment.
Safety Considerations

Creating a hanging planter is a fun and rewarding DIY project, but safety should always be a top priority. While the process is generally straightforward, certain steps involve tools and materials that can pose risks if not handled correctly. Here’s a comprehensive guide to ensure a safe and enjoyable crafting experience.
Using Proper Safety Equipment
It’s crucial to wear appropriate safety gear to protect yourself from potential hazards during the construction process.
- Safety Glasses:Always wear safety glasses when working with tools like saws, drills, or sanders to shield your eyes from flying debris or sawdust.
- Gloves:Wear work gloves to protect your hands from splinters, rough edges, or sharp tools.
- Dust Mask:A dust mask is essential when sanding wood to prevent inhaling fine particles that can irritate your respiratory system.
- Ear Protection:If using power tools that produce loud noise, wear earplugs or earmuffs to protect your hearing.
Safety Precautions During Construction
- Secure Work Area:Choose a well-lit and spacious work area, free from clutter and distractions. Ensure the floor is stable and non-slippery to prevent accidents.
- Proper Tool Usage:Always use tools according to their intended purpose and manufacturer’s instructions. Familiarize yourself with the operation of each tool before using it.
- Sharp Tools:Handle sharp tools like saws and knives with care. Keep them sharp and store them safely when not in use.
- Power Tool Safety:Use power tools with caution. Disconnect them from the power source before making adjustments or cleaning them. Always use the appropriate safety guards and keep your hands away from the blades or rotating parts.
- Fire Safety:When working with wood, be mindful of fire hazards. Keep a fire extinguisher readily available and avoid using flammable liquids near heat sources.
Securing the Hanging Planter
Properly securing the hanging planter is crucial to prevent accidents and ensure its stability.
- Sturdy Hanging Mechanism:Use a strong and reliable hanging mechanism, such as heavy-duty chains, ropes, or hooks, that can withstand the weight of the planter and its contents.
- Secure Attachment Points:Ensure the attachment points on the planter are robust and capable of supporting the weight. Use screws or nails of appropriate size and strength to attach the hanging mechanism securely.
- Weight Distribution:Distribute the weight of the planter evenly to avoid stress on any single point. If using multiple attachment points, ensure they are spaced evenly.
- Regular Inspection:Regularly inspect the hanging mechanism and attachment points for signs of wear or damage. Replace any worn or damaged components immediately.