
DIY Tabletop Tic Tac Toe: Craft Your Own Classic Game with These Comprehensive Guides
Creating your own tabletop Tic Tac Toe game is a rewarding DIY project that offers both nostalgic fun and a unique decorative element for any space. This guide provides multiple approaches, catering to various skill levels and material preferences, ensuring you can craft a personalized version of this timeless game. From simple wood-based designs to more elaborate fabric or tile creations, the possibilities are extensive. Focusing on durability, aesthetics, and the satisfying tactile experience of playing on a handmade board, this article will walk you through the essential steps, materials, and considerations for building your perfect DIY Tic Tac Toe set. Whether you’re a seasoned crafter or a beginner looking for an accessible project, this comprehensive resource will equip you with the knowledge to bring your tabletop game to life.
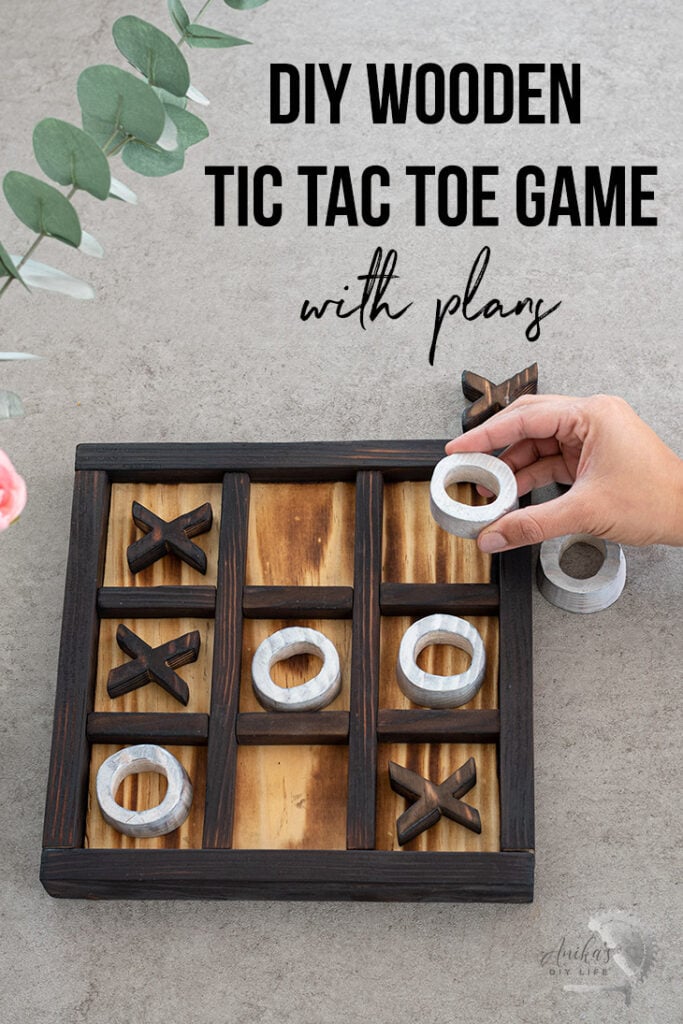
I. The Classic Wooden Tic Tac Toe Board: A Timeless Design
The most traditional and arguably the most satisfying DIY tabletop Tic Tac Toe board is constructed from wood. This approach offers a rustic charm, excellent durability, and a satisfying weight.
A. Materials Needed for a Wooden Board:
- Wood:
- Base Board: A piece of plywood, MDF, or solid wood (pine, oak, maple) measuring approximately 10×10 inches to 12×12 inches. The thickness can range from 1/2 inch to 3/4 inch, providing stability.
- Grid Lines: Small wooden dowels (1/4 inch diameter), thin wood strips (like lattice molding), or even painted lines are options.
- X & O Pieces:
- Wooden Discs: Small wooden discs (1-2 inches in diameter) or wooden cubes. You’ll need at least 5 of one shape and 5 of another.
- Alternative: Smooth stones, painted bottle caps, or even small felt shapes.
- Tools:
- Saw (hand saw, jigsaw, or miter saw for precise cuts if using wood strips)
- Sandpaper (medium and fine grit)
- Wood glue
- Ruler or measuring tape
- Pencil
- Paintbrushes
- Wood stain or paint (optional, for finishing)
- Clear sealant (polyurethane or varnish, optional)
- Drill with a small bit (if using dowels for grid lines)
- Clamps (optional, for securing pieces while glue dries)
B. Step-by-Step Construction of a Wooden Board:
- Prepare the Base Board: Cut your chosen wood to your desired dimensions for the game board. Sand all edges and surfaces until smooth, removing any splinters or rough patches.
- Mark the Grid: Using a ruler and pencil, carefully mark the Tic Tac Toe grid. Divide the board into nine equal squares. For a 10×10 inch board, you’ll mark lines at 3.33 inches and 6.66 inches horizontally and vertically. Ensure your markings are precise for a symmetrical grid.
- Create the Grid Lines (Choose Your Method):
- Method 1: Wooden Dowels/Strips:
- Cut four pieces of wooden dowel or thin wood strip to span the width and length of the board, creating the grid lines. You’ll need two for the horizontal lines and two for the vertical lines.
- Apply wood glue along the marked grid lines on the base board.
- Carefully press the dowels or strips into place, ensuring they are flush with the surface.
- Wipe away any excess glue.
- For added security, you can pre-drill small pilot holes along the marked lines and use small brad nails to secure the dowels/strips before gluing.
- Allow the glue to dry completely, using clamps if available to ensure firm contact.
- Method 2: Painted Lines:
- Ensure the base board is smooth and clean.
- Using a thin paintbrush and appropriate paint (wood paint or acrylic), carefully paint the marked grid lines. Practice on scrap wood first to achieve clean, straight lines. You may need multiple coats.
- Allow the paint to dry thoroughly between coats and before proceeding.
- Method 1: Wooden Dowels/Strips:
- Prepare the X & O Pieces:
- If using wooden discs or cubes, sand them smooth.
- Decide on your design for the X and O pieces. You can:
- Paint them: One set solid, the other set a contrasting solid color.
- Wood burn them: Draw or stencil an X on one set and an O on the other.
- Leave them natural: For a minimalist, natural wood look.
- Apply your chosen finish to the pieces and allow them to dry completely.
- Finishing Touches:
- Once the grid lines are dry and secure (or the paint is fully cured), you can opt to further finish the board.
- Staining: Apply wood stain to the entire board for a richer, deeper color. Wipe away excess stain according to product instructions.
- Painting: Paint the entire board a solid color or a decorative pattern.
- Sealing: Apply a clear sealant (polyurethane, varnish, or Mod Podge) to protect the wood and paint, giving it a durable, finished look. Apply multiple thin coats, allowing each to dry completely. Lightly sand between coats with fine-grit sandpaper for an ultra-smooth finish.
- Storage (Optional): You can add small felt pads to the bottom of the board to prevent scratching surfaces. Consider creating a small drawstring bag or a wooden box to store your X and O pieces when not in use.
II. Fabric Tic Tac Toe: A Soft and Portable Option
For a softer, more portable, and beginner-friendly approach, a fabric Tic Tac Toe board is an excellent choice. This method is ideal for travel, children’s play, or for those who prefer a textile craft.
A. Materials Needed for a Fabric Board:
- Fabric:
- Base Fabric: Two pieces of sturdy cotton fabric (quilting cotton works well), approximately 12×12 inches each. One will be the main board, the other the backing.
- Grid Fabric (Optional): Contrasting fabric strips for the grid lines (1/2 inch to 1 inch wide), or embroidery floss/yarn.
- X & O Pieces:
- Felt: Two different colors of felt (approximately 3×3 inches each).
- Alternative: Fabric scraps, small buttons, or crocheted/knitted pieces.
- Tools:
- Sewing machine (or needle and thread for hand-sewing)
- Fabric scissors
- Rotary cutter and mat (optional, for precise cutting)
- Fabric pins
- Iron and ironing board
- Ruler or measuring tape
- Fabric marker or chalk
- Thread that matches your fabric
B. Step-by-Step Construction of a Fabric Board:
- Prepare the Fabric:
- Wash and iron both pieces of your base fabric to pre-shrink them and remove wrinkles.
- If using contrasting fabric strips for the grid, cut them to the desired length and width. You will need four strips of equal length to form the grid lines.
- Create the Grid (Choose Your Method):
- Method 1: Fabric Strips (Sewn On):
- On one of the base fabric pieces (this will be the top of your board), use a fabric marker to lightly draw the Tic Tac Toe grid lines.
- Arrange the fabric strips over the drawn lines. Pin them in place.
- Using your sewing machine (or needle and thread), carefully sew along both edges of each fabric strip to secure them to the base fabric. This creates raised, textured grid lines.
- Press the fabric with an iron to flatten the seams.
- Method 2: Fabric Marker/Paint:
- On one of the base fabric pieces, use a fabric marker or fabric paint to draw the Tic Tac Toe grid lines. Ensure the lines are straight and evenly spaced.
- Allow the marker/paint to dry completely according to product instructions.
- Method 3: Embroidery/Yarn:
- On one of the base fabric pieces, mark the grid lines with a fabric marker.
- Using embroidery floss or yarn and a needle, stitch along the marked lines to create raised grid lines. You can use a simple running stitch or a more decorative stitch.
- Method 1: Fabric Strips (Sewn On):
- Prepare the X & O Pieces:
- Cut out at least 5 X shapes and 5 O shapes from your two different felt colors. You can find templates online or draw them freehand.
- For a more durable X and O, cut out two identical shapes for each piece and sew them together, leaving a small opening to turn them right side out, then stuff lightly with batting. Alternatively, you can simply use single-layer felt shapes.
- Assemble the Board:
- Place the backing fabric piece right-side down.
- Lay the top fabric piece (with the grid) right-side up on top of the backing fabric.
- Align the edges of both fabric pieces.
- Pin the layers together around the perimeter.
- Sew the Board Together:
- Using your sewing machine (or needle and thread), sew around the outer edge of the board, leaving a 2-3 inch opening for turning.
- Clip the corners to reduce bulk.
- Turn the board right-side out through the opening. Use a point turner or a chopstick to gently push out the corners.
- Press the board flat with an iron.
- Turn in the raw edges of the opening and stitch it closed, either by hand or machine.
- Finishing Touches:
- Consider quilting the board by sewing diagonal lines across the squares for added texture and stability.
- You can sew small pockets or a drawstring bag for storing the X and O pieces.
III. Tile or Stone Tic Tac Toe: A Durable and Elegant Option
For a sophisticated and durable tabletop game, consider using tiles or smooth stones. This method offers a more permanent and visually striking result.
A. Materials Needed for Tile/Stone Board:
- Base Board:
- A sturdy piece of wood (plywood, MDF, or solid wood) measuring approximately 10×10 inches to 12×12 inches.
- Alternatively, a large slate tile or a piece of smooth granite.
- Grid:
- Thin mosaic tile strips.
- Thin natural stone strips.
- Glass beads or pebbles.
- Permanent marker (for stone/glass bases).
- X & O Pieces:
- Matching mosaic tiles or small, flat stones (5 of one type, 5 of another).
- Alternatively, painted pebbles or polished glass gems.
- Tools:
- Tile nippers or a wet saw (if cutting tiles)
- Tile adhesive or strong craft glue (like E6000)
- Grout (optional, for tile boards)
- Grout float and sponge (if using grout)
- Drop cloth or protective covering
- Safety glasses
- Sandpaper (if using a wooden base)
- Ruler or measuring tape
- Pencil or marker
B. Step-by-Step Construction of a Tile/Stone Board:
- Prepare the Base:
- If using a wooden base, sand it smooth and apply a protective finish or paint as desired.
- If using a stone slab, ensure it is clean and flat.
- Design and Mark the Grid:
- On your base material, carefully measure and mark the Tic Tac Toe grid.
- If using a permanent marker on stone or glass, draw the lines directly.
- Attach the Grid Lines (Choose Your Method):
- Method 1: Tile/Stone Strips:
- Cut your tile or stone strips to the appropriate lengths for the grid lines.
- Apply tile adhesive or strong craft glue to the marked grid lines on the base.
- Carefully place the tile or stone strips onto the adhesive, ensuring they are straight and evenly spaced.
- Press down firmly.
- Allow the adhesive to cure completely according to the manufacturer’s instructions.
- Method 2: Beads/Pebbles:
- Apply adhesive along the marked grid lines.
- Carefully place the beads or pebbles to form the grid lines.
- Allow to cure.
- Method 1: Tile/Stone Strips:
- Grout the Tile Board (Optional):
- If you used tile strips for your grid, you can grout the spaces between the tiles for a seamless look.
- Mix the grout according to the manufacturer’s instructions.
- Using a grout float, spread the grout over the tile lines, pressing it into the gaps.
- Wipe away excess grout with a damp sponge, rinsing the sponge frequently.
- Allow the grout to cure for at least 24 hours.
- Prepare the X & O Pieces:
- Select your matching tiles or stones for the X and O pieces. Ensure they are relatively flat and easy to handle.
- If using plain tiles, you can paint or wood-burn X and O onto them.
- If using stones, you can paint them or use permanent markers.
- Finishing Touches:
- For wooden bases, apply a sealant to protect the finish.
- If using individual tiles or stones, consider adding felt pads to the bottom of the board to prevent scratching surfaces.
IV. Designing Your X & O Pieces: Beyond the Basics
The X and O pieces are an integral part of the game’s aesthetic. Consider these creative options:
- Painted Wood: Simple and classic, paint wooden discs or cubes in contrasting colors.
- Wood Burned: For a rustic, personalized touch, wood burn X and O onto wooden pieces.
- Stenciled: Use stencils to create intricate designs or letters on your X and O pieces.
- Fabric Appliqué: Cut X and O shapes from felt or fabric and sew them onto small fabric or felt bases.
- Resin Casting: Create custom X and O pieces by casting resin with embedded objects, glitter, or pigments.
- Embroidered Patches: Stitch X and O onto fabric and use them as appliqué pieces.
- Natural Elements: Use smooth, flat stones, polished seashells, or even acorns.
V. SEO Considerations for Your DIY Article:
To ensure this article ranks well in search engine results for terms like "DIY Tic Tac Toe," "tabletop game craft," "how to make Tic Tac Toe," and "wooden Tic Tac Toe instructions," several SEO elements are incorporated:
- Keyword Rich Title: The title directly addresses the core topic and includes relevant keywords.
- Header Tags (H2, H3): The content is structured with clear headings and subheadings, making it easy for search engines and readers to understand the topic hierarchy.
- Keyword Integration: Keywords like "DIY," "tabletop," "Tic Tac Toe," "craft," "game," "wooden," "fabric," "tile," "stone," "instructions," "guide," and "tutorial" are naturally woven throughout the text.
- Descriptive Content: The article provides detailed, step-by-step instructions, offering valuable and comprehensive information that users are searching for.
- Varied Methods: Offering multiple construction methods (wood, fabric, tile) caters to a wider range of user intent and increases the likelihood of capturing searches for specific materials.
- Material Lists: Clearly itemized material lists are highly searchable and appreciated by DIY enthusiasts.
- Actionable Steps: The instructions are presented in a clear, sequential, and actionable format.
- Focus on "How-To": The article’s core purpose is to guide the user through the creation process, aligning with "how-to" search queries.
- Internal Linking (Conceptual): While not directly implemented in this text-only format, in a live website context, this article could link to related DIY projects (e.g., "DIY Board Games," "Woodworking Projects for Beginners").
- External Linking (Conceptual): Again, in a live website, links to reputable sources for materials or tools would be beneficial.
By following these comprehensive guidelines, you can successfully create a beautiful and functional DIY tabletop Tic Tac Toe game that is both a fun activity and a cherished handmade item. The process itself is as enjoyable as playing the game, offering a creative outlet and a tangible result of your crafting efforts.
