The Ultimate Guide to Achieving Flawless, Bold Brows: From Definition to Drama
Achieving perfectly bold brows is a sought-after beauty goal, offering structure, definition, and an undeniable statement to any look. This comprehensive guide delves into the essential techniques, product recommendations, and expert tips to help you master the art of the bold brow, transforming sparse or unkempt arches into perfectly sculpted statements. We’ll cover everything from understanding your natural brow shape to the final setting spray, ensuring you can confidently create impactful, long-lasting bold brows. This isn’t about filling in a few gaps; this is about creating brow architecture that enhances your facial features and commands attention.
Understanding Your Brow Canvas: Shape and Structure
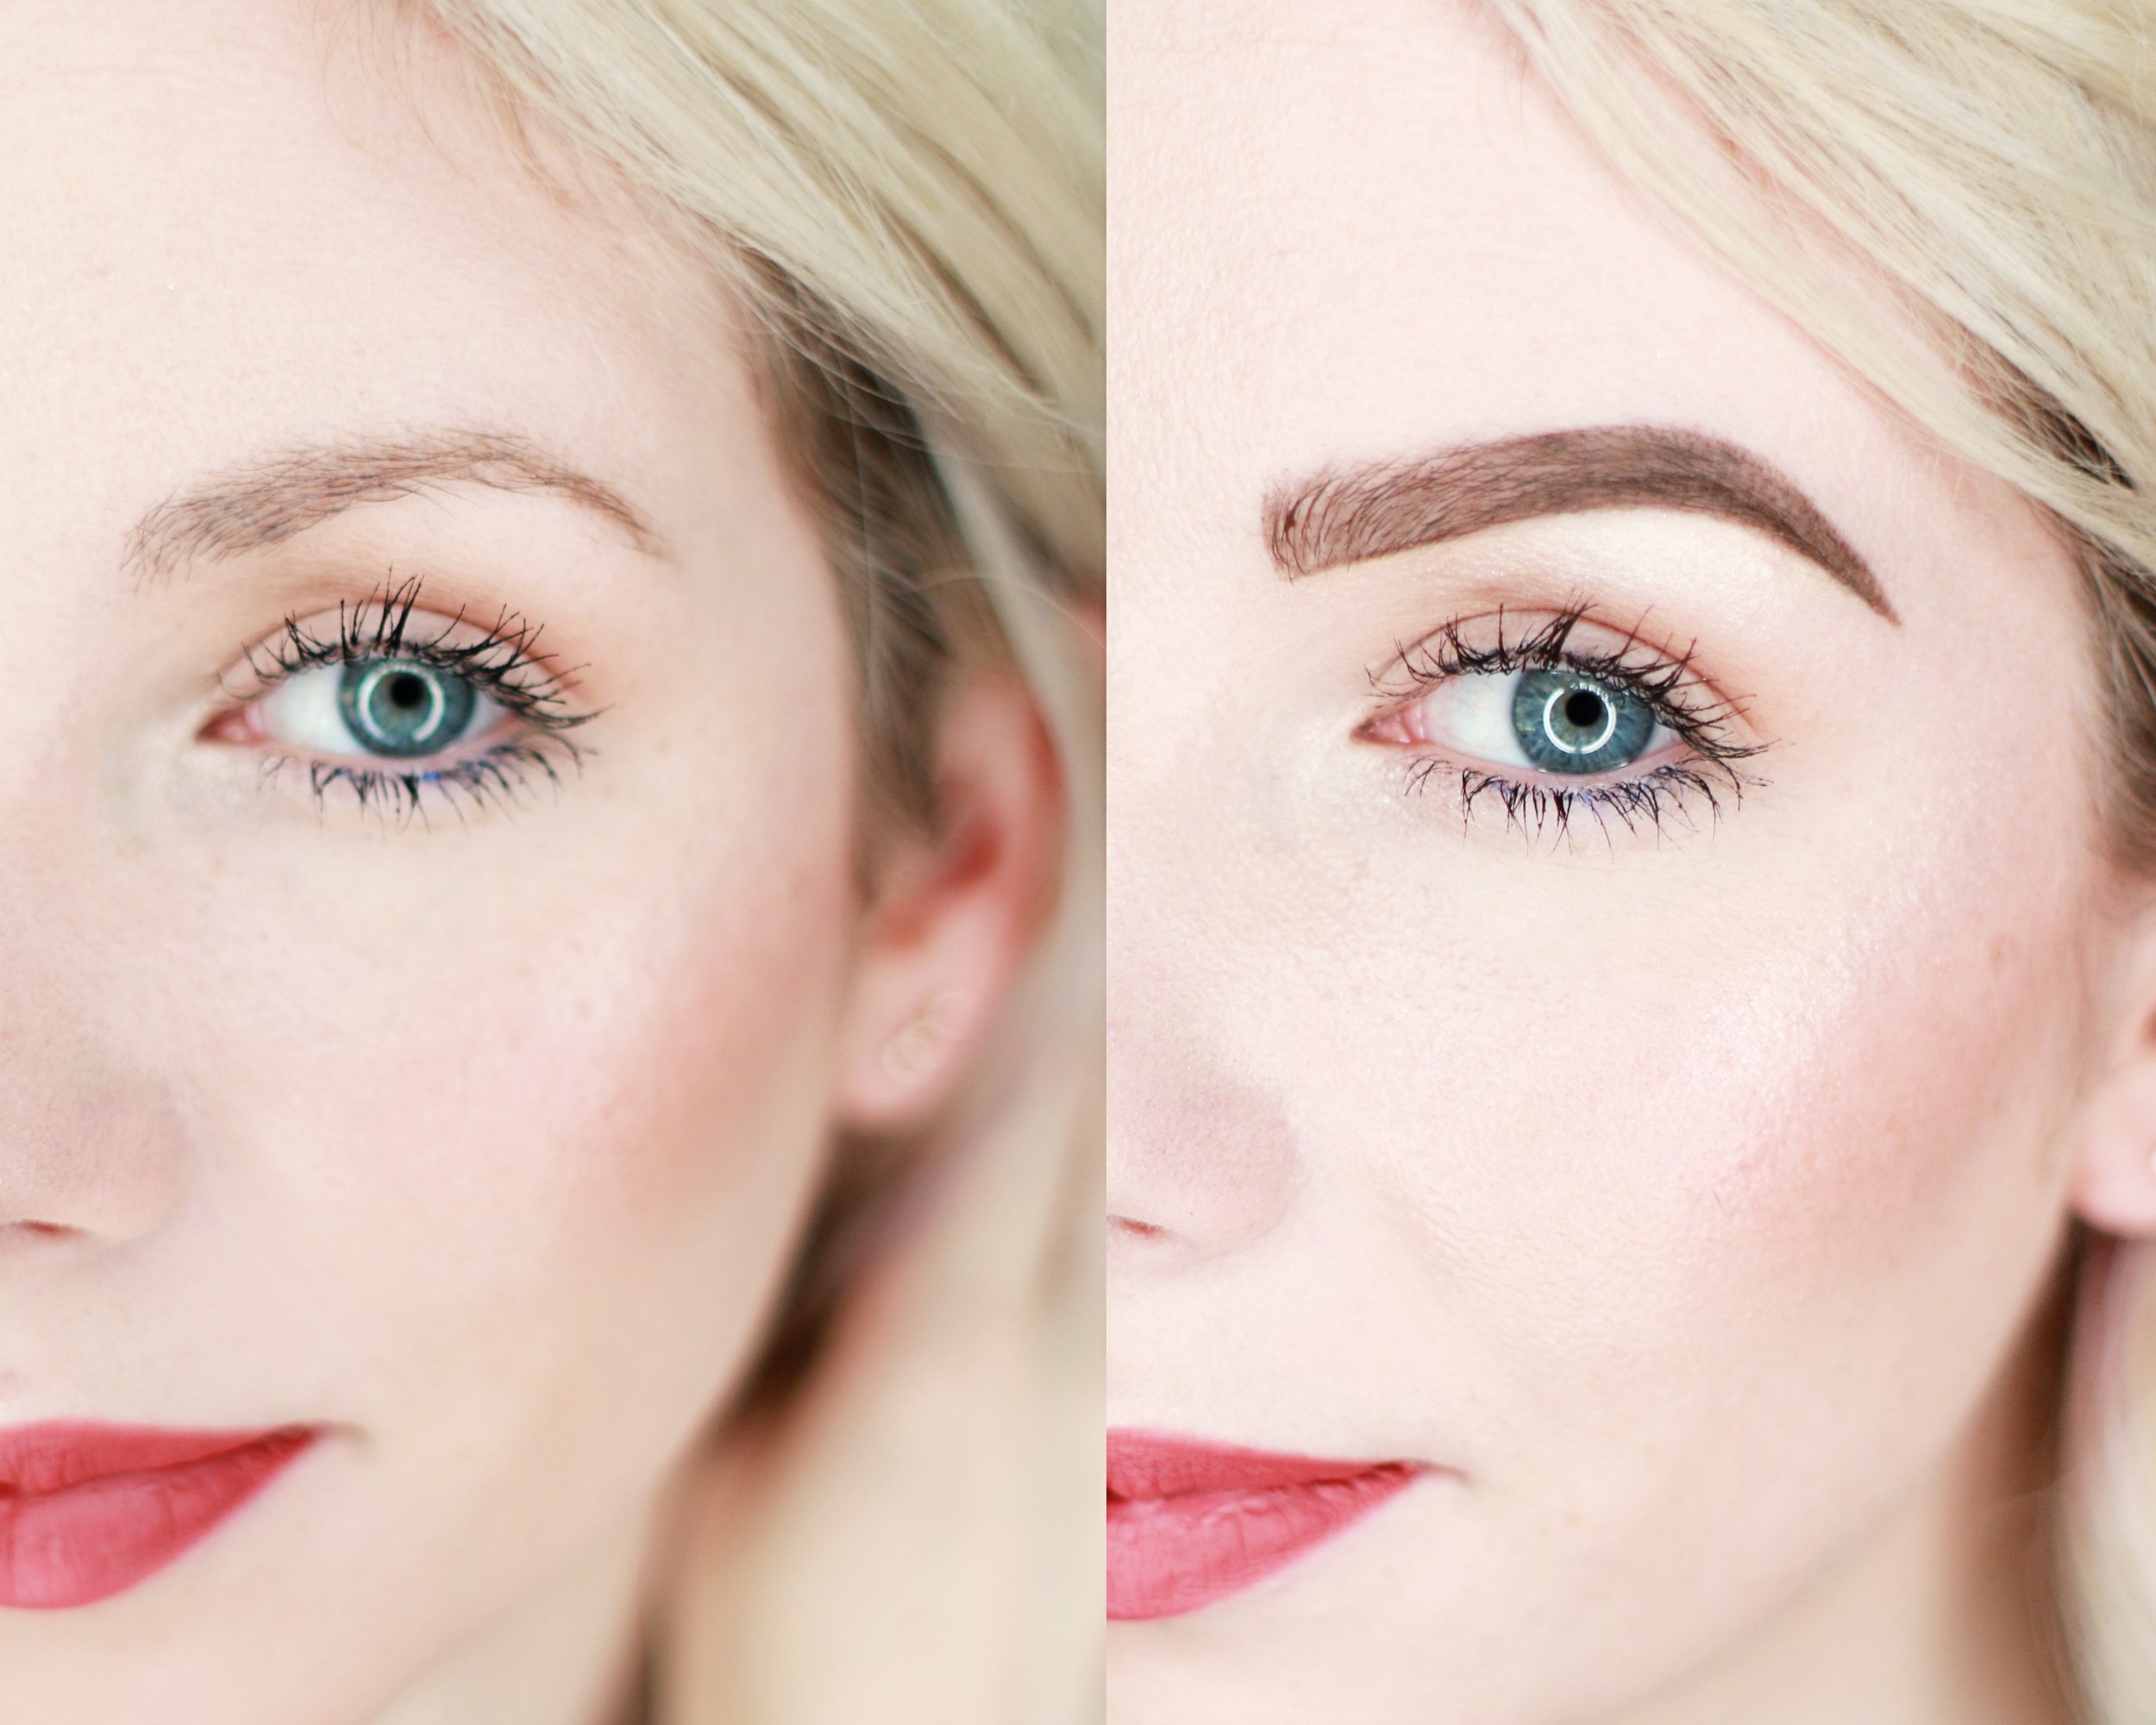
Before any product touches your skin, a thorough understanding of your natural brow’s potential is paramount. The perfect bold brow isn’t about forcing an unnatural shape; it’s about enhancing what you already have. Begin by identifying your natural brow’s key points: the start, the arch, and the tail. Use a clean spoolie brush or a pencil held vertically against the side of your nose to determine the ideal starting point. This should align with the edge of your nostril. To find the arch, tilt the pencil diagonally, placing its edge against the outer edge of your iris when looking straight ahead. This will indicate the highest point of your brow. Finally, for the tail, align the pencil from the corner of your nostril to the outer corner of your eye. This is where your brow should ideally end.
Once these anchor points are established, assess the natural density and growth pattern of your brow hairs. Are they sparse in certain areas? Do they grow downwards or erratically? Are there any natural gaps? Identifying these characteristics will inform your product selection and application strategy. A bold brow requires a solid foundation, and this foundation begins with understanding the unique landscape of your own eyebrows. This initial assessment prevents over-plucking and ensures that your bold brow creation is harmonious with your facial structure, rather than a superimposed afterthought.
Essential Tools for Bold Brow Mastery
The right tools are non-negotiable for achieving precise and impactful bold brows. Invest in a quality set that will facilitate both application and blending. A fine-tipped angled brush is crucial for precise hair-like strokes and sharp lines, particularly when using brow powders or pomades. For pomades, a dense, angled brush offers the most control. A spoolie brush is indispensable for blending product seamlessly, softening harsh lines, and grooming hairs into place before, during, and after application.
Consider investing in a brow pencil with a fine, retractable tip for filling in smaller gaps with natural-looking strokes. A brow gel, either tinted or clear, is vital for setting hairs in place, adding texture, and defining the overall shape. For those seeking maximum definition, a high-quality brow pomade offers intense pigmentation and staying power. Don’t underestimate the power of tweezers for precise grooming; slanted-tip tweezers are excellent for plucking stray hairs that fall outside your desired brow perimeter. Finally, a good quality concealer, preferably a shade lighter than your foundation or a skin-toned shade, is essential for cleaning up and sharpening the edges of your bold brow, creating a polished and defined finish. Having these tools readily available will elevate your brow game from amateur to professional.
Product Powerhouses: Choosing the Right Medium
The market is flooded with brow products, each offering a unique approach to achieving boldness. Understanding the strengths of different mediums will allow you to tailor your routine to your specific needs and desired level of intensity.
-
Brow Pomades: These are the workhorses for bold brows. Their creamy, highly pigmented formula allows for precise shaping and filling. They offer excellent control for creating sharp lines and can be layered for dramatic depth. Pomades are ideal for those with sparse brows or who desire a strong, sculpted look. However, they require a skilled hand and diligent blending to avoid looking too heavy or drawn-on.
-
Brow Powders: Lighter and more forgiving than pomades, brow powders are excellent for filling in larger areas with a softer, more diffused effect. They can be layered to build intensity gradually. Powders are a great option for beginners or for achieving a bold brow that still looks natural. They are best applied with a brush, allowing for controlled application.
-
Brow Pencils: Fine-tipped pencils are perfect for mimicking individual eyebrow hairs, creating realistic texture and filling in small gaps with precision. They are excellent for adding detail and enhancing existing brow hairs. For bolder brows, pencils can be used to draw in hair-like strokes along the brow’s edge, defining its shape.
-
Brow Gels: Whether tinted or clear, brow gels are crucial for setting the brow hairs in place, ensuring they stay put throughout the day. Tinted gels add subtle color and volume, enhancing the overall fullness. Clear gels provide hold without adding color, making them ideal for grooming and setting product. They contribute to a polished, defined finish.
-
Brow Pens: Similar to felt-tip eyeliner pens, brow pens offer precise application for creating hair-like strokes. They are excellent for filling in very sparse areas with extreme accuracy and can be used to create very fine, delicate lines.
The key to bold brows is often a combination of these products. You might use a pomade for the initial shape and fill, a pencil for detailed hair strokes, and a gel to set everything in place. Experimentation is crucial to discover the perfect blend for your desired outcome.
The Step-by-Step Process for Bold Brows
Achieving a perfect bold brow involves a methodical approach, ensuring each step contributes to the final, impactful result.
-
Prep and Prime: Start with clean, dry eyebrows. Brush your brow hairs upwards and outwards with a spoolie to groom them and assess your natural shape. If you have oily skin, a light dusting of translucent powder can help absorb excess oil and improve product longevity.
-
Outline the Shape: Using your chosen product (pomade is excellent for this step), gently sketch the desired outline of your bold brow. Begin by defining the underside of the brow from the start to the arch, then extend to the tail. Next, define the top edge, starting slightly in from the beginning of the brow and following the natural arch to the tail. Focus on creating a clean, sharp line. Remember the key anchor points identified earlier to ensure symmetry and a flattering shape.
-
Fill with Precision: Once the outline is established, begin filling in the brow. For pomades, use a light hand and an angled brush, applying in short, upward strokes that mimic natural hair growth. If using powder, load your angled brush and tap off excess, then lightly fill in sparse areas, focusing on the direction of hair growth. Avoid overfilling; aim for a solid base that can be blended. For a truly bold brow, concentrate on filling in the denser parts of the brow, creating a strong arch and a defined tail.
-
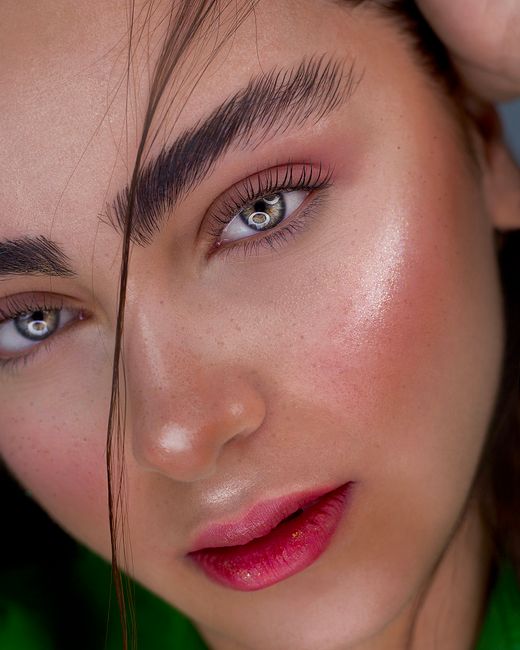
Create Hair-Like Strokes: This is where realism meets drama. Using a fine-tipped brow pencil or a brow pen, draw in individual hair-like strokes within the filled areas, especially where your natural brow hairs are sparser. Focus on mimicking the direction and texture of your natural hairs. This adds depth and dimension, preventing the brow from looking flat or drawn-on. For boldness, these strokes should be noticeable but still blend seamlessly with the base.
-
Blend for Softness and Definition: Crucially, blend, blend, blend. Use a clean spoolie brush to softly brush through the brow hairs, diffusing any harsh lines and integrating the product. Start from the front of the brow and work your way towards the tail, always blending upwards and outwards. This step is vital for preventing a blocky or artificial appearance. The goal is to soften the edges while maintaining the bold shape.
-
Conceal and Sharpen: For the ultimate polished finish, use a small concealer brush and a concealer that matches your skin tone or is slightly lighter. Carefully apply the concealer along the underside of your brow, creating a sharp, clean line that lifts and defines the brow. You can also apply a small amount to the top edge if needed for extra sharpness. Blend the concealer outwards onto your eyelid and forehead to ensure a seamless transition. This step acts like a frame for your brow, making it pop and appear perfectly sculpted.
-
Set and Lock: Finish by applying a brow gel. A tinted gel will add extra color and fullness, while a clear gel will simply set the hairs in place. Brush the gel through your brows, following the direction of hair growth. This will lock everything in, prevent smudging, and add a polished sheen. For extra longevity, consider a waterproof brow gel.
Mastering the Arch: The Cornerstone of Boldness
The arch is the focal point of any bold brow. A well-defined arch can lift the face, open up the eyes, and create a striking visual impact. When defining your arch, aim for a soft, natural curve rather than a sharp, angular peak. The highest point of the arch should align with the outer edge of your iris when looking straight ahead.
To create a more pronounced arch with a pomade or pencil, subtly extend the brow’s upper line upwards towards the desired arch point. Conversely, if your natural arch is too high, you can soften it by applying a small amount of concealer to the area above the arch and blending it away. Remember that the arch should be slightly closer to the nose than the tail. Precision in defining this curve is key to achieving that sought-after bold brow aesthetic without looking overly done.
Dealing with Sparse Brows: Building Boldness from Within
Sparse brows present a unique challenge, but with the right techniques and products, dramatic boldness is achievable. Start by identifying the areas that need filling. Use a fine-tipped pencil or brow pen to draw in individual hair-like strokes, mimicking the direction and thickness of your natural brow hairs. Focus on building the brow gradually, layering product to create a natural-looking density.
Brow powders applied with a dense angled brush are excellent for filling in larger sparse areas. For a more dramatic effect, consider using a brow pomade. Apply it in short, feathery strokes, focusing on the areas where hair is lacking. Don’t be afraid to overdraw slightly to create the illusion of fullness, but always blend thoroughly. Eyebrow serums that promote hair growth can also be a valuable long-term investment for building a naturally fuller brow canvas, making the bold brow application even more impactful.
Maintaining Your Bold Brow Masterpiece
Once you’ve achieved your perfect bold brows, maintenance is key to ensuring they stay looking sharp and defined. Regularly pluck any stray hairs that fall outside your meticulously sculpted shape. A daily brush with a spoolie can help keep hairs in place and maintain the overall shape.
For longevity, avoid touching your brows excessively throughout the day. If you tend to have oily skin, a light application of a mattifying primer on your brow bone before applying makeup can help prevent product breakdown. Consider investing in a setting spray specifically designed for makeup longevity to ensure your bold brows withstand the day’s elements. Regular touch-ups with your chosen brow products might be necessary, especially if you’re active or in humid conditions.
Common Bold Brow Mistakes to Avoid
Even with the best intentions, certain pitfalls can derail your bold brow aspirations. One of the most common mistakes is failing to blend. Harsh, unblended lines create a stark, artificial look. Always use a spoolie to soften edges and diffuse product. Overfilling is another prevalent error; it’s better to build density gradually than to create a solid block of color.
Ignoring symmetry is also a significant issue. Take your time to ensure both brows are as evenly shaped and filled as possible. Asymmetry can be incredibly distracting. Over-plucking, especially at the beginning of the brow, can lead to a severe, unnatural look. Remember to start your brow slightly in from the edge of your nostril. Finally, using a shade that is too dark or too light can make your brows appear unnatural. Always aim for a shade that is one to two shades lighter than your hair color for a softer, yet still bold, effect.
Conclusion: Empowering Your Look with Bold Brows
Mastering the art of the bold brow is a journey of understanding your facial structure, selecting the right tools and products, and applying techniques with precision and patience. From defining the initial outline to creating realistic hair-like strokes and setting your masterpiece, each step contributes to a polished, impactful look. By avoiding common mistakes and committing to regular maintenance, you can consistently achieve bold brows that enhance your features, boost your confidence, and leave a lasting impression. Embrace the power of a perfectly sculpted arch and unlock a more defined, dramatic you.
