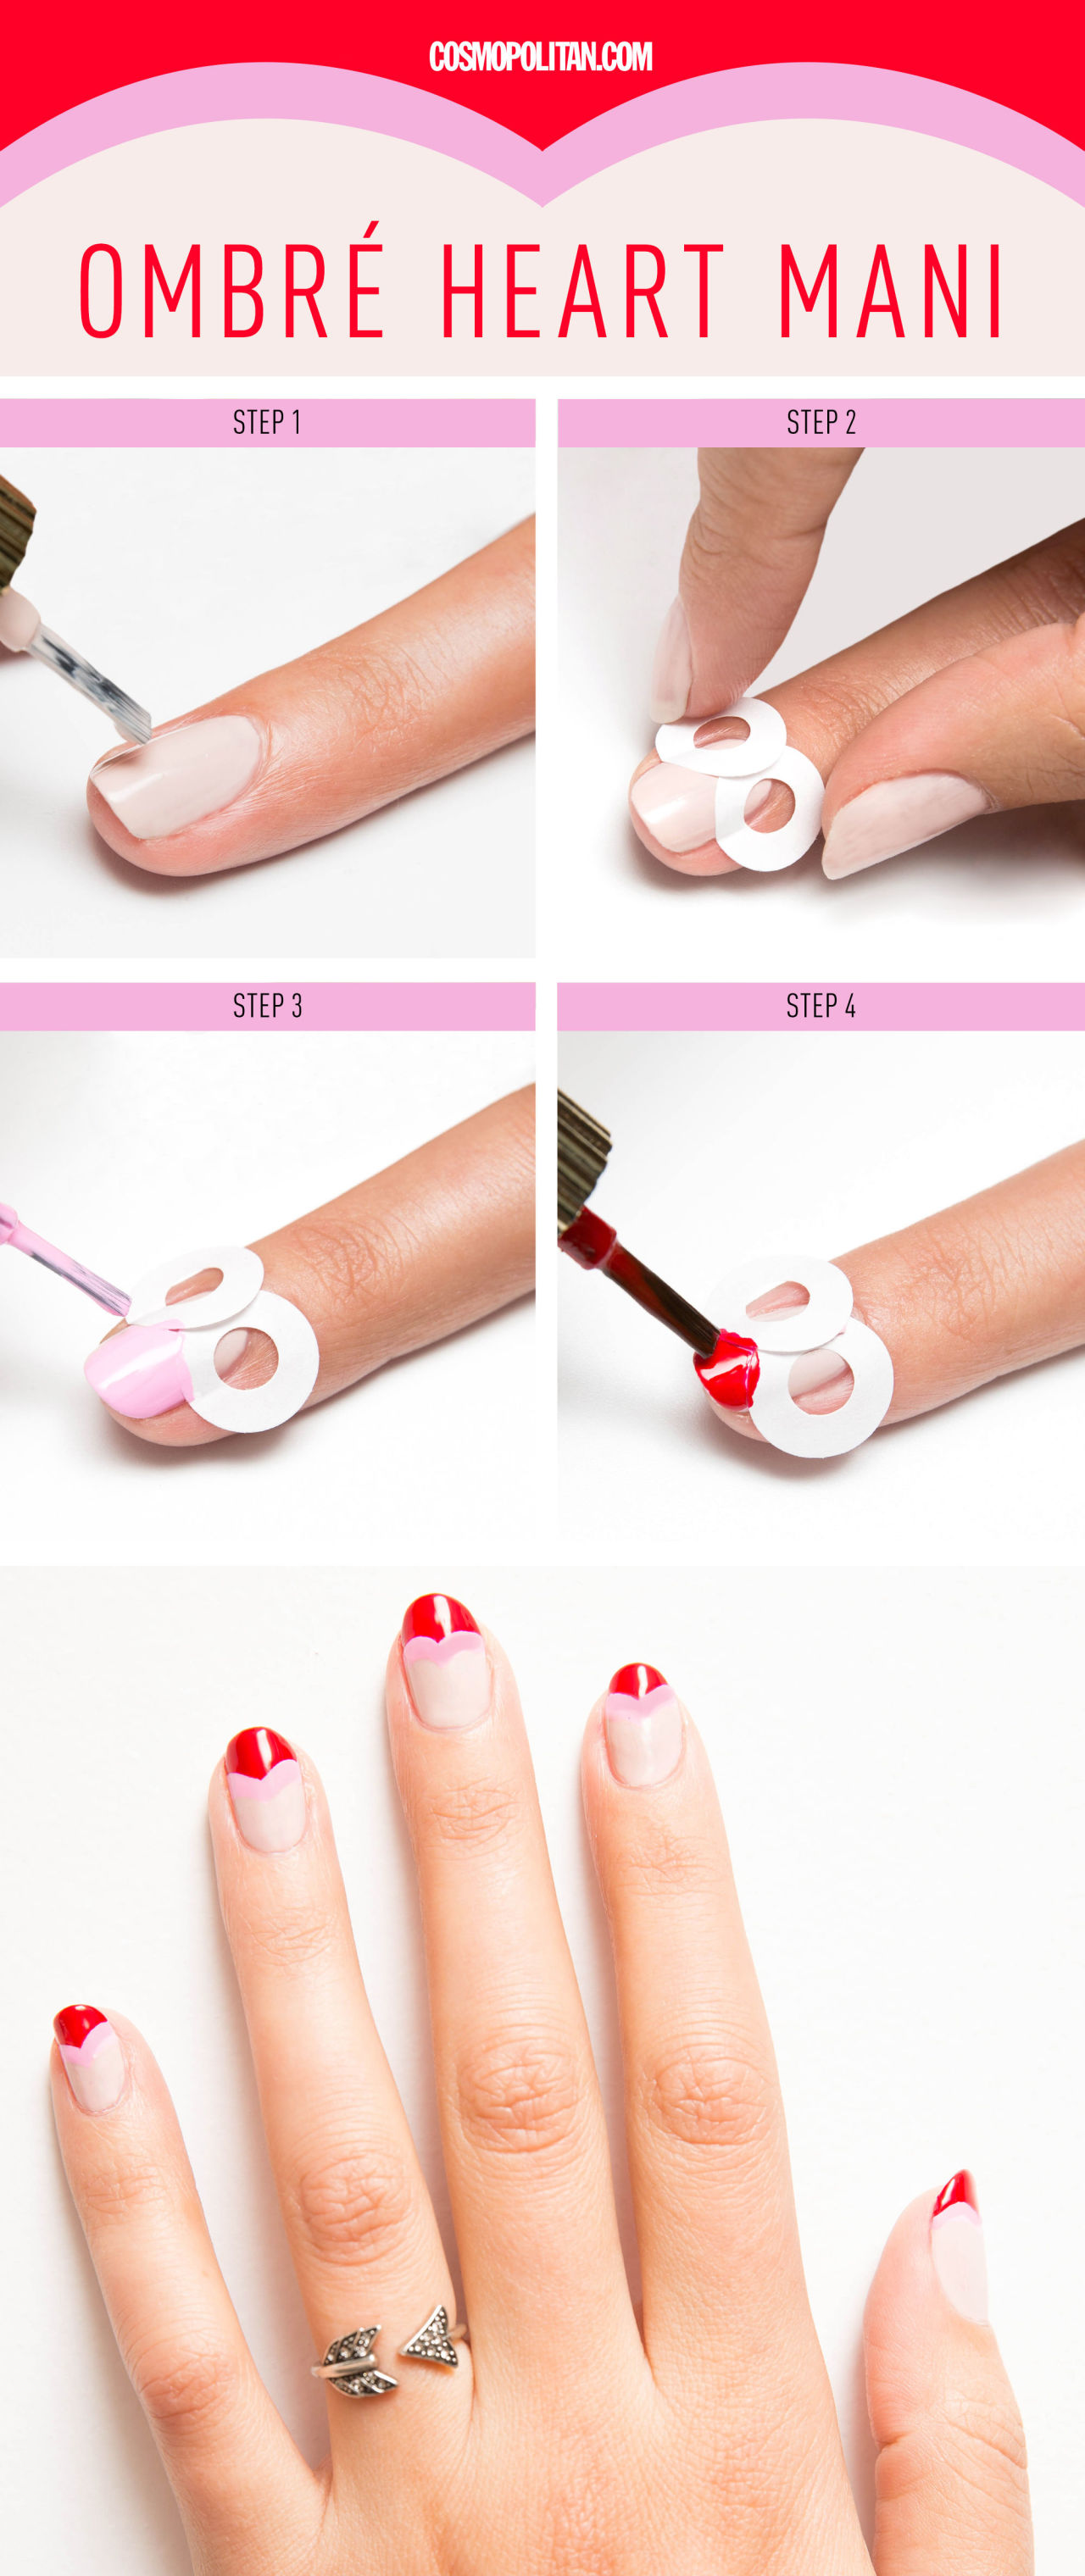
DIY Ombre Heart Manicure: A Step-by-Step Guide to Gradient Love
Achieving a salon-quality ombre heart manicure at home is entirely attainable with the right techniques and materials. This comprehensive guide will walk you through every step, from preparation to the final top coat, ensuring your nails are adorned with beautiful, blended heart designs. We’ll cover essential tools, color selection, application methods, and troubleshooting tips to help you master this popular nail art trend. The ombre effect, characterized by a smooth gradient transition between two or more colors, combined with the universally loved heart motif, creates a look that is both sophisticated and playful, perfect for any occasion.
Essential Tools and Materials for Your Ombre Heart Mani
Before you begin, gather all the necessary supplies. This ensures a seamless DIY experience and prevents interruptions. For a flawless ombre heart manicure, you will need:
- Base Coat: A good quality base coat is crucial for protecting your natural nails from staining and creating a smooth surface for polish application. It also helps your manicure last longer.
- Nail Polish Colors: Select at least two complementary or contrasting nail polish colors for your ombre gradient. A lighter shade for the base and a darker shade for the tip, or vice-versa, are common choices. For the heart, you’ll need a third color – typically a contrasting shade or a metallic for added flair. Consider the finish: creme, shimmer, or glitter can all contribute to unique looks.
- Makeup Sponge or Nail Art Sponge: A clean makeup sponge, specifically a beauty blender or a small wedge, is the most popular tool for creating the ombre effect. You can also purchase specialized nail art sponges designed for gradients. Cut the sponge into small, manageable pieces, ideally about 1-2 inches.
- Small Nail Art Brush or Toothpick: This will be used for precisely applying the heart shape. A fine-tipped brush offers more control, while a toothpick can be a good substitute for creating smaller hearts.
- Top Coat: A high-shine top coat seals your manicure, protects the design, and adds a professional finish. Consider a quick-dry formula to minimize smudging.
- Nail Polish Remover and Cotton Swabs/Pads: Essential for cleaning up any mistakes and removing excess polish from your skin.
- Cuticle Oil (Optional but Recommended): Applied at the end, cuticle oil hydrates and nourishes the skin around your nails, enhancing the overall polished look.
- Paper Towel or Palette: To deposit your nail polish onto for sponging.
Preparing Your Nails for the Perfect Canvas
Proper nail preparation is paramount for a long-lasting and aesthetically pleasing manicure.
- Remove Old Polish: Ensure all traces of previous nail polish are completely removed using a good quality nail polish remover.
- Shape Your Nails: File your nails to your desired shape and length. Aim for smooth, even edges.
- Push Back Cuticles: Gently push back your cuticles using a cuticle pusher or an orange stick. Avoid cutting them, as this can lead to infection. Healthy cuticles frame your nails beautifully.
- Buff Your Nails: Lightly buff the surface of your nails with a fine-grit buffer. This removes any ridges, creates a smooth surface for polish adhesion, and removes excess oils. Be gentle; over-buffing can weaken your nails.
- Cleanse and Dry: Wash your hands thoroughly with soap and water to remove any dust or debris. Ensure your nails are completely dry before proceeding. A final swipe with a nail polish remover can help remove any lingering oils.
Mastering the Ombre Gradient: The Foundation of Your Design
The ombre effect is the base upon which your heart design will sit. Patience and a light hand are key.
- Apply Base Coat: Apply a thin, even layer of your chosen base coat to each nail. Allow it to dry completely. This is non-negotiable for nail health and polish longevity.
- Apply the First Color (Lighter Shade): Apply one or two thin coats of your lighter nail polish color across the entire nail. Let each coat dry thoroughly. A solid base color provides a smooth transition for the gradient.
- Prepare Your Sponge: Take your cut makeup sponge piece. It’s helpful to slightly dampen the sponge with water and then gently squeeze out the excess. This can help the polish adhere better and create a softer blend.
- Create the Gradient on the Sponge:
- Apply a stripe of your lighter color along one edge of the sponge.
- Next to it, apply a stripe of your darker color, touching or slightly overlapping the first stripe.
- If you are using a third color for the deepest part of the gradient, apply a stripe of that color next to the second stripe.
- Begin the Ombre Application: Gently dab the sponge onto your nail, starting from the cuticle area and moving upwards towards the tip. Apply light to medium pressure, allowing the colors to blend on the nail.
- Reapply Polish to Sponge: After each application on the nail, you will likely need to reapply fresh polish to the sponge. Redip the sponge with the color stripes. Continue dabbing and blending until you achieve your desired gradient effect. You might need to build up the color intensity gradually.
- Refine the Gradient: To achieve a smoother transition, you can dab the sponge with a clean section, focusing on blending the colors. Some prefer to dab the sponge onto a clean surface (like a paper towel or a dedicated palette) first to remove excess polish and then gently dab onto the nail.
- Allow to Dry: Let the ombre gradient dry completely. This is crucial before moving on to the heart application, otherwise, you risk smudging the blend.
Creating the Perfect Ombre Heart
This is where the artistry comes in. Precision is key for a clean and impactful heart.
- Choose Your Heart Color: Select a nail polish color that will stand out against your ombre background. This could be a classic red, a bold pink, a shimmering gold, or even a black for a dramatic effect.
- Method 1: The Dot and Drag (Recommended for Beginners)
- Dip your small nail art brush or toothpick into your chosen heart color.
- On the nail where you want the heart to be (typically near the cuticle or in the center of the nail), create two small dots close together. These will form the top curves of your heart.
- Using the brush or toothpick, gently drag the polish downwards from the inner edge of each dot to create the V-shape of the heart.
- Connect the two downward strokes at the bottom to form the point of the heart.
- Fill in the heart shape with more polish if needed, ensuring smooth edges.
- Method 2: The Single Stroke (More Advanced)
- Dip your fine-tipped nail art brush into the heart color.
- Start by making a small curved stroke for one side of the top of the heart.
- Without lifting the brush, make a second curved stroke to meet the first, forming the top dip of the heart.
- Continue by drawing a slightly curved line downwards from the outer edge of each top curve to create the sides of the heart.
- Finally, bring the two lines together at the bottom to create the point.
- This method requires a steadier hand and practice but can result in very refined hearts.
- Placement and Size: Consider the placement and size of your hearts. They can be small and delicate, or larger and bolder. For a truly "ombre heart" effect, you might want to place the heart on a section of the nail where the ombre colors are most blended and appealing. You can apply a heart to every nail, or just accent nails.
Cleaning Up for a Professional Finish
Neatness is paramount for a polished look. Don’t skip this step.
- Clean Edges: Use a small brush dipped in nail polish remover to carefully clean up any stray polish from your skin around the nail. This is where a fine-tipped brush or an angled brush is invaluable. Dip the brush in remover and gently trace around the cuticle and sidewalls of your nail to create sharp, clean lines.
- Address Smudges: If you accidentally smudge your ombre or heart design, use a small amount of nail polish remover on a fine brush to gently correct the mistake. It’s often easier to fix small smudges while the polish is still slightly wet.
Sealing the Deal: The Top Coat and Final Touches
The top coat is your final layer of defense and shine.
- Apply Top Coat: Once the heart design is completely dry, apply a generous layer of your high-shine top coat over the entire nail. Ensure you cap the free edge (the tip of your nail) by running the brush along the edge. This helps prevent chipping and prolongs the life of your manicure.
- Allow to Dry: Let the top coat dry completely. This might take a few minutes, especially if you used a quick-dry formula. Avoid touching anything with your nails during this time.
- Apply Cuticle Oil (Optional): Once your nails are dry to the touch, massage a small amount of cuticle oil into the skin around your nails. This rehydrates the skin and cuticles, giving your manicure a finished, healthy appearance.
Troubleshooting Common Ombre Heart Mani Issues
Even with careful execution, you might encounter a few common hurdles.
- Streaky Ombre: If your ombre looks streaky, you might not be using enough polish on your sponge, or you’re not dabbing with enough pressure. Try applying more color to the sponge and dabbing with a slightly firmer hand. Building up the color in thin layers is often better than trying to achieve it in one go.
- Harsh Lines: If the transition between your ombre colors is too abrupt, use a clean section of the sponge or a slightly damp sponge to gently blend the colors together. You can also use a fine brush with a tiny bit of polish remover to feather the edges.
- Smudged Hearts: This usually happens when the base ombre hasn’t dried sufficiently before applying the heart, or when the heart polish is applied too thickly. Ensure each layer is dry before proceeding. If a smudge occurs, a fine brush with remover can help correct it. Sometimes, adding another layer of top coat can help smooth out minor smudges once dry.
- Uneven Heart Shape: Practice makes perfect! If your heart isn’t perfect, don’t worry. For beginners, the dot-and-drag method is generally more forgiving. For more advanced users, a steady hand and a good quality fine-tipped brush are essential. You can always refine the shape with a cleanup brush.
- Bubbles in Polish: Bubbles can occur if the polish is applied too thickly, or if the brush is agitated too much during application. Apply polish in thin, even coats and avoid excessive brushing. Ensure your polish bottles aren’t old and thick; thin them with a dedicated thinner if necessary.
SEO Keywords and Phrases for "Ombre Heart Mani DIY"
To maximize the reach of this article, here are some relevant SEO keywords and phrases:
- DIY ombre heart nails
- How to do ombre heart manicure
- Easy ombre heart nail art
- Gradient heart nail tutorial
- Heart ombre nails at home
- Step-by-step ombre heart mani
- DIY nail art hearts
- Ombre nail tutorial for beginners
- Heart nail design at home
- Love heart ombre nails
- French ombre heart nails
- Pink ombre heart nails
- Red ombre heart nails
- Nail art sponge ombre
- DIY Valentine’s Day nails
- Romantic nail art ideas
- Gradient nail art techniques
- How to apply ombre polish
- Creating heart shapes on nails
- Best tools for ombre nails
By following these detailed steps and tips, you can confidently create a stunning DIY ombre heart manicure that rivals any professional salon service. Experiment with different color combinations and heart placements to personalize your look and express your unique style.
