DIY Cake Dome Cloche Jars: Elevate Your Baking Presentation and Food Storage
Transforming ordinary glass jars into elegant cake dome cloches offers a budget-friendly and creative solution for both showcasing baked goods and preserving their freshness. This comprehensive guide delves into the DIY process, materials, techniques, and aesthetic possibilities of crafting your own cake dome cloche jars. Beyond mere aesthetics, these repurposed vessels provide practical benefits, offering a charming alternative to expensive store-bought options and a sustainable way to reduce waste. Whether you’re a seasoned baker looking to elevate your presentation or a DIY enthusiast seeking a rewarding project, understanding the principles behind creating these versatile cloches is key to unlocking their full potential.
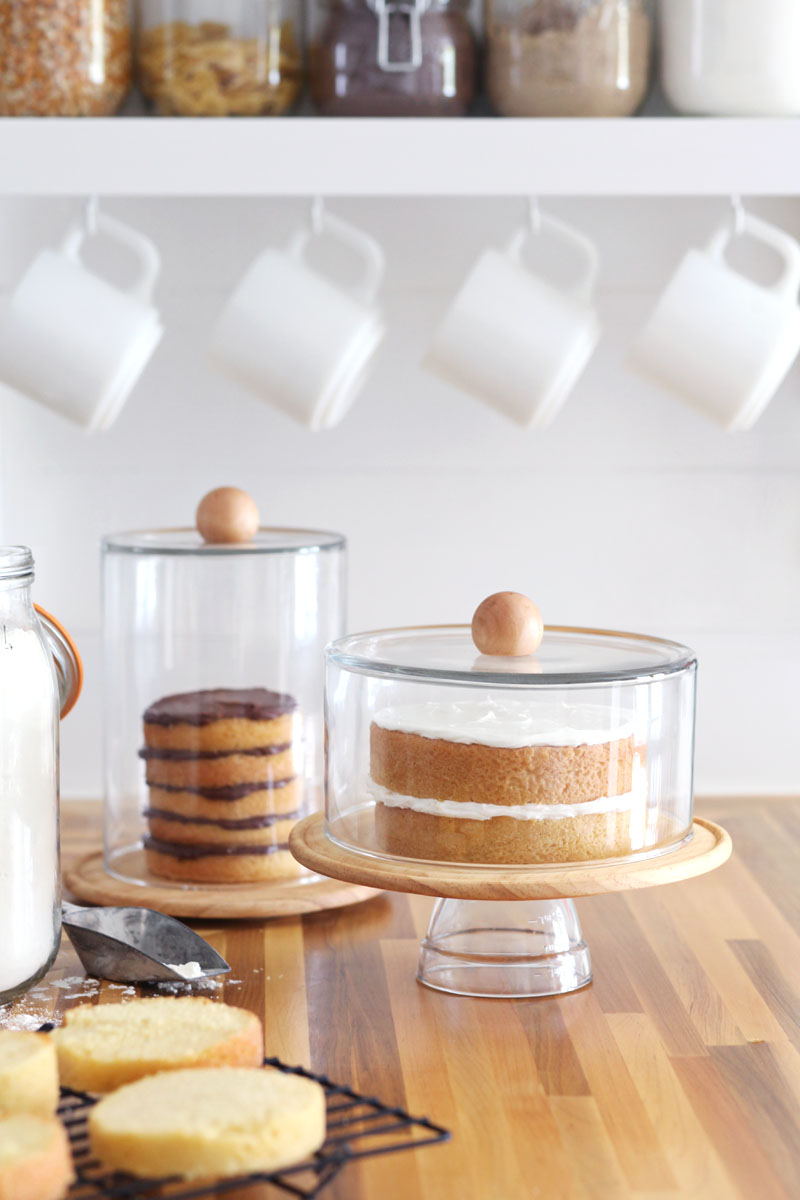
The core concept of a DIY cake dome cloche jar revolves around modifying an existing glass container to serve a dual purpose. Traditionally, cloches are bell-shaped covers designed to protect delicate plants from the elements or to display food items in an elegant manner. By adapting this concept to jars, we create a miniature, portable display and storage solution for individual desserts, pastries, or even small savory bites. The key lies in finding suitable jars and then employing simple modifications to create a secure, aesthetically pleasing dome. The beauty of this DIY approach lies in its adaptability. There’s no single "right" way to make a cake dome cloche jar; the design can be tailored to your personal style, the types of desserts you create, and the materials you have readily available. This flexibility ensures that each cloche will be unique and perfectly suited to its intended use.
Materials are fundamental to the success of any DIY project, and for cake dome cloche jars, a few key components are essential. The primary element is a glass jar with a wide mouth and a relatively straight body. Mason jars, particularly those with a capacity of a pint or quart, are excellent candidates due to their sturdy construction and readily available lids. However, other glass containers with similar dimensions, such as repurposed pickle jars, jam jars, or even certain apothecary jars, can also be utilized. The lid is crucial for creating the dome effect. This can be achieved using a second, identical jar lid, a flat wooden disc, a ceramic coaster, or even a piece of sturdy cardboard covered in decorative material. The choice of lid material will significantly influence the overall aesthetic of the cloche. For instance, a rustic wooden disc will lend a country charm, while a polished ceramic coaster might offer a more contemporary feel.
Beyond the glass jar and lid, you’ll need various tools and embellishments to personalize your cloche. Adhesive is vital for securing the lid to the jar and for attaching decorative elements. Hot glue guns are highly effective for quick and strong bonds, especially when working with wood or fabric. For a more refined finish, epoxy or E6000 glue can be used, offering superior durability and a less visible seam. Paint is a primary means of customization. Acrylic paints are versatile and come in a vast array of colors, suitable for both the lid and any decorative components. Specialty paints, such as metallic or chalk paints, can add unique textures and finishes. Beyond paint, consider decorative hardware like knobs or pulls for the lid, which not only enhance the visual appeal but also provide a functional element for lifting the cloche. Ribbon, lace, twine, or fabric scraps can be incorporated for a softer, more textured look. Small embellishments like faux flowers, beads, or vintage findings can further elevate the cloche’s design.
The construction process for DIY cake dome cloche jars can be broken down into several manageable steps. Begin by thoroughly cleaning and drying your chosen glass jar. This ensures a clean surface for painting or adhesion. If you intend to paint the jar, consider applying a primer specifically designed for glass to ensure optimal adhesion and a smooth finish. Once primed, you can apply your chosen paint colors. For a more intricate design, stencils can be used, or freehand painting can be employed to create patterns or motifs. Allow each layer of paint to dry completely before proceeding to the next.
The lid is where much of the creative expression for your cloche will manifest. If using a second jar lid, you can paint it to match the jar or create a contrasting effect. For wooden discs or ceramic coasters, ensure they are of a suitable size to cover the jar’s opening securely. These can also be painted, stained, or decoupaged with paper or fabric. The attachment of a decorative knob or pull to the center of the lid is a common and effective enhancement. Drill a small pilot hole through the center of the lid if necessary, and then secure the knob using a screw and nut from the underside. Ensure the knob is positioned so it doesn’t interfere with the lid’s ability to rest securely on the jar.
Once the jar and lid are prepared and decorated, it’s time to bring them together. The method of attachment depends on the desired outcome. For a permanent cloche, apply a strong adhesive, such as epoxy or E6000, to the rim of the jar and carefully press the prepared lid onto it. Ensure an even application of glue to create a good seal. For a cloche that can be easily separated for cleaning or for different lid options, consider using a strong double-sided adhesive tape on the rim of the jar, or simply allowing the lid to rest snugly on top without permanent attachment. This latter option is particularly suitable if your lid fits perfectly and provides enough friction to stay in place. If using a second jar lid as the base and the original lid as the knob, you would glue the second lid to the jar rim and then attach the original lid (flipped upside down) to the center of the second lid to create the dome shape.
The decorative possibilities for DIY cake dome cloche jars are virtually endless, allowing for complete personalization. Consider themes for special occasions. For a rustic wedding, burlap and lace accents might be appropriate. For a child’s birthday, bright colors and playful designs would be fitting. Vintage-inspired cloches can be created using muted color palettes, distressed paint techniques, and antique-style knobs. For a modern aesthetic, clean lines, geometric patterns, and metallic finishes would be ideal. Decoupage offers another avenue for creativity. Using patterned scrapbook paper, old maps, or even pages from vintage books, you can create intricate and unique designs on your lid. Applying a sealant, such as Mod Podge or a clear acrylic spray, over the decoupage will protect the design and provide a durable finish.
Beyond visual appeal, the practical applications of DIY cake dome cloche jars extend to food preservation and presentation. When used to cover individual cakes, cupcakes, or pastries, they create an attractive display that also helps to keep the treats fresh. The sealed environment helps to prevent them from drying out and protects them from dust or airborne contaminants. For larger baked goods, a modified cloche made from a wider-mouthed jar or even a repurposed glass bowl with a fitted base can be created. This is particularly useful for keeping pies, tarts, or even small loaves of bread fresh on the counter.
Sustainability is another significant advantage of this DIY project. By repurposing glass jars that might otherwise be discarded, you are contributing to waste reduction and promoting a more environmentally conscious approach to baking and decorating. This not only saves you money but also reduces your environmental footprint. The satisfaction derived from creating something beautiful and functional from discarded materials is a rewarding aspect of this endeavor.
When considering the types of desserts best suited for cloche presentation, think about items that benefit from individual servings or those with visually appealing toppings. Cupcakes, small cakes, brownies, cookies, and even individual trifles are excellent choices. For savory items, consider mini quiches, individual gratins, or even small charcuterie pairings. The cloche elevates the perception of the food, making even a simple treat feel like a special indulgence.
The choice of jar size is a critical factor to consider based on the intended use. Pint-sized jars are perfect for single cupcakes or small muffins. Quart-sized jars can accommodate larger cupcakes, small cakes, or multiple cookies. For larger items, you might need to think outside the traditional Mason jar and consider larger repurposed glass containers. The key is to ensure the jar is wide enough to comfortably house the dessert and tall enough to prevent the topping from touching the lid.
Safety considerations are paramount, especially when working with glass. Always handle glass jars with care to avoid breakage. When painting or gluing, ensure you are in a well-ventilated area. If drilling is required, wear safety glasses. When using hot glue, be mindful of the hot nozzle and glue to prevent burns. For any permanent adhesive, follow the manufacturer’s instructions and ensure proper curing time before using the cloche for food storage.
The longevity of your DIY cake dome cloche jars will depend on the quality of materials used and the care they receive. Painted surfaces may chip or scratch over time, especially with frequent use and washing. If this occurs, touch-up painting can easily restore their appearance. Jars that are hand-washed with mild soap and water will generally last longer than those subjected to the harsh conditions of a dishwasher. If the lid is not permanently attached, it can be washed separately, which simplifies cleaning and extends the life of the painted components.
For those seeking to professionalize their creations, consider investing in higher-quality paints and sealants designed for durability. Specialty glass paints offer a more robust finish that is less prone to chipping. Clear spray sealants can provide an extra layer of protection for painted surfaces. The choice of knob or pull can also impact durability; opting for solid metal hardware will generally be more long-lasting than plastic alternatives.
The SEO potential of this topic is substantial. Using keywords such as "DIY cake dome," "cloche jar tutorial," "upcycled dessert display," "homemade cake cloche," "food storage cloche," "glass jar crafts," and "baking presentation ideas" will attract a relevant audience. The comprehensiveness of this guide, covering materials, steps, customization, and practical applications, positions it as a valuable resource for anyone interested in creating their own cake dome cloche jars.
The versatility of DIY cake dome cloche jars extends beyond individual desserts. They can be incorporated into tiered dessert stands, used as part of a centerpiece, or even gifted as unique and personalized presents. The ability to customize the design to match specific themes or color schemes makes them incredibly adaptable for various events, from intimate gatherings to larger celebrations. Imagine a wedding dessert table adorned with a collection of cloches, each holding a miniature bridal shower cake or a selection of gourmet cookies. The visual impact would be stunning and deeply personal.
Furthermore, the educational aspect of this DIY project is valuable. It teaches individuals about repurposing, creative problem-solving, and the satisfaction of making things with their own hands. It encourages a mindful approach to consumption and highlights the potential hidden within everyday objects. The process itself can be a relaxing and enjoyable pastime, offering a creative outlet for stress relief and personal expression.
In conclusion, the DIY cake dome cloche jar is a project that offers a rich blend of creativity, practicality, and sustainability. By understanding the fundamental principles, carefully selecting materials, and employing thoughtful techniques, anyone can transform simple glass jars into elegant and functional pieces that enhance both the presentation and preservation of baked goods. The endless customization options ensure that each cloche can be a unique reflection of the creator’s style and the occasion for which it is intended. This guide provides a comprehensive foundation for embarking on this rewarding DIY journey, empowering individuals to elevate their baking and embrace a more resourceful approach to decor and food storage.