
DIY mini pinch pot planters sets the stage for this enthralling narrative, offering readers a glimpse into a story that is rich in detail and brimming with originality from the outset. Imagine transforming a humble lump of clay into a delightful miniature planter, brimming with life and personality.
Pinch pot planters, with their charmingly imperfect shapes and rustic appeal, are a testament to the beauty found in handcrafted creations. This guide will lead you through the process of crafting these miniature wonders, from shaping the clay to planting your favorite greenery.
The art of pinch pot creation dates back centuries, with evidence suggesting its origins in ancient civilizations. This technique, involving shaping clay with your hands, is both intuitive and rewarding. While pinch pots have traditionally been used for functional purposes like bowls and cups, their adaptability makes them perfect for creating adorable planters.
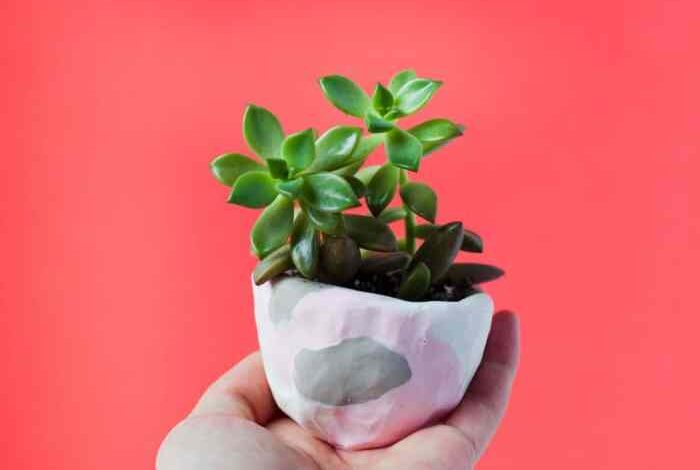
These tiny vessels add a touch of whimsy and personality to any space, making them ideal for showcasing small succulents, herbs, or even tiny flowering plants.
DIY Mini Pinch Pot Planters

There’s a certain charm to crafting your own planters, especially when they’re miniature works of art. DIY mini pinch pot planters offer a delightful way to bring a touch of nature and creativity to your home. This ancient technique, dating back thousands of years, is surprisingly easy to master, and the results are incredibly versatile.
History of Pinch Pots
Pinch pot techniques are among the oldest known pottery methods. Archaeological evidence suggests that they were used as early as 10,000 BC, with examples found in ancient civilizations across the globe. The simplicity of the method, requiring only clay and hands, made it a popular choice for early potters.
The technique involves shaping clay by pinching it between your fingers and thumbs, gradually forming a vessel.
Making DIY mini pinch pot planters is a great way to unwind and get creative. It’s a reminder that even in the face of demanding work, like that of a mental health cybersecurity analyst , finding simple joys and taking time for yourself can be incredibly beneficial.
Just like these tiny planters add a touch of life to your space, taking care of your mental well-being can help you flourish in all aspects of your life. So, grab some clay and get crafting!
Benefits of Using Mini Pinch Pots for Planting
Mini pinch pots offer a unique and practical solution for planting small succulents, herbs, and other miniature plants. Here’s why they’re gaining popularity:
- Aesthetic Appeal:The handcrafted nature of pinch pots adds a touch of rustic charm and individuality to your plant displays. Their irregular shapes and imperfections create a unique and visually appealing contrast with the lush greenery of the plants.
- Versatility:You can create a variety of sizes and shapes, making them perfect for showcasing different types of plants. Their small size also allows you to arrange multiple planters in a single space, creating a miniature garden.
- Cost-Effective:Clay is a relatively inexpensive material, making it a budget-friendly option for creating your own planters.
- Easy to Make:The pinch pot technique is surprisingly simple to learn, even for beginners. With a little practice, you can create beautiful and functional planters in no time.
Materials and Tools
Getting started with DIY mini pinch pot planters requires a basic set of materials and tools. This section will Artikel the essential items, their properties, and how they are used in the process.
Clay Types, Diy mini pinch pot planters
Clay is the foundation of your pinch pots. Selecting the right clay type is crucial for achieving the desired outcome.
- Air-dry Clay:This clay is ideal for beginners as it doesn’t require firing in a kiln. It dries naturally in the air, making it a convenient option for experimentation. Air-dry clay is typically lightweight and comes in various colors. However, it is not as durable as fired clay and may be prone to cracking or breaking if exposed to moisture.
- Polymer Clay:Polymer clay is another oven-bake option that offers a wide range of colors and textures. It is known for its durability and versatility. However, polymer clay can be slightly more expensive than air-dry clay. Polymer clay is often used for detailed work and intricate designs.
- Ceramic Clay:Ceramic clay requires firing in a kiln to harden and become waterproof. It is the most durable option and offers a wide range of firing temperatures and finishes. Ceramic clay is available in various colors and textures. It is commonly used for functional pottery, including planters.
Glazes and Finishes
Glazes are decorative coatings applied to ceramic clay before firing. They add color, texture, and a protective layer to the pottery.
- Glaze:Glazes come in a wide range of colors and finishes, from glossy to matte. They are typically applied in thin layers and fired in a kiln. Some glazes are specifically designed for planters, offering durability and water resistance.
- Stains:Stains are concentrated pigments that are mixed with water or a medium and applied to clay before firing. They are used to add color to the surface of the clay. Stains are often used for creating patterns and designs.
- Varnish:Varnish is a protective coating applied to air-dry or polymer clay after it has dried or baked. It adds a glossy finish and helps to seal the surface, making it more durable and water-resistant.
Pottery Tools
Pottery tools are essential for shaping and refining the clay. They come in various sizes and shapes to suit different needs.
- Pinch Pot Tools:These tools are specifically designed for creating pinch pots. They often have rounded ends to help shape the clay and smooth out any rough edges. Pinch pot tools can be made of wood, metal, or plastic.
- Sculpting Tools:These tools are used for adding details and shaping the clay. They come in various shapes and sizes, such as loops, needles, and spatulas. Sculpting tools can be made of metal, plastic, or wood.
- Rib Tools:Rib tools are used to smooth and refine the surface of the clay. They have a curved blade that helps to create even surfaces. Rib tools can be made of metal or plastic.
Drying Racks
Drying racks are used to support the clay pieces as they dry. This prevents warping and cracking.
- Wire Racks:Wire racks are a common and affordable option for drying clay. They allow for good air circulation and prevent the clay from sticking to the surface.
- Wooden Racks:Wooden racks are a more durable option and can be used for drying larger pieces of clay. They often have a smooth surface to prevent the clay from sticking.
- Ceramic Tiles:Ceramic tiles can be used as drying surfaces for smaller clay pieces. They provide a flat and smooth surface that is easy to clean.
Pinch Pot Techniques

Pinch pots are a fundamental pottery technique that involves shaping clay by hand. This method is perfect for creating simple yet charming planters, especially for beginners. You’ll learn the basics of pinch pot creation, including shaping, smoothing, and drying techniques.
Shaping the Pinch Pot
The process of shaping a pinch pot begins with a small ball of clay.
- Start with a Ball:Begin by rolling a ball of clay in your hands, ensuring it’s evenly rounded and smooth. The size of the ball determines the size of your pinch pot.
- Create a Base:Gently press your thumb into the center of the clay ball, creating a small indentation. This indentation will serve as the base of your pinch pot.
- Pinch and Shape:With your thumb inside the indentation, use your index finger and thumb to gently pinch the clay outward, expanding the opening. As you pinch, rotate the clay ball to create a symmetrical shape.
- Gradually Expand:Continue pinching and rotating the clay, gradually expanding the opening and shaping the sides of your pinch pot. You can create a variety of shapes, from simple cylinders to more elaborate forms.
Decorating and Personalizing: Diy Mini Pinch Pot Planters
Now that you have your mini pinch pots ready, it’s time to unleash your creativity and turn them into unique works of art! Decorating these planters allows you to express your personal style and add a touch of charm to your plants.
Painting Techniques
Painting is a versatile and popular way to decorate mini pinch pots. You can use acrylic paints, which are durable and water-based, or enamel paints for a glossy finish. Acrylic paints come in a wide range of colors and can be easily mixed to create custom shades.
DIY mini pinch pot planters are a fun and easy way to add a touch of greenery to your home. While I’m crafting these little pots, I often find myself browsing articles like the one on gamesbeat profile samsung next about the latest tech innovations.
It’s amazing how technology can inspire creativity, and I love seeing how it’s influencing the world of gardening, too. Perhaps one day we’ll have mini pinch pot planters that can water themselves!
- Solid Colors:Choose a single color to paint your entire pot for a minimalist and modern look. Consider earthy tones like terracotta or sage green for a natural feel, or vibrant colors like turquoise or yellow for a cheerful touch.
- Patterns and Designs:Get creative with patterns and designs using stencils, brushes, or even sponges. Geometric patterns, polka dots, stripes, and floral motifs are all popular choices.
- Ombre Effects:Create a gradual transition between two or more colors for a visually appealing ombre effect. Start with a darker shade at the bottom of the pot and gradually blend it into a lighter shade at the top.
Glazing Techniques
Glazing adds a protective layer to your pinch pots and gives them a smooth, shiny finish. Glazes are available in a variety of colors, textures, and finishes, allowing you to customize the look of your planters.
- Clear Glaze:A clear glaze enhances the natural color and texture of the clay, providing a glossy and protective coating.
- Colored Glaze:Colored glazes add a vibrant hue to your pinch pots, creating a bold and eye-catching effect. You can choose from a wide range of colors, from classic white and black to vibrant blues and greens.
- Crackle Glaze:Crackle glaze creates a unique and textured finish, with fine cracks appearing on the surface. The cracks can be accentuated with a contrasting color, adding another layer of depth to the design.
Embellishments
Embellishments add a touch of personality and whimsy to your mini pinch pots. There are countless options to choose from, allowing you to create planters that truly reflect your style.
- Stamps:Use rubber stamps to create repeating patterns or designs on your pots. Choose stamps with floral motifs, geometric shapes, or whimsical characters for a personalized touch.
- Stencils:Stencils offer a precise way to create intricate designs. Apply paint through the stencil to create clean lines and sharp edges. Stencils are available in a variety of themes, from classic patterns to contemporary designs.
- Beads and Charms:Add beads, charms, or other decorative elements to the rims of your pots for a touch of sparkle and personality. You can use beads in various colors, shapes, and materials to create a unique look.
- Natural Elements:Incorporate natural elements like dried flowers, moss, or shells into your designs. These elements add a touch of nature and create a rustic or coastal feel.
Planting and Care
Now that your mini pinch pot planters are ready, it’s time to bring life to them with beautiful plants. Choosing the right plants and ensuring proper care are crucial for their thriving.
DIY mini pinch pot planters are a fun and easy way to add a touch of green to your home. They’re perfect for succulents, herbs, or even small flowers. Once you’ve made your planters, you can personalize them with paint, stamps, or even a fun mosaic design.
For a unique touch, try adding magnets to the bottom of your planters and creating a magnetic photo puzzle, like the one described in this easy magnetic photo puzzle tutorial. The magnets will allow you to display your planters on a magnetic board or fridge, making them a conversation starter.
Preparing Mini Pinch Pots for Planting
Before planting, it’s important to prepare your mini pinch pots to ensure proper drainage and a healthy environment for your plants.
- Drainage:Mini pinch pots, due to their small size, are prone to waterlogging. To prevent this, ensure each pot has a drainage hole at the base. You can create a drainage hole by poking a small hole in the bottom with a skewer or a small nail.
- Soil Selection:Use a well-draining potting mix specifically designed for container plants. These mixes are formulated to retain moisture while allowing excess water to drain away. Avoid using garden soil, as it can be too dense and hold too much moisture, leading to root rot.
Suitable Plant Choices
Choosing the right plants for your mini pinch pots is crucial, as they will have limited space for root growth and require careful attention.
- Succulents:Succulents, like Echeveria, Sedum, and Haworthia, are popular choices for mini planters. They thrive in well-drained soil and require minimal watering, making them perfect for beginner plant owners.
- Herbs:Miniature herbs, such as thyme, rosemary, and oregano, can be grown in mini pinch pots, adding a touch of culinary charm to your space.
- Air Plants:Air plants, like Tillandsia, require no soil and absorb nutrients and moisture from the air. These unique plants are ideal for mini planters as they need minimal care and add a touch of whimsy.
Watering and Fertilizing
Watering and fertilizing mini planters requires a delicate balance.
- Watering:Water your mini planters when the soil is dry to the touch. Avoid overwatering, as it can lead to root rot. During the winter months, you may need to water less frequently.
- Fertilizing:Use a diluted liquid fertilizer specifically designed for container plants. Fertilize your plants every few weeks during the growing season (spring and summer) to provide them with essential nutrients.
Design Ideas and Inspiration
Now that you’ve mastered the art of pinch pot creation, it’s time to unleash your creativity and design unique planters that reflect your style. There are endless possibilities when it comes to decorating and personalizing your mini pinch pots, from rustic charm to modern elegance.
Design Ideas and Inspiration
Here are some creative ideas to spark your imagination and inspire your next pinch pot project:
| Image | Description | Key Features |
|---|---|---|
| Imagine a pinch pot with a rustic, earthy feel. The pot is painted in a warm brown hue with subtle brushstrokes to mimic the texture of weathered wood. A small, delicate succulent is planted inside, adding a touch of green to the natural aesthetic. | Rustic Charm | Earthy tones, textured paint, natural elements |
| Envision a sleek and modern pinch pot, painted in a glossy black with a smooth, polished finish. A single, vibrant cactus is planted inside, adding a pop of color against the dark background. | Modern Elegance | Bold colors, smooth surfaces, minimalist design |
| Picture a playful and whimsical pinch pot, adorned with bright, cheerful colors and whimsical patterns. Tiny flowers are planted inside, creating a delightful miniature garden. | Whimsical Delight | Bright colors, playful patterns, miniature plants |
| Contemplate a pinch pot with a geometric design, featuring clean lines and sharp angles. A small, low-maintenance air plant is planted inside, adding a touch of greenery to the minimalist aesthetic. | Geometric Precision | Geometric shapes, clean lines, modern design |
Projects and Tutorials

This section provides a collection of step-by-step tutorials to guide you in creating your own unique mini pinch pot planters. Each tutorial offers a distinct design approach, allowing you to explore various techniques and personalize your planters.
Mini Pinch Pot Planter with Geometric Design
This tutorial focuses on creating a mini pinch pot planter with a geometric design, adding a touch of contemporary flair. The geometric pattern is achieved using a simple tool like a fork or a chopstick.The process involves the following steps:
- Start by creating a basic pinch pot, ensuring the base is sturdy and even.
- Once the pinch pot has dried slightly, use a fork or a chopstick to create a series of indentations around the pot’s exterior.
- Continue adding indentations in a repeating pattern, forming a geometric design.
- Allow the pinch pot to fully dry before decorating it with your desired color scheme.