DIY Mini Pinch Pot Planters: A Guide to Crafting Tiny Terracotta Treasures
Mini pinch pot planters offer a charming and accessible entry point into the world of pottery and plant propagation. These diminutive vessels, created through a simple hand-building technique, are perfect for housing succulents, small herbs, air plants, or even acting as decorative holders for other small items. Their compact size makes them ideal for windowsills, desks, or any small space that could benefit from a touch of green. This comprehensive guide will walk you through the entire DIY process, from selecting the right clay to adding the finishing touches, ensuring you can create a collection of unique and functional mini pinch pot planters. The SEO focus of this article centers on keywords such as "DIY mini planters," "pinch pot pottery," "small plant pots," "terracotta planters," "succulent pots," "air plant holders," "beginner pottery," and "handmade planters."
The fundamental technique for creating a pinch pot is deceptively simple, relying on the manipulation of a ball of clay with just your hands. Begin by acquiring suitable clay. Air-dry clay is an excellent choice for beginners as it requires no kiln firing and hardens naturally, making it readily available and easy to work with. Polymer clay is another option, offering a wider range of colors and requiring baking in a standard oven to cure. For a more traditional ceramic experience, earthenware or stoneware clay can be used, but this necessitates access to a kiln for firing. For this guide, we will primarily focus on air-dry clay due to its accessibility. When purchasing air-dry clay, look for brands that are specifically designed for crafting and model making. Different clays have varying drying times and shrinkage rates, so understanding your chosen material is crucial. Before you begin, ensure you have a clean, flat work surface. A piece of canvas or an old cloth can prevent the clay from sticking. You’ll also need a small bowl of water, a sponge, and potentially some basic sculpting tools like a wooden skewer, a needle tool, or a small craft knife, though these are not strictly necessary for basic pinch pots.
To start, take a manageable piece of air-dry clay, roughly the size of a golf ball or slightly larger, depending on your desired planter size. Roll this piece of clay into a smooth, uniform ball between your palms. The key to a good pinch pot lies in this initial spherical form. Ensure there are no major air bubbles trapped within the clay. You can gently tap the ball on your work surface to encourage any small pockets of air to escape. Once you have a well-formed ball, it’s time to begin the pinching process. This is where the "pinch" in pinch pot truly comes into play.
Place the clay ball in the palm of one hand. Using the thumb of your other hand, gently press down into the center of the clay ball, creating an indentation. Do not push all the way through to the bottom; aim to leave a base thickness of at least ¼ inch. This initial indentation is the foundation of your pot. Now, the pinching begins. Slowly and deliberately begin to pinch the clay between your thumb (on the inside) and your fingers (on the outside). Rotate the clay ball as you pinch, moving your thumb and fingers around the circumference. The goal is to gradually expand the opening while thinning the walls of the pot. Work slowly and evenly. If you find the clay sticking to your fingers, dip them lightly in water. However, avoid over-watering the clay, as too much water can make it sticky and difficult to control, and can lead to cracking during drying.
The beauty of pinch pots lies in their organic, imperfect nature. Don’t strive for perfect symmetry; embrace the slight variations and textures that arise from your hands. As you pinch, pay attention to the wall thickness. Aim for consistency throughout. If one area becomes too thin, you can gently press and reshape it. Conversely, if a section is too thick, continue to pinch and thin it out. The process is iterative. You will likely go back and forth, pinching, rotating, and refining the shape. The opening of the pot can be adjusted to your liking. You can create a wide, shallow bowl or a taller, narrower cylinder. Experiment with different finger placements and pressure to achieve the desired form.
Once you are satisfied with the overall shape and the consistency of the walls, it’s time to refine the rim. The rim of your pinch pot can be left natural and slightly uneven, or you can smooth it out for a more finished look. To smooth the rim, you can use the edge of your thumb or a damp sponge to gently glide along the top edge, creating a cleaner line. You can also use a craft knife or a wooden skewer to trim away any excess clay and create a more precise edge. Remember, this is a miniature planter, so the scale of your refinements should be proportionate.
Before allowing your mini pinch pot planter to dry, it’s essential to ensure it has a drainage hole. This is critical for plant health, preventing root rot. You can create a drainage hole by carefully poking a hole in the center of the base with a skewer, needle tool, or even a blunt pencil. Ensure the hole is large enough to allow water to escape but not so large that soil will fall through. If you are concerned about soil loss, you can place a small piece of mesh screen or a coffee filter at the bottom of the pot before adding soil.
Allow your newly formed pinch pot to dry completely. The drying time will vary depending on the thickness of the clay, the humidity of your environment, and the type of air-dry clay used. This can take anywhere from 24 hours to several days. Place the pot on a flat, well-ventilated surface away from direct sunlight or heat sources, which can cause uneven drying and cracking. You can gently turn the pot periodically to ensure all sides dry evenly. As the clay dries, it will lighten in color. You’ll know it’s dry when it feels hard to the touch and no longer cool or damp.
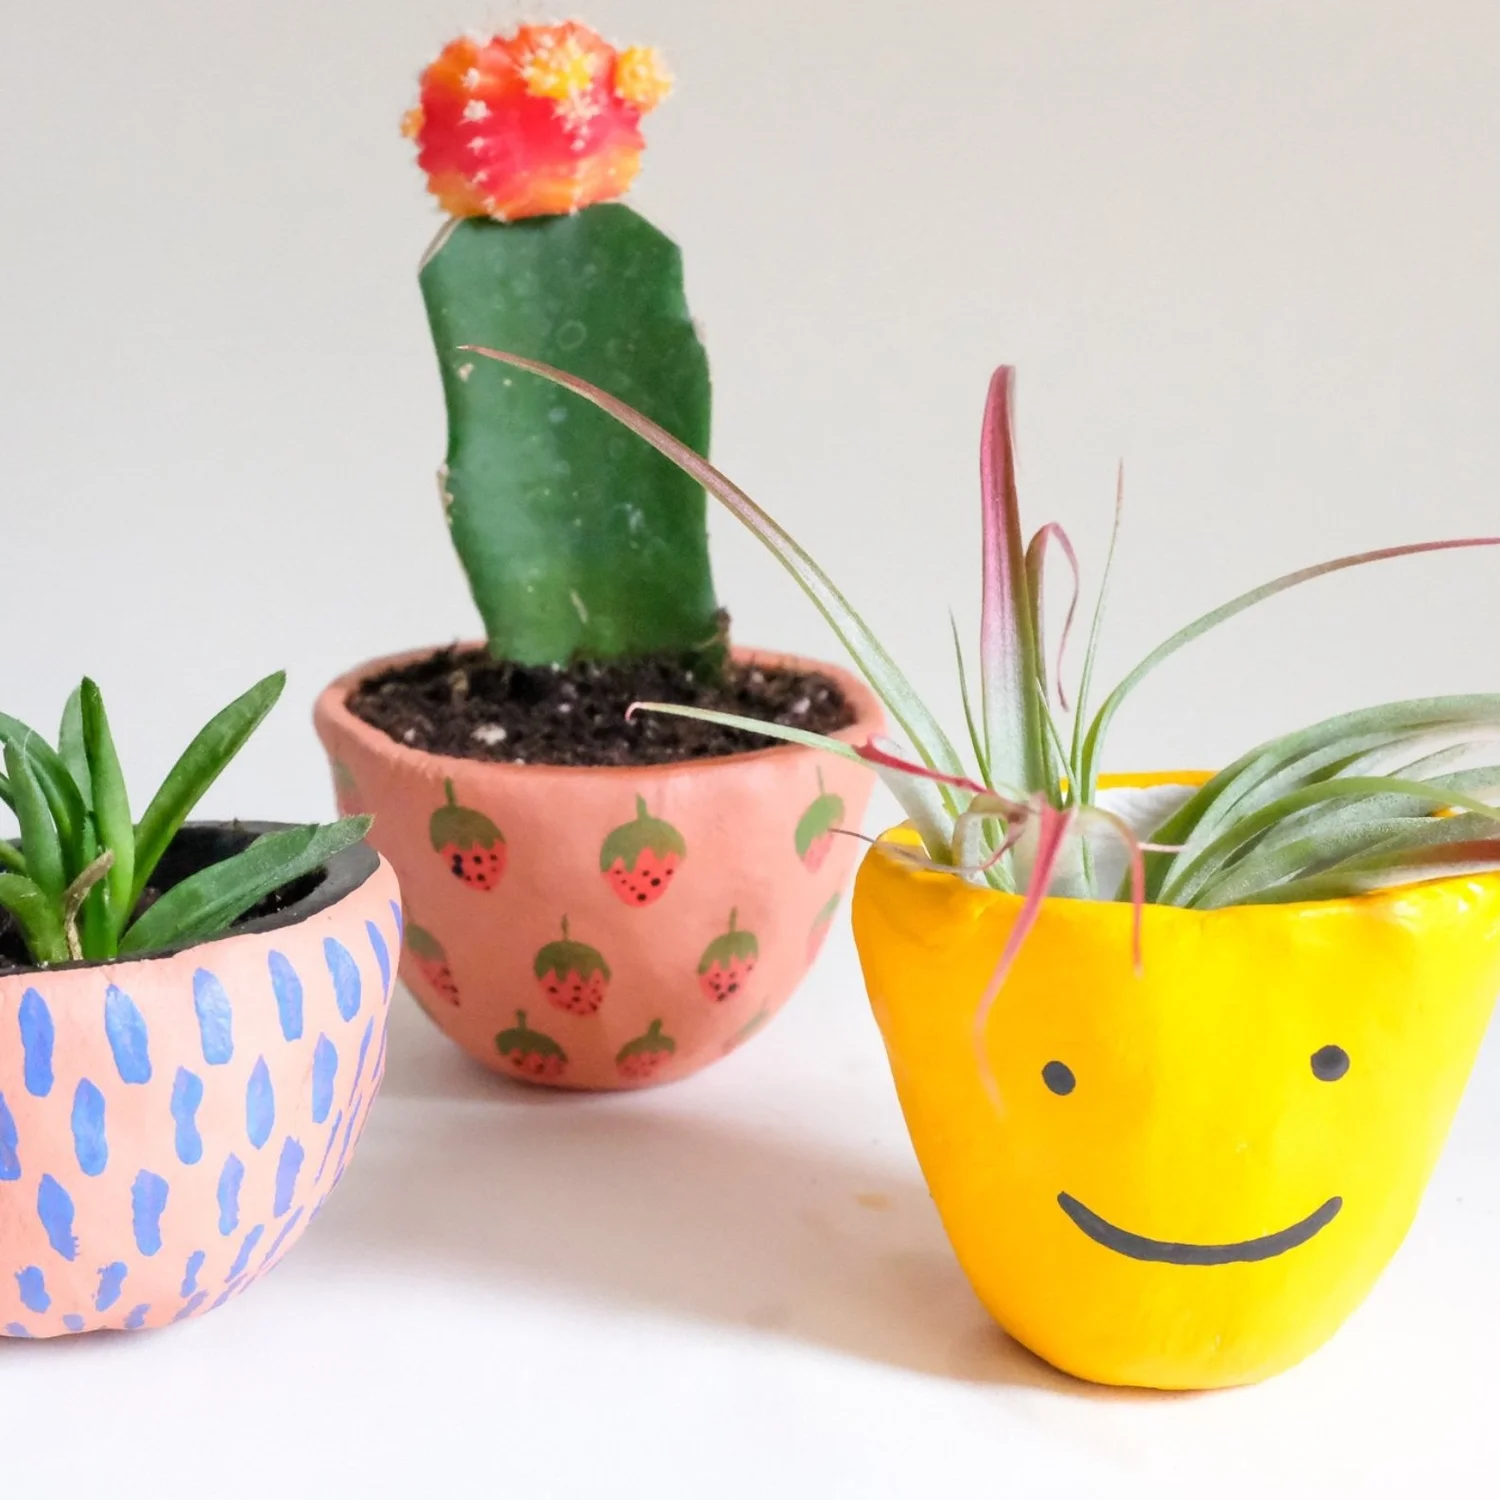
Once your mini pinch pot planter is thoroughly dry, you have a few options for finishing. For a rustic, unadorned look, you can leave it as is. The natural texture of the clay is often appealing. However, for a more decorative finish, you can paint your pinch pots. Acrylic paints are an excellent choice for air-dry clay. They are water-based, easy to clean up, and come in a vast array of colors. Before painting, you may wish to apply a thin layer of gesso or primer to create a smoother surface and help the paint adhere better. You can paint the inside and outside of the pot, or just one or the other. Consider creating patterns, solid colors, or even faux finishes to mimic terracotta or aged ceramic.
After painting, it’s highly recommended to seal your pinch pot planter to protect the paint and the clay from moisture. A clear acrylic sealant, such as a matte or satin varnish, will provide a durable finish. Apply one or two thin coats, allowing each coat to dry completely according to the product’s instructions. This will make your planters more resistant to water damage and easier to clean.
For those using polymer clay, the process of shaping is similar to air-dry clay. However, the curing process is different. Once you have shaped your pinch pot, it needs to be baked in a conventional oven at the temperature and for the duration specified on the polymer clay packaging. Be sure to follow these instructions precisely to ensure the clay cures properly and becomes hard and durable. After baking and cooling, polymer clay planters can be sanded, buffed, and sealed for a smooth, professional finish.
The applications for DIY mini pinch pot planters are extensive. They are ideal for propagating succulent cuttings. Simply insert a cutting into the pot, add a little succulent soil, and water sparingly. These small pots are also perfect for starting herb seedlings, such as basil, parsley, or mint. For air plants, which don’t require soil, these pinch pots serve as attractive decorative holders, allowing their roots to breathe. Beyond plants, they can be used to store small items like paperclips, beads, or earrings, adding a handmade touch to your desk or vanity.
To create a cohesive collection of mini planters, consider working with a theme or a limited color palette. You can also experiment with different textures by adding small indentations with tools or pressing textured objects into the wet clay. Sgraffito, a technique where a layer of contrasting colored clay is applied and then scratched away to reveal the layer beneath, can create intricate designs. Decoupage with small pieces of patterned paper can also add a unique decorative element.
When planting in your DIY mini pinch pot planters, remember their size. Choose plants that are naturally small or that can be kept small through pruning. For succulents, use a well-draining potting mix specifically formulated for them. For herbs, a standard potting mix will suffice. Water your plants according to their individual needs, being mindful of the limited capacity of these small pots. Overwatering is a common pitfall, especially with miniature containers.
The beauty of DIY mini pinch pot planters lies in their simplicity and individuality. Each pot will have its own unique character, reflecting the maker’s touch. They are a testament to the power of simple materials and a little bit of patience. The satisfaction of creating something functional and beautiful with your own hands is immense. This guide has provided the foundational knowledge to embark on your pinch pot journey, from the initial shaping to the final decorative touches. With practice, you will develop your own techniques and create an ever-growing collection of these charming miniature planters, bringing a touch of handcrafted greenery into your life. Experiment, have fun, and enjoy the rewarding process of creating your own tiny terracotta treasures.
