DIY our office desk – the idea itself conjures up images of a personalized, functional, and stylish workspace that perfectly reflects your needs and tastes. Building your own desk isn’t just about saving money, it’s about taking control of your environment and creating a space that truly inspires you.
Imagine crafting a desk that seamlessly blends with your existing décor, offers ample storage for your essentials, and provides the perfect ergonomic support for hours of focused work.
This journey into DIY desk creation will guide you through every step, from planning the perfect design to selecting the right materials and tools. We’ll delve into the advantages of a DIY desk, discuss essential ergonomic considerations, and explore a range of creative design ideas to inspire your own unique project.
The Appeal of DIY Office Desks
The allure of crafting your own office desk is undeniable. It offers a unique blend of creativity, functionality, and personal satisfaction that store-bought options often lack. From the freedom to design a desk that perfectly suits your workspace needs to the pride of building something with your own hands, DIY desk projects have become increasingly popular.
Advantages of DIY Office Desks
Building your own office desk offers several advantages over purchasing a pre-made one. It allows you to customize the desk to your exact specifications, ensuring a perfect fit for your workspace and personal style. This includes tailoring the dimensions, choosing the materials, and incorporating unique features that enhance your workflow and comfort.
Building a DIY office desk is a great way to personalize your workspace and save some money. But after a long day of sawing and sanding, you deserve a treat! Why not try out this amazing crockpot caramel recipe while you admire your handiwork?
It’s the perfect way to unwind and celebrate your DIY success.
- Customization:DIY desks provide unparalleled customization, allowing you to choose the size, shape, materials, and features that best suit your needs and preferences. This includes incorporating specialized storage solutions, cable management systems, and ergonomic elements tailored to your body and work habits.
- Cost Savings:While the initial investment in materials might seem comparable, DIY desks often prove more cost-effective in the long run. You can source high-quality materials at competitive prices, eliminating the markups associated with pre-made furniture.
- Unique Design:DIY desks allow you to express your personal style and create a workspace that reflects your individuality. You can choose unique materials, finishes, and design elements to create a truly one-of-a-kind desk that sets your workspace apart.
- Enhanced Functionality:By designing and building your own desk, you can optimize its functionality to meet your specific needs. This includes incorporating features such as built-in power outlets, adjustable height mechanisms, and specialized storage solutions that enhance your workflow and productivity.
- Learning and Skill Development:DIY projects like building a desk provide valuable learning experiences and opportunities for skill development. You gain practical knowledge in woodworking, carpentry, and design, fostering a sense of accomplishment and enhancing your DIY capabilities.
Motivations for DIY Desk Projects
The reasons behind embarking on a DIY desk project are diverse, ranging from practical considerations to personal fulfillment.
- Budget Constraints:For those on a tight budget, DIY desks offer a cost-effective solution to creating a functional and stylish workspace. Sourcing materials and building the desk yourself can significantly reduce the overall cost compared to purchasing a pre-made option.
- Desire for Customization:Many individuals seek a desk that perfectly aligns with their workspace needs and personal style. DIY projects allow for complete customization, ensuring a desk that fits their space, accommodates their workflow, and reflects their aesthetic preferences.
- Creative Expression:Building a desk provides an outlet for creative expression and allows individuals to showcase their unique design sensibilities. It’s a chance to create something truly personal and unique, reflecting their individual taste and style.
- Sense of Accomplishment:Completing a DIY desk project offers a sense of accomplishment and pride in creating something functional and aesthetically pleasing with your own hands. It fosters a sense of self-reliance and empowers individuals to tackle complex projects.
- Personal Satisfaction:The process of designing, planning, and building a desk can be deeply satisfying and rewarding. It allows individuals to engage in a hands-on activity that combines creativity, problem-solving, and craftsmanship, providing a sense of accomplishment and fulfillment.
Planning Your DIY Desk
Creating a custom desk is a rewarding project, but it requires careful planning to ensure it meets your needs and preferences. Before you start building, take the time to design your desk and create a detailed plan. This will help you avoid costly mistakes and ensure a successful project.
Determining Your Desk’s Dimensions
The dimensions of your desk are crucial for comfort and functionality. Consider these factors when determining the ideal height, width, and depth:
- Height:A standard desk height is 29 inches, but you might need to adjust this based on your height and posture. A good rule of thumb is to ensure your elbows are at a 90-degree angle when typing, and your feet are flat on the floor.
- Width:The width of your desk should accommodate your computer monitor, keyboard, and other essentials, while providing enough space for your work and any additional items. A minimum width of 48 inches is recommended for a single person.
- Depth:The depth of your desk should be sufficient for your keyboard and mouse, and provide enough space for your arms to move freely. A minimum depth of 24 inches is recommended.
Choosing Materials: Diy Our Office Desk
Choosing the right materials for your DIY desk is crucial for its durability, aesthetics, and functionality. The materials you select will determine the overall look, feel, and longevity of your desk.
Wood
Wood is a classic and popular choice for DIY desks, offering a natural, warm aesthetic and excellent durability. It is available in various species, each with unique characteristics and price points.
Building our own office desk was a fun weekend project. We wanted a setup that was both functional and stylish, and we knew the right keyboard would be key. After much research, we settled on an iPad Pro mechanical keyboard for its sleek design and satisfying typing experience.
Now, with our custom desk and keyboard, we have a workspace that’s both inspiring and efficient.
- Hardwoods:Hardwoods like oak, maple, and cherry are known for their strength, durability, and beautiful grain patterns. They are ideal for desks that will see heavy use. However, hardwoods are also more expensive than softwoods.
- Softwoods:Softwoods like pine and fir are less expensive and easier to work with, making them suitable for beginners. They are lighter than hardwoods, but they may not be as durable.
- Plywood:Plywood is a cost-effective and versatile option. It is made from thin layers of wood veneer glued together, making it strong and stable. Plywood is a good choice for desks that require a flat, smooth surface.
- Reclaimed wood:Reclaimed wood adds a unique character and eco-friendly touch to your desk. It can be sourced from old barns, pallets, or other structures. Reclaimed wood often has interesting knots, cracks, and imperfections that contribute to its charm.
Metal
Metal is a durable and modern option for DIY desks. It offers a sleek and industrial look, and it is resistant to scratches and dents.
- Steel:Steel is a strong and versatile metal that is commonly used for desk frames and legs. It is available in various finishes, including powder coating, chrome, and brushed steel.
- Aluminum:Aluminum is a lightweight and corrosion-resistant metal that is often used for desk tops and shelves. It is also relatively easy to work with.
- Iron:Iron is a durable and affordable metal that can be used for desk frames and legs. It can be easily painted or coated with a protective finish.
Laminate
Laminate is a durable and affordable surface material that is often used for desk tops. It is available in a wide range of colors, patterns, and finishes.
Building a DIY office desk can be a fun project, especially if you’re into customizing your workspace. While I was brainstorming design ideas, I stumbled upon an article about Etros best summer looks, fresh and fashionable styles , and it got me thinking about incorporating a similar kind of bold, vibrant energy into my desk.
Maybe I’ll add a pop of color with some patterned fabric or even a funky lamp. Either way, the project is going to be a blast!
- Melamine:Melamine is a type of laminate that is known for its durability and resistance to scratches and stains. It is also easy to clean.
- High-pressure laminate (HPL):HPL is a more durable type of laminate that is often used in commercial settings. It is resistant to heat, moisture, and abrasion.
Essential Tools and Equipment
Building a DIY desk requires a set of tools and equipment that will enable you to cut, shape, assemble, and finish your desk. The tools you need will depend on the complexity of your design, the materials you choose, and your experience level.
Essential Tools
This section provides a list of essential tools for building a DIY desk, including their purpose and usage. It also offers suggestions for alternative tools depending on budget or skill level.
- Measuring Tape:A measuring tape is essential for accurately measuring the dimensions of your desk and its components. It helps ensure all parts are cut to the correct size, resulting in a well-proportioned desk.
- Level:A level is used to ensure that your desk is perfectly horizontal and straight. It helps prevent wobbling and ensures a stable and comfortable work surface.
- Pencil:A pencil is used for marking cutting lines on the wood and for transferring measurements. A sharp pencil helps to ensure accurate markings.
- Safety Glasses:Safety glasses are essential for protecting your eyes from flying debris when cutting wood. They should be worn at all times when using power tools or working with sharp objects.
- Saw:A saw is used for cutting wood to the desired dimensions. The type of saw you need will depend on the type of wood and the complexity of the cuts. For simple cuts, a handsaw is sufficient. For more intricate cuts, a jigsaw or circular saw might be necessary.
- Screwdriver:A screwdriver is used for attaching the various parts of your desk. It is important to use a screwdriver that matches the type of screws you are using. A cordless screwdriver is a great option for faster and easier assembly.
- Drill:A drill is used for creating pilot holes for screws and for attaching hardware. A cordless drill is a versatile tool that can also be used for driving screws.
- Clamps:Clamps are used to hold pieces of wood together while you are working on them. They are especially useful when gluing or attaching hardware.
- Sandpaper:Sandpaper is used to smooth out rough edges and to create a uniform finish on the wood. It is important to use sandpaper in different grits to achieve the desired level of smoothness.
- Wood Glue:Wood glue is used for bonding pieces of wood together. It is important to use a high-quality wood glue that is specifically designed for woodworking projects.
Alternative Tools and Equipment
This section provides suggestions for alternative tools and equipment depending on budget or skill level.
- Handsaw vs. Power Saw:If you are on a budget, a handsaw is a great option for simple cuts. However, if you are working with thicker wood or need more precise cuts, a power saw like a jigsaw or circular saw will be more efficient.
- Cordless Drill vs. Corded Drill:Cordless drills are more convenient and portable but can be more expensive. Corded drills are typically more powerful and can be a good option for larger projects.
- Hand Plane vs. Power Sander:A hand plane can be used to smooth out wood surfaces but can be time-consuming.
A power sander is a more efficient option for sanding large surfaces and can be used with different grits of sandpaper to achieve different levels of smoothness.
Step-by-Step Construction Guide
Now that you have your materials and tools ready, let’s dive into the exciting partbuilding your desk! This step-by-step guide will walk you through the process, from cutting the wood to assembling the final piece. Remember, safety first! Always wear safety goggles and use appropriate tools for each task.
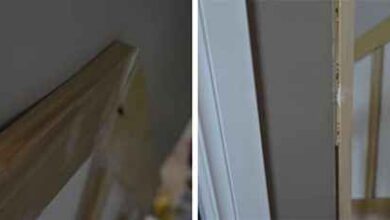
Cutting the Wood
Cutting the wood accurately is crucial for a sturdy and aesthetically pleasing desk. Here’s how to do it:
- Measure twice, cut once.This age-old advice holds true for DIY projects. Carefully measure the dimensions of your desk and mark the wood accordingly.
- Use a saw that’s suitable for your material.For example, a circular saw is great for straight cuts, while a jigsaw is better for curved or intricate shapes.
- Secure the wood.Use clamps or a work table to ensure the wood doesn’t move while cutting.
- Make smooth, controlled cuts.Avoid rushing or applying excessive pressure, which can lead to uneven cuts.
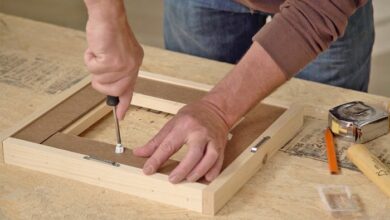
Assembling the Desk
Now it’s time to bring your desk to life!
- Prepare the work area.Clear a spacious and well-lit area for assembling your desk. It’s helpful to have a work table or sawhorses to support the desk while you’re working.
- Attach the legs.Use wood glue and screws to attach the legs to the tabletop. Ensure the legs are securely fastened and aligned.
- Attach the drawer slides.If you’re adding drawers, attach the drawer slides to the sides of the desk frame.
- Install the drawers.Slide the drawers onto the slides and ensure they open and close smoothly.
- Sand and finish.Once the desk is assembled, sand down any rough edges and apply a finish of your choice. This can be paint, stain, or varnish.
Troubleshooting Common Challenges
Even experienced DIYers encounter challenges. Here are some common issues and solutions:
- Uneven cuts:If your cuts are uneven, use a sander to smooth out the edges. For significant discrepancies, you may need to recut the wood.
- Loose screws:If screws become loose, tighten them with a screwdriver. You can also use wood glue to reinforce the joint.
- Misaligned drawers:If your drawers don’t slide smoothly or are misaligned, check the drawer slides and adjust them accordingly. You can also use a level to ensure the drawer frame is level.
Customizing Your Desk
The beauty of a DIY desk lies in its adaptability. It’s a blank canvas for your personal style and functional needs. You can transform it from a simple work surface into a personalized workspace that reflects your preferences and enhances your productivity.
Desk Accessories
Desk accessories can elevate your workspace’s functionality and aesthetics. They range from practical tools like organizers and cable management solutions to decorative elements like lamps, plants, and artwork.
- Organizers: Desk organizers help keep your workspace tidy. Consider trays, drawers, and vertical organizers for pens, pencils, paperclips, and other stationery.
- Cable Management: A tangle of cables can be distracting and unsightly. Use cable ties, clips, and organizers to keep your wires neat and organized.
- Lighting: Good lighting is crucial for comfortable work. Desk lamps provide focused illumination, while ambient lighting creates a relaxing atmosphere.
- Plants: Adding greenery to your desk can improve air quality and create a more calming environment. Choose low-maintenance plants that thrive in indoor conditions.
- Artwork: Personalize your desk with artwork that inspires you. Photographs, paintings, prints, or even inspirational quotes can add a touch of personality to your workspace.
Storage Solutions
Storage solutions are essential for keeping your desk organized and clutter-free. You can incorporate various storage features into your DIY desk design.
- Drawers: Built-in drawers provide ample storage space for documents, files, and other items. Consider using different drawer sizes to accommodate various items.
- Shelves: Open shelves offer easy access to frequently used items. You can use shelves to display books, decorative items, or even create a small library.
- Under-Desk Storage: Utilize the space beneath your desk for storage. You can install shelves, drawers, or baskets to store items that you don’t need immediate access to.
- Vertical Storage: Maximize vertical space with vertical storage solutions. Use file organizers, magazine holders, or wall-mounted shelves to store items efficiently.
Organizational Features
Organizational features enhance the efficiency of your workspace. You can integrate various features into your DIY desk to optimize its functionality.
- Built-in Pen Holders: Add a pen holder to your desk design for easy access to writing tools. You can create a dedicated slot, a small drawer, or a separate stand.
- Integrated Cable Management: Plan for cable management during the construction phase. Create channels or slots to route cables neatly and prevent tangles.
- Keyboard Trays: A keyboard tray can improve ergonomics by allowing you to adjust the height of your keyboard for comfortable typing.
- Monitor Stands: A monitor stand raises your screen to eye level, reducing neck strain and improving posture. You can create a built-in monitor stand or use a separate stand.
Desk Customization Examples
| Customization Feature | Material Options | Finishes | Hardware |
|---|---|---|---|
| Desk Top | Wood (pine, oak, maple), Laminate, Concrete, Glass | Paint, Stain, Oil, Wax, Lacquer | Hinges, Drawer Slides, Clips, Fasteners |
| Desk Legs | Wood (pine, oak, maple), Metal (steel, aluminum), Concrete | Paint, Powder Coating, Rust-Oleum | Screws, Bolts, Nuts, Brackets |
| Drawers | Wood (pine, oak, maple), Metal (steel, aluminum) | Paint, Stain, Powder Coating | Hinges, Drawer Slides, Knobs, Handles |
| Shelves | Wood (pine, oak, maple), Metal (steel, aluminum), Glass | Paint, Stain, Powder Coating | Brackets, Clips, Fasteners |
| Cable Management | Plastic, Metal, Wood | Paint, Powder Coating | Clips, Ties, Organizers |
Ergonomics and Comfort
Building a DIY desk is an exciting project, but it’s crucial to consider ergonomics for a comfortable and healthy work environment. A well-designed desk can prevent aches, pains, and long-term health issues.
Importance of Ergonomics
Ergonomics focuses on designing and arranging things to optimize human well-being and overall performance. When applied to desk design, it aims to minimize strain on your body, especially your back, neck, wrists, and eyes. Proper ergonomics can help you maintain good posture, reduce fatigue, and increase productivity.
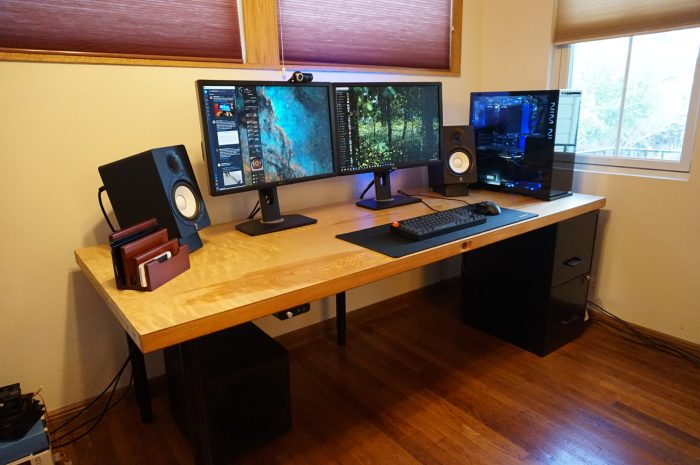
Inspiring DIY Desk Ideas

The beauty of DIY desk projects lies in the endless possibilities for creativity and personalization. From sleek minimalist designs to rustic industrial aesthetics, you can craft a desk that perfectly complements your style and workspace needs. Here are some inspiring DIY desk ideas that will spark your imagination and help you bring your dream desk to life.
Industrial Chic Desk, Diy our office desk
Industrial chic desks exude a raw, edgy charm that blends seamlessly with modern and vintage décor. These desks often feature reclaimed wood, metal accents, and exposed hardware, creating a unique and eye-catching statement piece.
- Materials:Reclaimed wood planks, metal pipe legs, metal brackets, wood stain, clear sealant.
- Construction:The desk top can be made by joining reclaimed wood planks with wood glue and screws. Metal pipe legs can be attached to the underside of the desk top using metal brackets. The desk can be stained and sealed to enhance its natural beauty and protect it from scratches and spills.
- Customization:You can add storage compartments, drawers, or shelves to the desk using reclaimed wood and metal brackets. You can also incorporate vintage industrial elements, such as old gears, pipes, or lighting fixtures, to add a touch of character.