
Geometric Painted Wallpaper DIY: A Comprehensive Guide to Creating Stunning Walls
Transforming a living space with impactful, on-trend design doesn’t always require professional installers or costly pre-made wallpaper. The geometric painted wallpaper DIY approach offers a unique and highly customizable alternative, allowing homeowners to inject personality and style into any room with a can of paint and a touch of creativity. This method involves hand-painting geometric patterns directly onto a wall, mimicking the aesthetic of wallpaper but with unparalleled control over color, scale, and placement. The advantages are numerous: cost-effectiveness, the ability to perfectly match existing décor, the satisfaction of a handmade project, and the creation of a truly bespoke feature wall. This comprehensive guide will delve into every aspect of executing a successful geometric painted wallpaper DIY project, from initial planning and material selection to execution and finishing touches, ensuring a professional-looking result.
Planning Your Geometric Masterpiece: Design and Layout
The foundation of any successful DIY project lies in meticulous planning. Before a single brushstroke is applied, a clear vision for your geometric painted wallpaper is essential. Consider the overall style of the room. Is it modern and minimalist, bohemian and eclectic, or something in between? The geometric pattern should complement, not compete with, the existing furniture and décor.
Geometric Pattern Inspiration: The geometric world is vast. Common and impactful choices include:
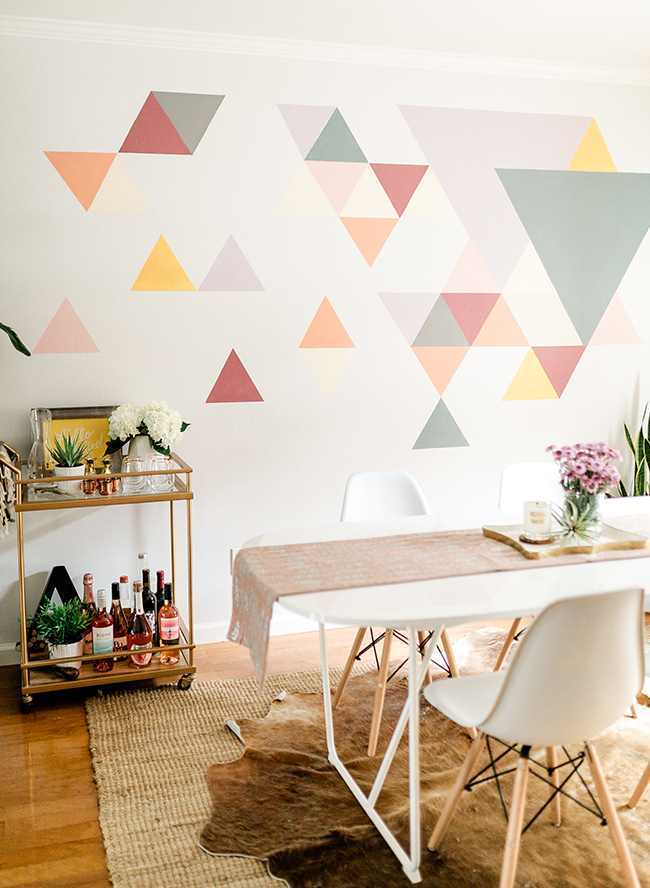
- Triangles: Sharp and dynamic, triangles can be arranged in honeycomb patterns, chevrons, or scattered randomly for a more abstract feel.
- Squares and Rectangles: Offering a sense of order and structure, these can be laid out in grids, offset patterns, or as simple, bold blocks of color.
- Hexagons: Mimicking natural forms, hexagons create a sophisticated and visually engaging honeycomb effect.
- Lines: Straight, diagonal, or intersecting lines can create a sense of movement and depth. Consider thin pin-stripes for subtle elegance or bold, thick lines for a statement.
- Circles and Arcs: While less strictly geometric, these can be incorporated for softer, organic-feeling patterns.
- Custom Geometric Combinations: Don’t be afraid to mix and match basic shapes, creating more complex and unique tessellations.
Scale and Repetition: The size of your geometric elements and how they repeat are crucial. A small, intricate pattern might work well on a large wall, while a bold, oversized motif will command attention on a smaller accent wall. Consider how the pattern will look from different vantage points within the room. Use graph paper or digital design tools to sketch out your envisioned pattern to scale. This visual representation will help you identify potential issues and refine your design before committing to paint.
Color Palette Selection: This is where the true customization of DIY geometric painted wallpaper shines. Aim for a palette that harmonizes with your existing room colors. Consider:
- Monochromatic: Using different shades and tints of a single color for a subtle yet sophisticated look.
- Analogous: Pairing colors that are next to each other on the color wheel for a harmonious and pleasing effect.
- Complementary: Using colors opposite each other on the color wheel for high contrast and visual impact. Use sparingly or for accent elements.
- Neutral Base with Bold Accents: A neutral wall color can serve as the canvas for pops of vibrant geometric shapes.
- Consider the Mood: Lighter, cooler colors tend to create a sense of calm and spaciousness, while warmer, bolder colors can evoke energy and excitement.
Layout and Placement: Decide if you’re covering an entire wall, creating a feature wall, or incorporating geometric elements into a specific area. If covering an entire wall, consider how the pattern will align with corners, windows, and doors. If creating a feature, think about how it will draw the eye.
Tools and Materials: Gathering Your Arsenal
Having the right tools and high-quality materials is paramount for a smooth and professional DIY geometric painted wallpaper project.
- Paint:
- Wall Paint: High-quality, durable interior latex paint is essential. Choose an appropriate sheen (e.g., matte, eggshell, satin) based on your desired look and the wall’s condition. Consider a low-VOC option for healthier indoor air quality. You’ll need a base coat for the wall and contrasting colors for your geometric elements.
- Primer: A good primer ensures even paint adhesion and can help hide imperfections in the wall. It’s particularly important if you’re painting over a dark color or a glossy finish.
- Application Tools:
- Paint Rollers: A good quality roller with a nap appropriate for your wall surface (e.g., smooth for smooth walls, slightly textured for slightly textured walls) is needed for the base coat.
- Paint Brushes: A variety of sizes will be necessary for painting the geometric shapes. Angled sash brushes are excellent for crisp lines and corners. Smaller detail brushes will be useful for touch-ups.
- Painter’s Tape: High-quality painter’s tape is your best friend for achieving sharp, clean lines. Look for tape specifically designed for delicate surfaces if you have concerns about paint damage. You’ll need several rolls.
- Stencils (Optional but Recommended): Pre-made geometric stencils can save significant time and ensure pattern uniformity. However, for truly bespoke designs, freehand painting or custom stencils are the way to go.
- Tracing Paper or Transfer Paper: If you’re freehanding or using a complex design, these can help transfer your sketched pattern onto the wall.
- Measuring and Marking Tools:
- Measuring Tape: Essential for planning and layout.
- Level: Crucial for ensuring your lines are straight and your patterns are aligned.
- Pencil: For lightly marking guidelines on the wall.
- Chalk Line (Optional): For longer, straight lines.
- Preparation and Cleanup:
- Drop Cloths/Plastic Sheeting: To protect floors and furniture from paint drips.
- Sanding Block and Fine-Grit Sandpaper: For minor wall repairs and smoothing.
- Spackle/Filler: For filling any holes or imperfections.
- Cleaning Supplies: Rags, mild soap, and water for preparing the wall.
- Paint Tray: For your various paint colors.
- Bucket: For water and cleaning brushes.
The DIY Geometric Painted Wallpaper Process: Step-by-Step Execution
A structured approach ensures a polished finish and minimizes frustration.
1. Wall Preparation: The Crucial First Step
Thorough preparation is non-negotiable for a professional-looking result.
- Clean the Walls: Wipe down the walls with a damp cloth and mild soap to remove dust, dirt, and grease. Allow to dry completely.
- Repair Imperfections: Fill any nail holes, cracks, or dents with spackle. Once dry, sand smooth with fine-grit sandpaper.
- Light Sanding (Optional): If the existing paint is glossy, a light sanding can create a better surface for primer and paint adhesion. Wipe away dust thoroughly afterward.
- Protect Your Space: Lay down drop cloths or plastic sheeting to cover floors and any furniture you cannot move. Use painter’s tape to protect trim, baseboards, and electrical outlets.
2. Priming for Perfection
- Apply Primer: Apply a coat of high-quality primer to the entire wall. This creates a uniform base, improves paint adhesion, and can help block any underlying stains. Allow the primer to dry completely according to the manufacturer’s instructions.
3. Laying the Foundation: The Base Coat
- Paint the Base Color: Apply your chosen base wall color using a roller. Work in even strokes, ensuring complete coverage. If the base color is significantly lighter or darker than the primer, you may need two coats for optimal opacity. Allow each coat to dry completely.
4. Designing and Transferring Your Geometric Pattern
This is where your creative vision comes to life. Choose the method that best suits your design complexity and comfort level.
- Freehand with Guidelines:
- Lightly sketch your geometric pattern onto the wall using a pencil. Use your level and measuring tape to ensure straight lines and consistent spacing. This method is best for simpler patterns and requires a steady hand.
- Using Stencils:
- Pre-made Stencils: Position the stencil on the wall and secure it with painter’s tape. Apply paint using a stencil brush or a small roller, being careful not to let paint bleed under the edges. Remove the stencil while the paint is still slightly wet for cleaner lines. Repeat the process, ensuring proper alignment for a seamless pattern.
- Custom Stencils: You can create your own stencils by drawing your pattern onto thick paper or stencil material and carefully cutting it out with a craft knife.
- Using Transfer Paper:
- Draw your geometric pattern onto tracing paper. Place the tracing paper onto the wall where you want the design. Place transfer paper between the tracing paper and the wall. Trace over your design on the tracing paper, which will transfer a faint outline onto the wall.
5. The Art of Painting the Geometric Elements
This is the most labor-intensive but rewarding part of the process.
- Masking for Precision:
- Once your guidelines are established or your stencil is in place, use painter’s tape to carefully outline each geometric shape that will be painted in a contrasting color. Press down firmly on the edges of the tape to ensure a tight seal and prevent paint bleed.
- Applying the Geometric Colors:
- Using your chosen paint brushes or small rollers, carefully fill in the taped-off geometric shapes. Apply thin, even coats. For intricate designs or sharp corners, a smaller brush will be more effective.
- The "Peel Test": It’s a good practice to peel a small section of tape while the paint is still slightly wet (but not dripping). This helps prevent the paint from drying onto the tape and potentially peeling off with it.
- Working in Sections: For large or complex designs, it’s often easier to work on one section of the wall at a time. This allows the paint to dry partially before moving on to the next area, reducing the risk of smudging.
- Multi-Color Designs: If your design involves multiple colors, ensure each color is dry before masking and painting the next layer. This requires patience but is crucial for clean lines.
6. The Satisfying Reveal: Removing the Tape
- The Moment of Truth: Once all the geometric elements are painted and the paint has had sufficient time to dry (check paint can recommendations), it’s time to remove the painter’s tape.
- Slow and Steady: Pull the tape off slowly and at a 45-degree angle away from the painted edge. This minimizes the chance of peeling the new paint. If you encounter any areas where the paint has bled, you can carefully touch them up with a small brush.
7. Finishing Touches and Protection
- Touch-Ups: Carefully inspect your walls for any missed spots, minor bleeds, or imperfections. Use a small artist’s brush to meticulously touch up these areas.
- Sealing (Optional): For added durability and to make cleaning easier, you can apply a clear, matte-finish sealant over the entire painted wallpaper. This is particularly recommended for high-traffic areas or rooms prone to moisture.
- Clean Up: Remove all drop cloths and clean your brushes, rollers, and trays thoroughly.
Tips for Success and Avoiding Pitfalls
- Practice Makes Perfect: Before tackling your main wall, practice your chosen technique on a piece of cardboard or a spare wall. This will help you get a feel for the paint, the brushes, and your chosen pattern.
- Quality Over Quantity: Invest in good quality paint and painter’s tape. They will make a significant difference in the ease of application and the final look.
- Patience is a Virtue: This project requires time and patience. Don’t rush the drying times between coats, and take breaks when needed.
- Good Lighting is Key: Ensure you have adequate lighting in the room to see your lines clearly and avoid mistakes.
- Embrace Imperfection (Slightly): While aiming for a professional finish, remember that DIY projects often have a unique charm. Small imperfections can add to the handmade character.
- Consider the Room’s Purpose: For a bedroom, a softer, more muted geometric pattern might be ideal, while a bold, graphic design could be perfect for a playroom or a statement entryway.
- Document Your Process: Take photos as you go! It’s satisfying to see your progress, and it can also be helpful for troubleshooting if you encounter an issue.
SEO Optimization for Your DIY Geometric Painted Wallpaper Project
To ensure this article is discoverable by individuals searching for this project, strategically incorporate relevant keywords throughout the text. Consider terms like:
- Geometric painted wallpaper DIY
- DIY geometric wall
- Hand-painted wallpaper
- Geometric wall design
- How to paint geometric wallpaper
- DIY wall patterns
- Custom geometric walls
- Easy geometric wall ideas
- Affordable wall décor
- Feature wall DIY
- Geometric paint ideas
- Wall painting techniques
Utilize these keywords naturally within headings, subheadings, and the body of the text. The comprehensive nature of this guide, covering all aspects from planning to execution, naturally lends itself to containing a wealth of information that search engines value. Including specific examples of geometric patterns and color palettes also enhances its SEO potential.
Conclusion
Creating geometric painted wallpaper yourself is an accessible and deeply rewarding DIY project that allows for unparalleled personalization. By meticulously planning your design, selecting the right materials, and following a structured execution process, you can transform any wall into a stunning, bespoke feature that reflects your unique style and elevates your living space. This approach offers a cost-effective, creative, and ultimately, highly satisfying way to achieve the impactful look of wallpaper with the freedom and individuality of a handmade touch.
