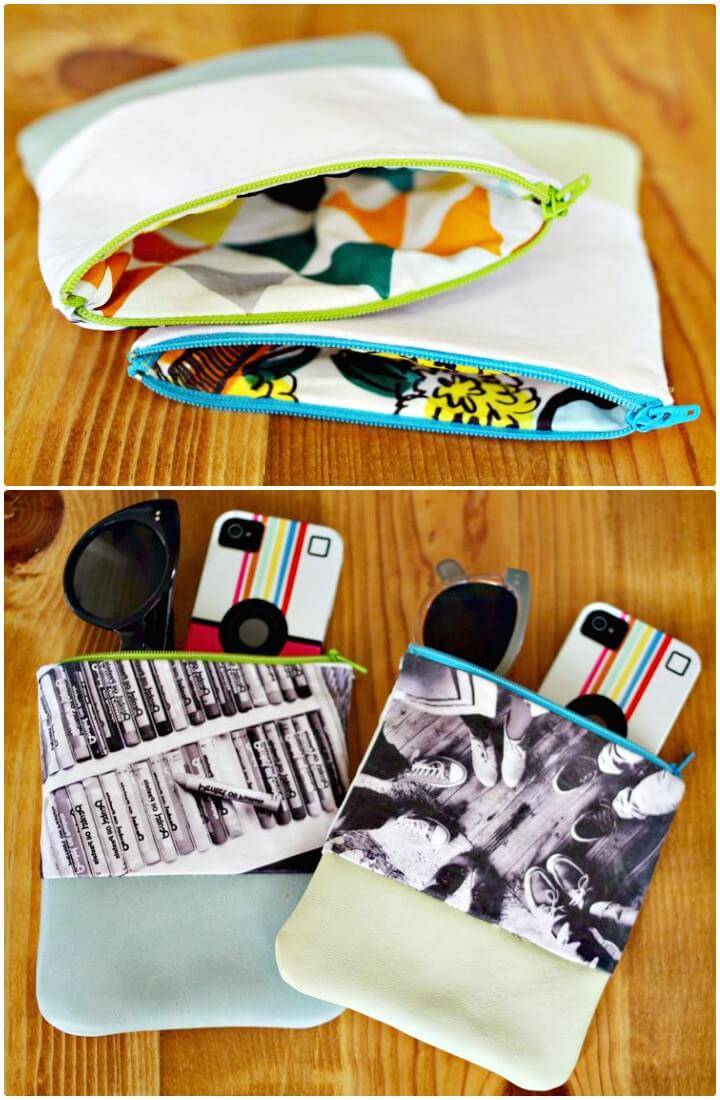
DIY Mini Cotton Leather Clutch: A Comprehensive Guide to Crafting Your Own Chic Accessory
This guide provides a step-by-step process for creating a stylish and functional mini cotton leather clutch. This DIY project combines the rustic charm of cotton with the sophisticated appeal of leather, resulting in a versatile accessory perfect for evenings out, special events, or simply adding a touch of handmade elegance to your everyday look. The process involves precise cutting, careful stitching, and thoughtful finishing, making it an engaging and rewarding craft. We will explore the materials needed, detailed instructions for each stage of construction, and tips for personalization and care, ensuring you can create a clutch that is both beautiful and durable. Understanding the properties of each material, particularly the way cotton fabric drapes and leather provides structure, is key to achieving a professional-looking finish. This project is suitable for intermediate crafters with basic sewing machine knowledge, but can also be adapted for hand-sewing with patience and attention to detail. The mini size makes it an ideal project for utilizing fabric scraps and leather remnants, contributing to a more sustainable crafting practice.
Materials and Tools for Your Mini Cotton Leather Clutch
To embark on this DIY mini cotton leather clutch project, gather the following essential materials and tools. Quality materials will significantly impact the final aesthetic and durability of your clutch.
Fabric Components:
- Cotton Fabric: A medium-weight cotton fabric is ideal for the exterior and lining of your clutch. Consider prints that complement your style, or opt for a solid color for a more minimalist look. Approximately 0.5 yards will be sufficient. Ensure the fabric is pre-washed and ironed to prevent shrinkage after construction.
- Leather or Faux Leather: This will form the structured elements of your clutch, such as the flap, any decorative accents, or a reinforced base. A thin to medium-weight leather (1-2 oz) is recommended for ease of cutting and sewing. Alternatively, a high-quality faux leather can achieve a similar look at a lower cost. A piece measuring at least 6" x 12" should suffice.
- Interfacing (Optional but Recommended): Lightweight fusible interfacing can add structure and body to the cotton fabric, preventing it from becoming too limp. Choose interfacing that is compatible with your chosen cotton fabric.
Hardware and Notions:
- Zipper: A 7-9 inch metal or nylon zipper. Consider a zipper color that contrasts or complements your fabric and leather choices.
- Magnetic Snap or Clasp: A small magnetic snap or a decorative clasp for securing the clutch flap.
- Thread: Strong polyester or cotton thread that matches your fabric and leather. For leather accents, a slightly heavier thread might be beneficial.
- Fabric Glue or Fusible Webbing: For temporarily adhering leather pieces or stabilizing edges before sewing.
Tools:
- Sewing Machine: A standard sewing machine capable of handling both fabric and thin leather. Ensure you have the correct needle for leather (a leather needle or a strong universal needle).
- Rotary Cutter and Cutting Mat: For precise and clean cuts on fabric and leather.
- Sharp Fabric Scissors: For intricate cuts.
- Fabric Marker or Chalk: For marking cutting lines and sewing guidelines.
- Ruler or Measuring Tape: For accurate measurements.
- Seam Ripper: For correcting any mistakes.
- Leather Hole Punch or Awl: For creating pilot holes in the leather, especially if hand-stitching or using hardware that requires pre-drilled holes.
- Hammer and Hard Surface (for magnetic snaps): If using a magnetic snap that requires punching through the material.
- Iron and Ironing Board: For pressing seams and fabric.
- Clips or Binder Clips: To hold fabric and leather pieces together while sewing, especially on thicker layers. Leather can be damaged by pins.
- Optional: Rotary Punch or Leather Punch: For creating clean holes for snaps or clasps.
Cutting Your Clutch Components: Precision is Paramount
Accurate cutting is the foundation of a well-made clutch. We will be creating two main fabric panels, a lining panel, and leather accents. Ensure all measurements are precise and marked clearly before cutting.
1. Main Clutch Panels (Cotton Fabric):
- Cut two rectangles of your chosen cotton fabric to 8 inches wide by 6 inches tall. These will form the exterior of your clutch.
- If using fusible interfacing, cut two identical rectangles of interfacing and fuse them to the wrong side of these cotton panels according to the manufacturer’s instructions.
2. Lining Panels (Cotton Fabric):
- Cut two rectangles of your chosen cotton fabric to 8 inches wide by 6 inches tall. These will serve as the lining for your clutch. No interfacing is needed for the lining unless you desire extra stiffness.
3. Leather Flap:
- Cut one rectangle of leather (or faux leather) to 8 inches wide by 4 inches tall. This will be the main flap that covers the front of the clutch.
- Consider the grain of the leather when cutting to ensure it drapes and folds nicely.
4. Optional Leather Accent Strip:
- Cut one thin strip of leather, approximately 0.5 inches wide and 8 inches long. This can be used as a decorative trim along the top edge of the flap or to reinforce the bottom of the clutch.
5. Optional Leather Base Reinforcement:
- If you desire a more structured base, cut a rectangle of leather to 7.5 inches wide by 1 inch tall. This will be attached to the bottom edge of the exterior cotton panels.
Important Note on Leather: When cutting leather, avoid using pins as they will leave permanent holes. Use a rotary cutter, sharp scissors, and fabric clips to hold pieces together. If you need to mark leather, use a silver gel pen or a tailor’s chalk that can be easily wiped away or will not show through.
Constructing the Clutch Body: Sewing Fabric Panels and Zipper Insertion
This stage involves assembling the main body of the clutch by attaching the zipper to the exterior panels and then sewing the lining.
1. Prepare Exterior Panels:
- Take one of your interfaced cotton exterior panels.
- Align the top edge of the panel with the teeth of your zipper. Ensure the right side of the fabric is facing up and the zipper pull is facing downwards.
- Using a zipper foot on your sewing machine, stitch approximately 1/4 inch from the edge, securing the fabric to the zipper tape. Go slowly and carefully.
- Repeat this process with the second exterior cotton panel, attaching it to the other side of the zipper tape. The right side of this panel should also be facing up, and the zipper pull should be pointing upwards, creating a sandwich with the zipper in the middle.
2. Attach Lining Panels:
- Now, take your two lining panels.
- Place one lining panel right side down onto one of the exterior panels, aligning the top edges and enclosing the zipper. The zipper teeth should be between the exterior fabric and the lining fabric.
- Stitch along the zipper tape, 1/4 inch from the edge, attaching the lining to the exterior.
- Repeat with the second lining panel on the other side of the zipper.
3. Open and Press:
- Once both lining panels are attached to the zipper, open up the clutch. You should have two exterior panels and two lining panels sewn to the zipper, creating a sort of "book" shape.
- Press the seams flat, ensuring the fabric is lying smoothly against the zipper tape.
4. Join the Lining:
- Open the zipper about halfway. This is crucial for turning the clutch later.
- Turn the clutch so that the right sides of the lining fabric are facing each other, and the right sides of the exterior fabric are facing each other. The zipper should be sandwiched between the exterior and lining layers.
- Align all the edges carefully.
- Starting at one side of the zipper, begin stitching the lining panels together. Leave a gap of about 3-4 inches in one of the lining seams. This unsewn section will be used to turn the entire clutch right side out.
- Stitch along the bottom edge of the clutch body, then up the other side, carefully stitching around the corners.
5. Join the Exterior (Optional Reinforcement):
- If you are adding a leather base reinforcement strip, now is the time to attach it to the bottom edge of the exterior panels. You can do this by placing the leather strip right side up along the bottom edge of the exterior fabric, and then stitching it in place with your exterior fabric. Then, when you sandwich the exterior and lining, this reinforced edge will be included.
- Alternatively, you can attach the leather strip after the exterior panels are joined. You would then fold the bottom edges of the exterior panels over the leather strip and stitch securely. This method might be easier for beginners.
6. Prepare for Turning:
- Clip the corners of the exterior fabric, being careful not to cut through your stitching. This will help create sharper corners when turned right side out.
Constructing and Attaching the Leather Flap: Adding a Touch of Luxury
The leather flap provides structure and a sophisticated finish to your mini clutch.
1. Prepare the Leather Flap:
- Take your cut leather rectangle for the flap (8" x 4").
- If you are using a decorative leather accent strip, you can adhere it to the top edge of the flap now using fabric glue or fusible webbing. Press firmly and allow to dry completely.
- If you are adding a magnetic snap, now is the time to install it. Mark the placement for the two halves of the snap on the wrong side of the leather flap, ensuring they are centered and appropriately spaced. Use a leather punch or an awl to create holes for the prongs. Install the snap according to the manufacturer’s instructions, often involving a small washer and then folding the prongs over.
2. Attaching the Flap to the Clutch Body:
- Open the zipper fully.
- Place the clutch body right side up.
- Position the leather flap onto the right side of the back exterior panel. The flap should be placed so that when the clutch is closed, it drapes over the front. The raw, unsewn edge of the flap (the 8-inch edge) should be aligned with the top edge of the back exterior panel.
- The wrong side of the leather flap should be facing upwards at this point.
- Secure the flap in place using fabric clips.
- Using a leather needle in your sewing machine and a strong thread, stitch along the top edge of the back exterior panel, through the flap, to secure it. Stitch approximately 1/4 inch from the edge. You may need to hand-crank your sewing machine over the leather to maintain control.
3. Attaching the Magnetic Snap (Front):
- If you are using a magnetic snap, now is the time to attach the other half to the front exterior panel of your clutch.
- Align the flap so it is in its closed position. Mark the exact spot where the magnetic clasp on the flap meets the front panel.
- On the inside of the front exterior panel, mark the corresponding spot for the other half of the magnetic snap. Ensure it is aligned so that the flap will close securely.
- Use a leather punch or awl to create holes and install the magnetic snap on the front panel, following the manufacturer’s instructions.
Turning and Finishing: The Final Touches
This is the stage where your clutch truly takes shape. Careful turning and finishing will elevate its professional appearance.
1. Turn the Clutch:
- Reach through the unsewn gap in the lining and carefully pull the entire clutch right side out.
- Work your fingers into the corners to push them out as much as possible. Use a blunt tool like a chopstick or a bone folder to gently push out the corners from the inside.
2. Close the Lining Gap:
- Once the clutch is turned, you will have an opening in the lining.
- Tuck the raw edges of this opening inwards so they are flush with the rest of the lining.
- You can hand-stitch this opening closed using a ladder stitch (also known as a blind stitch) for an invisible finish. Alternatively, you can machine stitch this gap closed, but be sure to stitch very close to the folded edge, as it will be visible.
3. Pressing and Final Shaping:
- Gently press the entire clutch, paying close attention to the seams and edges. Be cautious when pressing leather, as excessive heat can damage it. Use a pressing cloth if necessary.
- Ensure the flap lies flat and the magnetic snap engages correctly.
4. Optional Decorative Stitching:
- For an extra decorative touch, you can add a topstitch around the edges of the leather flap or along the top edge of the clutch body. Use a slightly longer stitch length for a cleaner look.
Personalization and Customization Ideas
Your DIY mini cotton leather clutch is a canvas for your creativity. Here are some ideas to make it uniquely yours:
- Embellishments: Add embroidery to the cotton fabric, beadwork to the leather flap, or small charms to the zipper pull.
- Hardware Variations: Experiment with different types of clasps, buckles, or even a wrist strap made from leather or braided cord.
- Color Blocking: Use contrasting cotton fabrics or combine different leather textures for a modern, color-blocked effect.
- Interior Pockets: Add a small interior pocket to the lining for organizing essentials like cards or lip balm.
- Monogramming: Personalize your clutch with hand-stitched or machine-embroidered monograms on the leather flap or cotton exterior.
- Fringe or Tassels: Add a leather fringe detail to the flap or a handmade tassel to the zipper pull for a bohemian flair.
Care and Maintenance of Your DIY Clutch
Proper care will ensure your handmade clutch remains a cherished accessory for years to come.
- Leather Care: Wipe the leather with a soft, damp cloth to remove dust and light dirt. For deeper cleaning or conditioning, use a leather cleaner and conditioner specifically designed for the type of leather you used. Test any product on an inconspicuous area first.
- Fabric Care: The cotton fabric can be spot-cleaned with mild soap and water. If the entire clutch needs cleaning, it is advisable to hand-wash it gently in cool water and allow it to air dry flat. Avoid machine washing or drying, as this can damage the leather components.
- Storage: Store your clutch in a dust bag or a soft cloth to protect it from dust and light when not in use. Avoid storing it in direct sunlight, which can cause the leather to fade or dry out.
- Zipper Maintenance: Keep the zipper clean and free of debris. Lubricate it occasionally with a graphite pencil or a specialized zipper lubricant if it becomes stiff.
By following this comprehensive guide, you can confidently create a beautiful, functional, and personalized mini cotton leather clutch. This project offers a rewarding opportunity to hone your crafting skills and produce an accessory that is both stylish and imbued with the charm of handmade quality. The combination of soft cotton and structured leather creates a tactile and visual appeal, making this clutch a standout piece.
