
DIY Pom Pom Sweaters: Unleash Your Creativity with Cozy Embellishments
Transforming a plain sweater into a unique statement piece is an accessible and rewarding DIY project, and the addition of pom poms offers a playful and textural embellishment that’s both on-trend and incredibly customizable. This comprehensive guide will walk you through the entire process of creating your own DIY pom pom sweater, from selecting the perfect materials to mastering different pom pom-making techniques and integrating them seamlessly onto your chosen garment. Whether you’re a seasoned crafter or a beginner looking to add a touch of personalized flair to your wardrobe, this guide provides all the essential information and creative inspiration you need.
Choosing Your Base Sweater: The Foundation of Your Pom Pom Masterpiece
The success of your DIY pom pom sweater hinges significantly on the base garment you choose. Consider the following factors to ensure a harmonious and aesthetically pleasing final product:
- Material: Opt for sweaters made from natural fibers like wool, cotton, or acrylic blends. These materials generally offer a good texture for pom pom adhesion and can withstand the addition of embellishments without excessive stretching or damage. Avoid overly delicate or loosely knit sweaters that might snag or lose their shape easily. Thicker knits provide a more robust surface for attaching pom poms.
- Color: The color of your sweater will dictate the overall mood and impact of your pom pom design. Neutrals like cream, grey, black, or navy serve as excellent canvases for vibrant or contrasting pom poms, allowing them to truly pop. However, don’t shy away from bolder sweater colors if you want your pom poms to blend in for a more subtle texture or to create a monochromatic statement. Consider the color palette of your intended pom poms when selecting the sweater.
- Knit Type and Texture: A smooth, even knit will be the easiest to work with, providing a consistent surface for attaching your pom poms. Chunky knits or heavily textured sweaters can create a more bohemian or rustic aesthetic, but they might make it slightly more challenging to secure pom poms firmly.
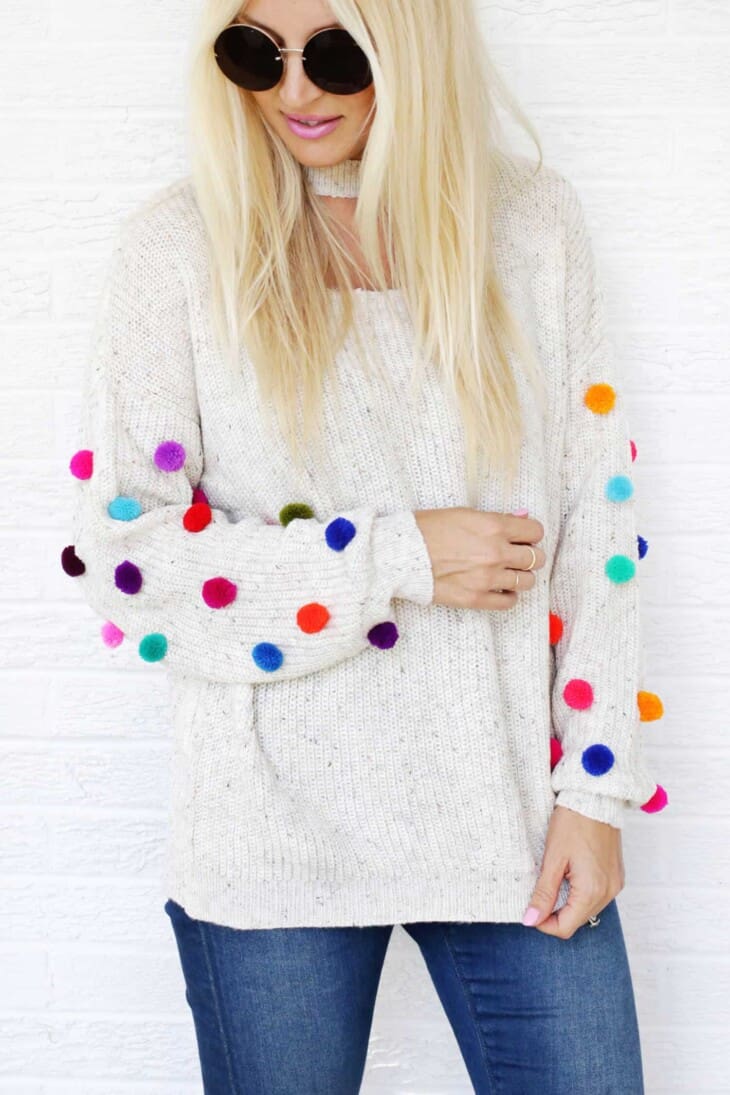
- Fit and Style: The silhouette of your sweater will influence how the pom poms are perceived. A cropped sweater might look great with a scattering of small pom poms, while a longer, oversized sweater could accommodate larger pom poms arranged in a pattern. Consider where you want to place the pom poms – along the neckline, cuffs, hem, shoulders, or even as a full-on embellishment across the entire piece.
- Pre-washing: Always wash and dry your sweater according to its care instructions before you begin. This ensures any potential shrinkage occurs beforehand and removes any finishes that might interfere with adhesive or sewing.
Pom Pom Power: Mastering Different Creation Techniques
The heart of your DIY pom pom sweater lies in the pom poms themselves. Fortunately, there are several effective and easy-to-learn methods for creating them, each yielding slightly different results.
-
The Cardboard Circle Method (Classic & Versatile):
- Materials: Cardboard (cereal box, poster board), pencil, scissors, yarn, a second pair of scissors for trimming.
- Process: Draw two identical circles on your cardboard, one smaller than the other, creating a ring shape. The inner diameter will determine the size of your pom pom’s core, and the outer diameter will determine its final fullness. Cut out the larger circle, then carefully cut out the smaller inner circle to create a donut shape. You’ll need two of these rings to sandwich together. Cut a slit from the outer edge to the inner hole on each ring. Thread your yarn through the center hole and begin wrapping it around the cardboard ring, covering the entire surface evenly. Continue wrapping until the ring is completely obscured and you can no longer see the cardboard. Once you’ve achieved desired thickness, take a sharp pair of scissors and carefully insert them between the two cardboard rings. Begin cutting the yarn all the way around the outer edge of the ring. As you cut, the yarn will begin to fan out. Once all the yarn is cut, tightly tie a piece of yarn around the center of the pom pom, in the gap between the two cardboard rings. This is crucial for securing the pom pom. Remove the cardboard rings and fluff and trim your pom pom to achieve a neat, spherical shape. For denser pom poms, wrap more yarn. For fluffier ones, use less.
-
The Pom Pom Maker Method (Quick & Consistent):
- Materials: A commercial pom pom maker (available in various sizes), yarn, scissors.
- Process: Pom pom makers typically consist of interlocking plastic arms that create the circular shape. Open the arms and begin wrapping yarn around one set of arms until it’s densely covered. Close those arms and then repeat the process on the other side. Once both sides are fully wrapped, use sharp scissors to cut the yarn along the groove that runs around the circumference of the maker, between the two halves. Secure the pom pom by tying a piece of yarn tightly around the center, just as you did with the cardboard method. Open the pom pom maker and release your perfectly formed pom pom. These are fantastic for achieving uniform pom poms quickly, especially if you’re making many.
-
The Fork Method (Small & Delicate):
- Materials: A fork (standard size), yarn, scissors.
- Process: Wrap yarn around the tines of the fork, ensuring even coverage. The more yarn you wrap, the denser your pom pom will be. Once you’ve wrapped sufficient yarn, carefully slide a separate piece of yarn underneath the wrapped yarn, between the two middle tines of the fork. Tie this piece of yarn very tightly around the center of the wrapped yarn. Then, carefully slide the yarn off the fork and trim around the circumference to create a fluffy sphere. This method is excellent for creating smaller pom poms, perfect for delicate embellishments or for filling in smaller spaces on your sweater.
-
The Hand Method (Simple & Accessible):
- Materials: Your hand, yarn, scissors.
- Process: Wrap yarn around your fingers (the number of fingers you use will influence the size of the pom pom). Wrap it multiple times for a denser pom pom. Once you have enough yarn, carefully slide a separate piece of yarn underneath the wrapped yarn, between your thumb and forefinger, and tie it very tightly around the center. Gently slide the yarn off your fingers and trim around the circumference to create your pom pom. This is a no-fuss method, ideal if you don’t have any tools on hand.
Yarn Selection: Color, Texture, and Material for Your Pom Poms
The yarn you choose will dramatically impact the look and feel of your pom pom sweater. Consider these aspects:
- Material: Acrylic yarn is a popular choice due to its affordability, durability, and wide range of colors. Wool and wool blends offer natural warmth and a luxurious feel but can be more expensive and require delicate care. Cotton yarn provides a matte finish and is breathable, but it might not be as resilient as acrylic or wool for pom poms.
- Weight: Worsted weight yarn is a good all-rounder for pom poms, offering a balance of fullness and ease of wrapping. Bulky or super bulky yarns will create larger, more dramatic pom poms very quickly. Thinner yarns, like fingering or sport weight, can be used for very small, delicate pom poms or for creating intricate colorwork within a larger pom.
- Color Palette: This is where your creativity truly shines.
- Monochromatic: Using shades of the same color creates a sophisticated and textured look.
- Contrasting: Bold contrasting colors make a strong statement and highlight the pom poms as focal points.
- Rainbow/Ombre: Employing a gradient of colors within a single pom or across multiple pom poms adds a playful and whimsical touch.
- Textural Yarns: Incorporate novelty yarns like boucle, chenille, or eyelash yarn for added visual and tactile interest. Be aware that these can be trickier to trim and might not hold their shape as well.
Attaching Your Pom Poms: Securing Your Cozy Creation
Once you have your pom poms ready, the next crucial step is securely attaching them to your sweater.
-
Sewing (Most Secure & Recommended):
- Materials: Sharp needle, strong thread that matches your yarn or sweater color, scissors.
- Process: Thread your needle with a doubled strand of strong thread, knotting the end. For each pom pom, locate the secured center tie. Insert your needle through the underside of the pom pom, catching the center tie. Bring the needle through to the back of your sweater and pull it taut. Reinsert the needle a short distance away from where it emerged on the back of the sweater and bring it back up through the pom pom, again catching the center tie. Repeat this process several times, working your way around the pom pom’s base and pulling the thread taut each time. Aim to catch the yarn of the pom pom’s center tie and the knit of the sweater. Finally, tie off your thread securely on the inside of the sweater, weaving it through the knit to hide the knot. This method offers the most durable attachment, ensuring your pom poms stay put through wear and washing.
-
Fabric Glue/Adhesive (For Delicate Yarns or Quick Projects):
- Materials: Strong fabric glue or a hot glue gun with fabric-safe glue sticks, scissors.
- Process: For fabric glue, apply a generous bead of glue to the back of the pom pom’s center. Carefully press the pom pom onto the desired location on your sweater. Hold in place until the glue begins to set. For a hot glue gun, apply a small amount of glue to the back of the pom pom’s center. Quickly and carefully press it onto the sweater. Be mindful of the heat and avoid applying too much glue, which can seep through the knit. While faster, glue can sometimes stiffen the sweater’s fabric, and the bond may not be as durable as sewing, potentially loosening over time or with frequent washing. Test the glue on a scrap piece of fabric first.
-
Pinning (Temporary or for Planning):
- Materials: Straight pins.
- Process: Before committing to sewing or gluing, use pins to arrange your pom poms on the sweater. This allows you to experiment with different layouts, densities, and placements until you achieve your desired design. Once you’re happy with the arrangement, you can then proceed with sewing or gluing.
Designing Your Pom Pom Sweater: Creative Layouts and Embellishments
The design possibilities for your pom pom sweater are virtually endless. Consider these approaches:
- Scattered All-Over: Create a whimsical and playful look by scattering pom poms of varying sizes randomly across the entire sweater.
- Patterned Placement:
- Stripes: Arrange pom poms in horizontal or vertical lines.
- Geometric Shapes: Create diamond, square, or triangular patterns.
- Floral Motifs: Cluster pom poms to form flower shapes, perhaps with a contrasting color in the center.
- Animal or Character Designs: For the ambitious crafter, use pom poms to create recognizable shapes or characters.
- Focused Embellishment:
- Neckline and Cuffs: Add a border of pom poms around the neckline, hem, or cuffs for a subtle yet impactful detail.
- Shoulder Embellishments: Create epaulets or decorative shoulder patches with pom poms.
- Yoke Design: Embellish the yoke area of the sweater for a distinctive look.
- Size Variation: Mixing different sizes of pom poms within a single design adds depth and visual interest. Larger pom poms can act as focal points, while smaller ones can fill in gaps or create a sense of texture.
- Color Blocking with Pom Poms: If your sweater has color-blocked sections, consider using pom poms that either complement or contrast with these blocks.
- Seasonal Themes: Create designs inspired by holidays or seasons, such as a cluster of red and green pom poms for Christmas or pastel pom poms for spring.
Troubleshooting and Tips for a Flawless Finish
- Uneven Pom Poms: Don’t be discouraged by slightly uneven pom poms initially. The key is thorough trimming. Use sharp scissors and rotate the pom pom as you trim to achieve a perfectly spherical shape. A rotary cutter and mat can also be helpful for precise trimming.
- Loose Pom Poms: If you’re concerned about security, always opt for sewing. If using glue, ensure you’re using a strong fabric adhesive and allow ample drying time.
- Yarn Unraveling: When making your pom poms, ensure you tie the center knot very tightly. If you notice any unraveling after trimming, you can carefully dab a tiny bit of fabric glue or clear nail polish onto the loose ends before they become more significant.
- Protecting Your Sweater: When sewing, place a piece of cardboard or thick paper inside the sweater between the layers of fabric where you’re sewing. This prevents the needle from accidentally piercing through to the other side of the sweater, especially with thinner knits.
- Washing Your Pom Pom Sweater: Hand washing is generally recommended for longevity. Use a mild detergent and cool water. Gently squeeze out excess water (do not wring). Reshape the pom poms and lay the sweater flat to dry, away from direct heat or sunlight. If machine washing is necessary, use a delicate cycle with cold water and place the sweater inside a mesh laundry bag.
Conclusion: Wear Your Handmade Masterpiece with Pride
Creating a DIY pom pom sweater is more than just a craft project; it’s an opportunity to inject personality, warmth, and a touch of playful charm into your wardrobe. By following these detailed steps, experimenting with different techniques, and letting your creativity guide you, you can craft a truly unique and cozy garment that’s sure to turn heads and spark conversations. Embrace the process, enjoy the tactile satisfaction of working with yarn, and wear your handmade masterpiece with the immense pride it deserves. This accessible DIY project allows you to personalize your style and embrace the joy of handmade fashion.
