Punch needle embroidery pillow tutorial? Yes, you read that right! This exciting craft is all about creating stunning, textured pillows using a simple, yet powerful tool: the punch needle. It’s a fun and rewarding hobby that’s perfect for beginners and experienced crafters alike.
Imagine transforming plain fabric into a cozy masterpiece, complete with intricate designs and delightful textures. Get ready to unleash your creativity and learn the basics of punch needle embroidery, from choosing the right supplies to assembling your very own unique pillow.
We’ll dive into the world of punch needle embroidery, exploring its history, basic techniques, and essential tools. You’ll discover the joys of working with different yarns and fabrics, creating captivating designs, and mastering the art of adding finishing touches to your projects.
We’ll even address common challenges and provide helpful tips to ensure your success. So, grab your punch needle and get ready to embark on a journey of creative expression and cozy comfort.
Introduction to Punch Needle Embroidery
Punch needle embroidery is a versatile and captivating craft that allows you to create stunning, textured designs using a simple tool and yarn. This technique has been around for centuries, with its roots in traditional rug hooking and other forms of textile art.
Punch needle embroidery is such a relaxing hobby, especially when you’re creating something cozy like a pillow. I find that the repetitive motions are incredibly calming, and the finished product is so rewarding. To really enhance the experience, I love to diffuse some calming scents while I work.
There are so many great essential oils diffuser blends out there, and I’ve found that lavender and chamomile are perfect for creating a peaceful atmosphere while I’m stitching. Once my pillow is complete, it’s like having a little piece of tranquility to snuggle up with.
It involves using a specialized needle with a hooked end to push yarn through a woven fabric, creating loops that form a raised, three-dimensional design.Punch needle embroidery has gained immense popularity in recent years due to its accessibility, affordability, and the wide range of creative possibilities it offers.
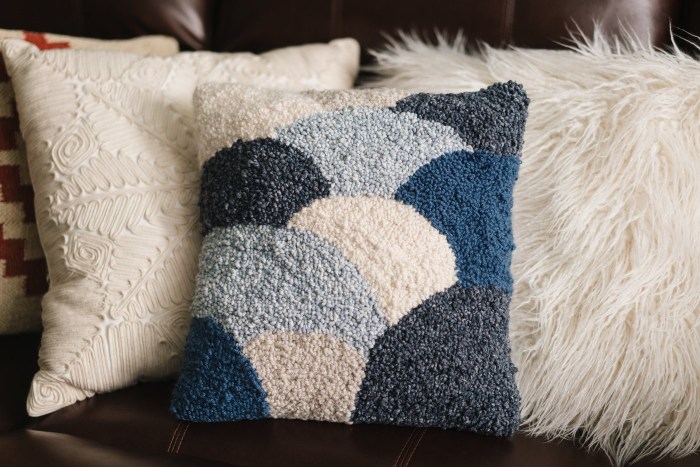
Punch needle embroidery is such a fun and rewarding craft, and making a pillow is a great way to showcase your skills! I love using different textures and colors to create unique designs. If you’re looking for some inspiration, check out at home with elizabeth – Elizabeth has some amazing punch needle projects, and her blog is a great resource for beginners and experienced crafters alike.
Once you’ve got your design figured out, you can easily transform your punch needle artwork into a cozy pillow to add a personal touch to your home.
It’s a craft that can be enjoyed by beginners and experienced crafters alike, allowing for endless experimentation and personalized expression.
The Tools and Materials of Punch Needle Embroidery, Punch needle embroidery pillow tutorial
A basic punch needle embroidery kit typically includes the following essential tools and materials:
- Punch Needle:The punch needle is the heart of this craft. It comes in various sizes, with the size determining the thickness of the loops created. The hook at the end of the needle is designed to grab the yarn and pull it through the fabric, forming the desired loops.
I’ve been having so much fun with my punch needle embroidery pillow tutorial, and I’m excited to see what I can create next! It’s amazing how a simple technique can lead to such beautiful and unique designs. Speaking of changes, I just read about the volition closes embracer group restructuring , which seems like a big shift for the industry.
I wonder how this will affect the creative landscape going forward. But back to my pillows – I’m already planning my next project and can’t wait to share the results!
- Fabric:Monk’s cloth is a popular choice for punch needle embroidery, as its open weave allows for easy yarn insertion. Other suitable fabrics include Aida cloth, canvas, and even felt.
- Yarn:A variety of yarns can be used for punch needle embroidery, including wool, acrylic, cotton, and even embroidery floss. The choice of yarn will depend on the desired texture and appearance of the finished project.
- Embroidery Hoop:An embroidery hoop is used to keep the fabric taut while you work, ensuring that the loops are even and consistent.
- Scissors:Sharp scissors are essential for cutting the yarn to the desired length.
Benefits and Appeal of Punch Needle Embroidery
Punch needle embroidery offers a range of benefits that make it a rewarding and enjoyable hobby:
- Relaxing and Therapeutic:The repetitive motion of punching the needle can be incredibly calming and meditative. It’s a great way to de-stress and unwind after a long day.
- Creative Expression:Punch needle embroidery allows you to create unique and personalized designs, whether you follow patterns or let your imagination run wild.
- Versatile and Adaptable:This craft can be used to create a wide variety of projects, from small wall hangings and coasters to larger rugs and pillows.
- Affordable and Accessible:The basic tools and materials for punch needle embroidery are relatively inexpensive, making it an accessible craft for everyone.
- Portable and Convenient:Punch needle embroidery is a portable craft that can be enjoyed anywhere, making it a perfect activity for travel or downtime.
Choosing the Right Supplies
Gathering the right supplies is crucial for a successful punch needle embroidery project, especially when creating a pillow. This section will guide you through selecting the best tools and materials for your first punch needle adventure.
Punch Needle Selection for Beginners
Choosing the right punch needle is essential for a smooth and enjoyable embroidery experience. For beginners, it’s recommended to start with a simple, basic punch needle. This will allow you to get acquainted with the technique without being overwhelmed by advanced features.
Here are some key factors to consider when selecting a punch needle for beginners:
- Size:A smaller punch needle (typically 1-2 mm) is easier to control and provides a tighter stitch density, which is ideal for beginners.
- Material:Punch needles are usually made of metal, with some models offering a plastic or wooden handle. Metal needles tend to be more durable, but plastic and wooden handles can offer a more comfortable grip.
- Type:There are two main types of punch needles: standard and double-ended. Standard needles have a single point, while double-ended needles have two points, allowing you to create different stitch types. For beginners, a standard needle is recommended.
Yarn and Fabric Selection
The choice of yarn and fabric significantly impacts the final look and feel of your punch needle embroidery. Consider the following factors when selecting your materials:
- Yarn:For beginners, a medium-weight yarn, like worsted weight or aran weight, is ideal. These yarns are easy to work with and provide a good balance of thickness and texture. Choose a yarn that is not too fuzzy or bulky, as this can make it difficult to punch through the fabric.
- Fabric:Monofilament fabrics like Aida cloth or evenweave fabric are excellent choices for punch needle embroidery. They offer a consistent weave that makes it easier to create even stitches. For pillow projects, a heavier weight fabric like canvas or linen can provide a more durable base.
Hoop Size for Pillow Projects
The hoop size you choose will depend on the size of your pillow and the design you intend to create. For a standard-sized pillow (16×16 inches), a 10-inch hoop is generally sufficient. However, if you plan on creating a larger design or a more intricate pattern, a larger hoop might be necessary.
Remember: Choose a hoop size that allows you to comfortably work with your chosen design and fabric.
Designing Your Pillow: Punch Needle Embroidery Pillow Tutorial

Now that you’ve gathered your supplies, it’s time to get creative! Designing your pillow is the fun part, and there are endless possibilities. You can use your imagination to create a unique and personalized piece of art that reflects your style and personality.To start, you need to decide on a design.
This could be a simple geometric pattern, a whimsical animal, a beautiful floral arrangement, or anything else that inspires you. You can find inspiration from nature, art, fashion, or even your own dreams.
Creating a Clear Pattern
Creating a clear pattern or sketch for your pillow is essential. This will help you visualize the final product and ensure that your design is well-balanced and proportioned. You can use a pencil and paper, a digital drawing program, or even a simple sketch on your fabric.Here are some tips for creating a clear pattern:
- Start with a basic shape or Artikel.
- Add details gradually, working from the general to the specific.
- Consider the scale of your design and how it will look on the pillow.
- Use different colors and textures to add depth and interest.
- Remember to leave some space around your design for the edges of the pillow.
Transferring Designs onto Fabric
Once you have a clear pattern, you need to transfer it onto your fabric. There are several techniques you can use, depending on your preference and the complexity of your design.
- Tracing:You can use a lightbox or a window to trace your pattern onto the fabric using a pencil or fabric marker. This method is simple and works well for designs with sharp lines.
- Carbon Paper:Carbon paper can be used to transfer designs onto fabric. Place the carbon paper between your pattern and the fabric, then trace the design with a pencil or pen. The carbon paper will leave a mark on the fabric, which you can then use as a guide for your punch needle embroidery.
- Freehand Drawing:If you’re comfortable with freehand drawing, you can draw your design directly onto the fabric using a fabric marker or pencil. This method is more forgiving for designs with organic shapes.
- Iron-On Transfer Paper:Iron-on transfer paper is a great option for transferring designs with intricate details. Simply print your design onto the transfer paper, then iron it onto the fabric according to the manufacturer’s instructions. The design will transfer to the fabric, leaving a clear Artikel that you can follow.
No matter which method you choose, be sure to test it on a scrap piece of fabric first to ensure that the transfer is clear and that the ink or pencil won’t bleed or smudge.