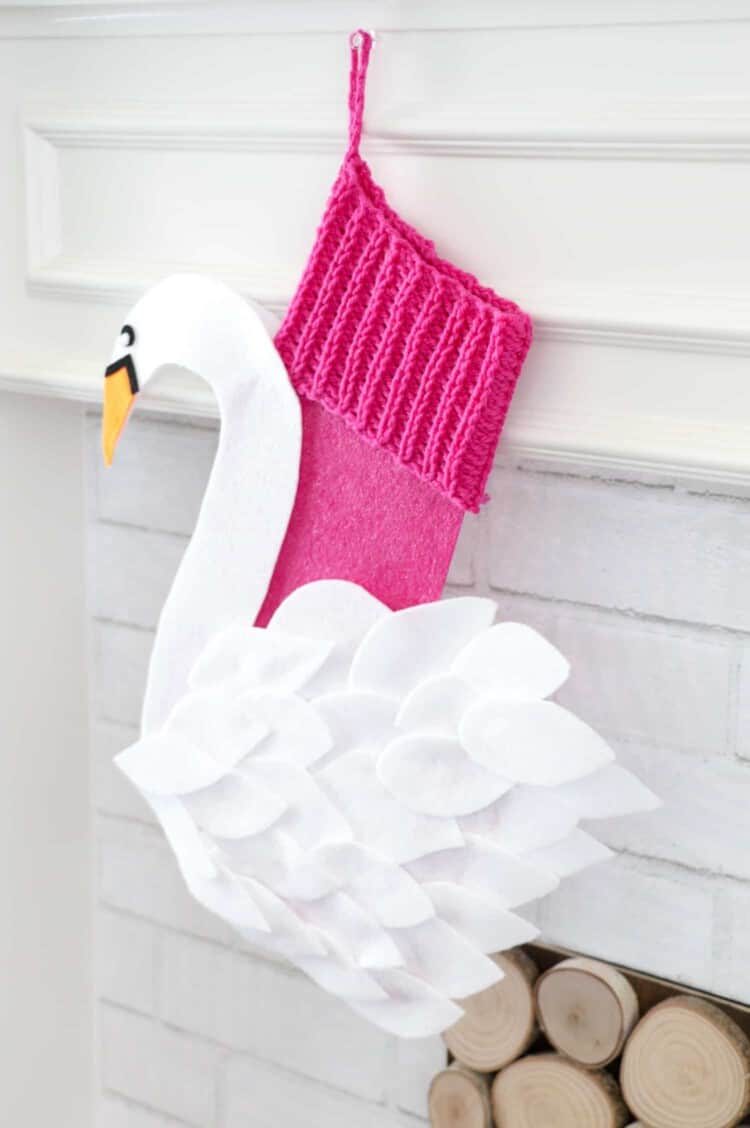
Craft Your Own Elegant Swan Stocking: A Detailed DIY Guide for a Touch of Graceful Holiday Charm
Embarking on the creation of a handmade swan stocking offers a unique opportunity to infuse your holiday décor with elegance and personalized charm. Beyond the standard festive fare, a swan stocking introduces a sophisticated aesthetic, reminiscent of tranquil waters and graceful avian beauty. This comprehensive guide will walk you through every step of the process, from selecting materials to the final embellishments, ensuring a stunning and durable addition to your Christmas celebrations. We’ll delve into the nuances of fabric choices, pattern creation, sewing techniques, and decorative elements, making this project accessible to crafters of varying skill levels. Prepare to transform simple fabric into a captivating centerpiece for your mantelpiece, a testament to your crafting prowess and holiday spirit.
The foundational element for any successful DIY project is meticulous planning and the selection of appropriate materials. For your swan stocking, consider the overall aesthetic you wish to achieve. Traditionalists might opt for luxurious velvets in deep jewel tones like emerald green, sapphire blue, or ruby red, evoking a sense of classic opulence. Alternatively, a more contemporary approach could involve sophisticated brocades with subtle metallic threads, or even textured dupioni silk for a lustrous finish. For a whimsical touch, consider patterned fabrics like subtle floral prints, damask, or even elegant animal prints that subtly echo the swan motif without being overtly thematic. The lining is equally important for a professional finish and added durability. Cotton or a soft satin makes an excellent choice, providing a smooth interior and preventing fraying. You’ll also need interfacing, a stiffening material that adds structure and body to the fabric, crucial for the swan’s form, especially around the neck and head. Consider medium-weight fusible interfacing for ease of application. For thread, opt for a high-quality polyester or cotton thread that matches your main fabric or provides a subtle contrast for decorative stitching. Essential tools include sharp fabric scissors, a rotary cutter and mat for precise cutting, a sewing machine with appropriate needles for your chosen fabrics, pins, a measuring tape, tailor’s chalk or a fabric marker, and an iron and ironing board for pressing seams. Don’t forget decorative elements such as lace trims, satin ribbons, beads, sequins, or even small faux pearls to adorn your swan.
The heart of any handmade item lies in its pattern. For a swan stocking, the key is to capture the graceful silhouette of the bird. You can find numerous swan stocking patterns online by searching for "DIY swan stocking pattern" or "handmade swan Christmas stocking template." Many of these are free printables, while others might be available for purchase. Alternatively, you can draft your own pattern. Begin by sketching a swan shape on a large piece of paper or butcher paper. Consider the desired size of your stocking – a typical Christmas stocking measures around 18-20 inches from top to toe. Draw the body of the swan, ensuring it has a pleasing curve and a substantial base to hold gifts. From the body, extend a graceful neck that curves upwards, culminating in a distinct head with a beak. The tail can be a gentle sweep at the back. Once you’re satisfied with the overall shape, refine the lines. Remember to account for a seam allowance of approximately 0.5 inches around the entire pattern. You’ll need two identical main body pieces for the exterior of the stocking, and two identical lining pieces. For the swan’s neck and head, you’ll likely need two pieces for the exterior and two for the lining, attached to the main body. Some patterns might also include a separate cuff piece. If you’re drafting your own, consider making the cuff a separate element for a more defined edge. Once your pattern pieces are finalized, carefully cut them out from the paper.
With your pattern pieces ready, it’s time to transfer them onto your chosen fabrics. Lay your main fabric flat, wrong side up. Pin the pattern pieces securely in place, ensuring they are aligned with the grain of the fabric if specified by the pattern. If you’re using a directional print, pay close attention to the orientation of the swan. Use tailor’s chalk or a fabric marker to trace around each pattern piece, including the seam allowance. Repeat this process for the lining fabric, placing the pattern pieces on the wrong side of the lining material. For the interfacing, lay it flat, fusible side up, and place the corresponding pattern pieces on top. Carefully follow the manufacturer’s instructions for applying fusible interfacing, typically involving ironing it onto the wrong side of the fabric pieces. This step is crucial for creating a structured and elegant swan form, preventing the neck and head from drooping. Once all pieces are traced and the interfacing is applied, carefully cut them out using sharp fabric scissors or a rotary cutter and mat. Accuracy in cutting will significantly impact the final appearance of your swan stocking.
The sewing process is where your swan stocking truly begins to take shape. Start by preparing the swan’s neck and head. Take one exterior neck/head piece and one lining neck/head piece. Place them right sides together and sew along the outer curved edges, leaving the straight edge that will attach to the main stocking body open. Repeat this for the second set of neck/head pieces. Trim the seam allowances to about a quarter inch, clipping curves to allow for smooth turning. Turn both sewn neck/head pieces right side out and press them flat, ensuring a crisp edge. Now, prepare the main stocking body. Take one exterior main body piece and one lining main body piece. Place them right sides together. Now, take one of your prepared swan neck/head pieces and place it between the main body pieces, with its raw edge aligned with the top edge of the stocking body and its right side facing inwards. Pin securely in place. Repeat this with the second swan neck/head piece on the other side of the main body pieces, ensuring they are mirroring each other to form the complete swan. This will create a layered effect where the neck/head pieces will emerge from between the exterior and lining of the stocking. If your pattern includes a cuff, prepare it now by sewing the short ends right sides together to form a loop. Fold the cuff in half lengthwise, wrong sides together, and press. This will create a finished edge for the top of your stocking.
Continue assembling the main stocking body and lining. With the neck/head pieces positioned, pin the entire exterior of the stocking together, paying close attention to aligning the raw edges of the main body pieces and the open edges of the neck/head pieces. Sew along the entire outer edge of the stocking, starting from the bottom of one leg and continuing all the way around to the bottom of the other leg, maintaining your chosen seam allowance. Leave the top opening of the stocking unsewn. Now, take your prepared lining pieces. Place the lining pieces right sides together and sew along the entire outer edge, leaving the top opening and a small opening of about 3-4 inches in one of the side seams (this will be used for turning the stocking right side out). Carefully clip curves and trim seam allowances as you did with the neck/head pieces.
Turning the stocking right side out is a crucial step for a professional finish. Gently turn the exterior of the stocking right side out. Then, take the assembled lining and insert it into the exterior stocking, with right sides together. The raw edges of the top openings of both the exterior and lining should be aligned. Pin them securely together. Now, sew around the entire top opening of the stocking, enclosing the raw edges. Once sewn, use the opening you left in the lining seam to carefully pull the entire stocking right side out. Gently work the lining into the stocking and press the top edge flat, creating a clean and defined opening. If you’re adding a separate cuff, it would be sewn to this top edge now, typically with the raw edges of the cuff aligned with the raw edges of the stocking opening and then turned to the inside. Finally, close the opening in the lining seam by hand-stitching or machine stitching it closed.
Embellishing your swan stocking is where your creativity can truly shine and elevate the piece from a simple sewing project to a work of art. Consider the swan’s features. A delicate bead or sequin can be used for the eye, adding a subtle sparkle. For the beak, a small piece of contrasting fabric, perhaps a metallic gold or silver, can be appliquéd or embroidered. Lace trim can be used to adorn the edge of the stocking opening, creating a romantic and sophisticated finish. Satin ribbons can be tied into a bow at the neck of the swan or used to create a hanging loop. If you’ve chosen a luxurious fabric, consider adding delicate embroidery to the body of the swan, perhaps a swirling pattern or a subtle vine motif. Small faux pearls or crystals can be strategically placed to mimic water droplets or add a touch of understated glamour. For a more whimsical approach, consider felt cutouts in complementary colors to add accents. When attaching embellishments, ensure they are securely fastened to withstand the rigors of the holiday season. Hand-sewing beads and sequins will provide the most durable results.
The final touches and hanging mechanism are essential for a functional and attractive stocking. Once all embellishments are in place, give your swan stocking a final press with your iron. Ensure all seams are neat and flat. For the hanging loop, you have several options. You can create a sturdy loop from ribbon, fabric, or even a strong braided cord. Attach this loop securely to the back of the stocking, near the top. Ensure it’s strong enough to support the weight of any gifts. Some crafters prefer to sew a decorative tab or a D-ring onto the back for hanging. If you’ve incorporated a cuff, the hanging loop can be integrated into the cuff’s construction. When deciding on the placement of the hanging loop, consider how it will drape on your mantelpiece and ensure it allows the swan’s graceful form to be prominently displayed. A well-crafted hanging loop not only provides functionality but can also be an aesthetic element in itself.
Storing your handmade swan stocking properly after the holiday season will ensure its longevity and beauty for years to come. Once the festive period has concluded, gently remove any ornaments or delicate embellishments that could be snagged. Hand-wash the stocking if necessary, using a mild detergent and cool water, avoiding harsh scrubbing. Lay it flat to air dry completely, away from direct sunlight or heat, which can fade colors or damage fabrics. Once dry, carefully fold or roll the stocking to prevent creases. Consider storing it in a breathable fabric bag or a garment box. Avoid plastic bags, as they can trap moisture and lead to mildew. If you’ve used intricate beadwork or delicate lace, consider placing acid-free tissue paper between folds to protect these elements. Storing your swan stocking in a cool, dry, and dark place, such as a closet or an attic that doesn’t experience extreme temperature fluctuations, will preserve its exquisite appearance. By taking these simple care and storage steps, your elegantly crafted swan stocking will remain a cherished part of your holiday décor for many Christmases to come, a beautiful reminder of your personalized touch and the joy of handmade traditions.
