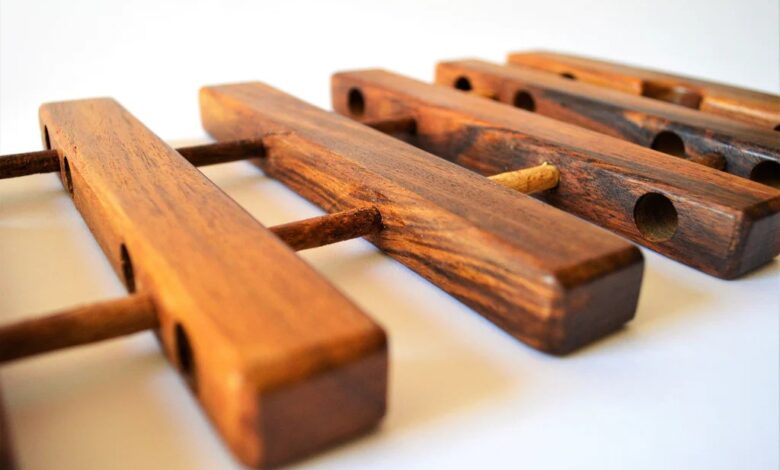
DIY Wooden Trivet Set: Have you ever admired the rustic charm of wooden trivets and wished you could create your own? Well, you’re in luck! This project allows you to unleash your creativity and craft functional and stylish trivets that add warmth and character to your kitchen.
Wooden trivets are more than just practical kitchen accessories; they are a testament to craftsmanship and a reflection of personal style. They protect surfaces from heat, add a touch of rustic elegance, and can even be personalized with unique designs and engravings.
Building your own wooden trivet set is a rewarding experience that allows you to express your creativity and create something truly unique.
Introduction to DIY Wooden Trivet Sets
Wooden trivets are essential kitchen tools that serve as heat-resistant platforms for hot pots, pans, and dishes. They protect countertops and table surfaces from heat damage and scratches. They also elevate dishes, allowing for better airflow and preventing condensation.DIY wooden trivet sets offer a unique opportunity to personalize your kitchen decor and add a touch of handcrafted charm.
They also provide a chance to showcase your woodworking skills and create practical and stylish accessories for your home.
Benefits of Using Wooden Trivets
Wooden trivets offer several advantages over other materials, such as silicone or metal:
- Durability:Well-crafted wooden trivets are highly durable and can withstand high temperatures without warping or cracking.
- Heat Resistance:Wood is a natural insulator, providing excellent heat resistance, protecting your surfaces from heat damage.
- Aesthetic Appeal:Wooden trivets add warmth and natural beauty to your kitchen decor, complementing various styles.
- Sustainability:Using wood, a renewable resource, promotes environmentally friendly practices.
The Appeal of Creating DIY Wooden Trivet Sets
Creating your own wooden trivet sets offers numerous benefits:
- Customization:You can choose the wood type, size, shape, and finish to match your personal style and kitchen decor.
- Cost-effectiveness:DIY projects can be more budget-friendly than purchasing ready-made trivets.
- Sense of Accomplishment:Completing a woodworking project provides a sense of satisfaction and accomplishment.
- Unique Gifts:Handmade wooden trivets make thoughtful and personalized gifts for friends and family.
Materials and Tools for DIY Wooden Trivet Sets

Creating a DIY wooden trivet set is an enjoyable and rewarding project, and the right materials and tools are crucial for achieving a beautiful and functional outcome. This guide will Artikel the essential components needed to embark on this crafting journey.
Materials for DIY Wooden Trivet Sets
The materials you choose will influence the final look, durability, and overall aesthetic of your trivets. Here’s a comprehensive list of materials commonly used for DIY wooden trivet sets:
Wood Types
- Hardwoods:Hardwoods, known for their strength and durability, are excellent choices for trivets. They resist heat and scratching, making them ideal for everyday use. Examples include:
- Maple:Renowned for its smooth grain and beautiful light color, maple is a popular choice for trivets, offering both beauty and durability.
- Cherry:Cherry wood is known for its rich reddish-brown color and fine grain. It adds a touch of elegance to trivets.
- Walnut:With its distinctive dark brown color and beautiful grain patterns, walnut is a luxurious option for trivets.
- Oak:Strong and durable, oak is a classic choice for trivets, offering a rustic and timeless look.
- Softwoods:Softwoods, while less durable than hardwoods, can still be used for trivets. They are typically more affordable and easier to work with.
- Pine:Pine is a readily available and affordable softwood, known for its light color and straight grain. It is suitable for trivets, but may require additional finishing to enhance its durability.
- Cedar:Cedar wood is known for its distinctive aroma and natural resistance to insects. It adds a unique touch to trivets.
Finishes
- Wood Oil:Wood oils penetrate the wood, enhancing its natural beauty and providing protection against moisture and stains. They are available in various finishes, from natural to darker tones.
- Polyurethane:Polyurethane forms a protective layer over the wood, providing a durable and water-resistant finish. It is available in both gloss and matte finishes.
- Wax:Wax provides a protective layer while enhancing the natural beauty of the wood. It is typically applied in multiple coats for a durable finish.
Adhesives
- Wood Glue:Wood glue is essential for securely bonding wooden pieces together. Choose a high-quality wood glue designed for strong and durable bonds.
Tools for DIY Wooden Trivet Sets
The right tools are essential for creating a high-quality wooden trivet set. Here’s a list of common tools used for this project:
Measuring and Marking Tools
- Measuring Tape:A measuring tape is essential for accurately measuring the dimensions of your trivets.
- Ruler:A ruler is useful for smaller measurements and marking precise lines.
- Pencil:A pencil is used for marking lines and transferring measurements.
Cutting Tools
- Hand Saw:A hand saw is useful for cutting smaller pieces of wood.
- Circular Saw:A circular saw is ideal for making straight cuts through wood.
- Jigsaw:A jigsaw is used for making curved cuts and intricate shapes.
Sanding Tools
- Sandpaper:Sandpaper is used to smooth the surface of the wood and remove any imperfections.
- Orbital Sander:An orbital sander is a power tool that speeds up the sanding process, providing a smooth and even finish.
Drilling Tools
- Drill:A drill is essential for creating holes in the wood for attaching handles or other decorative elements.
- Drill Bits:Various drill bits are needed for different sizes of holes.
Other Tools
- Clamps:Clamps are used to hold pieces of wood together while the glue dries.
- Safety Glasses:Safety glasses are essential for protecting your eyes from wood dust and debris.
- Dust Mask:A dust mask is recommended to protect your respiratory system from wood dust.
DIY Wooden Trivet Design Ideas
Once you’ve gathered your materials and tools, it’s time to get creative with your wooden trivet designs! There are endless possibilities for customizing your trivets to fit your style and needs. Whether you prefer simple geometric shapes or intricate patterns, there’s a design out there for everyone.
You can also personalize your trivets with engravings or decorative elements that reflect your personality or the occasion.
Trivet Shapes and Sizes
The shape and size of your trivet will depend on the size and weight of the pots and pans you plan to use it for. Here are some common trivet shapes and sizes to consider:
- Square:Square trivets are a classic choice that provides a stable base for a variety of pots and pans. They can be made in a range of sizes, from small to large.
- Round:Round trivets are a more modern and stylish option that can add a touch of elegance to your kitchen. They are also ideal for use with round pots and pans.
- Rectangular:Rectangular trivets are a versatile option that can be used for a variety of purposes, including serving platters and hot dishes.
Trivet Design Elements
You can enhance the functionality and aesthetic appeal of your wooden trivet by incorporating different design elements. These elements can be both practical and decorative, adding a personal touch to your creation.
| Element | Description | Example | Benefit |
|---|---|---|---|
| Handles | Handles can make it easier to move hot pots and pans. They can be made from wood, metal, or leather. | A pair of small wooden handles on the sides of a square trivet. | Improved ease of use and handling. |
| Decorative Elements | Decorative elements can add a touch of personality to your trivet. These can include inlays, carvings, paint, or even burned designs. | A geometric pattern carved into the surface of a round trivet. | Enhanced visual appeal and unique style. |
| Functional Features | Functional features can improve the performance of your trivet. These can include grooves for drainage, raised edges to prevent spills, or even a built-in thermometer. | A small groove around the perimeter of a square trivet to catch spills. | Improved functionality and practicality. |
| Personalized Engravings | Engravings can add a personal touch to your trivet. You can engrave names, dates, initials, or even a special message. | Engraving a family name or a special date on a rectangular trivet. | Unique and meaningful personalization. |
Step-by-Step Guide to Creating DIY Wooden Trivet Sets
Creating your own wooden trivet sets is a rewarding and enjoyable project. This guide will walk you through the process, from cutting and sanding to finishing and sealing, ensuring you have a beautiful and functional set of trivets.
Cutting and Sanding the Wooden Trivet Components
Before beginning, gather your materials: wood, measuring tape, pencil, saw, sandpaper, and safety gear. The type of wood you choose will affect the look and feel of your trivets. Hardwoods like maple or oak are durable and offer beautiful grain patterns.
Softer woods like pine are easier to work with but may be less resistant to scratches.
- Measure and Cut:Use a measuring tape and pencil to mark the desired dimensions of your trivets on the wood. For a standard-sized trivet, aim for 6-8 inches in diameter. Cut the wood to size using a saw, ensuring clean and precise cuts.
Creating a DIY wooden trivet set is a fun way to add a personal touch to your kitchen decor. You can stain or paint them in any color you like, and if you’re feeling adventurous, you can even try some simple watercolor techniques to create a unique design.
For inspiration, check out this article on 5 easy watercolor techniques to get your creative juices flowing. Once you’ve mastered your watercolor skills, you can use them to paint your trivets and create a truly one-of-a-kind set.
- Sanding:Sand the cut pieces of wood with progressively finer grits of sandpaper to achieve a smooth surface. Start with a coarse grit (80-120) to remove any rough edges and then move to a finer grit (220-400) for a smooth finish.
Creating a DIY wooden trivet set is a fun and rewarding project. It’s a great way to add a touch of handmade charm to your kitchen. If you’re looking for a cute and cuddly project to pair with your trivets, check out this plush fox doll DIY tutorial.
After all, a cozy fox doll and a set of rustic wooden trivets make the perfect pairing for a warm and inviting home.
Assembling the Wooden Trivet Components, Diy wooden trivet set
Once the wooden components are cut and sanded, it’s time to assemble them. The assembly process will vary depending on the design you’ve chosen. For a simple trivet, you can use wood glue to attach the base to the top piece.
For more intricate designs, you may need to use screws, dowels, or other fasteners.
- Applying Glue:Apply a thin layer of wood glue to the surfaces that will be joined. Ensure the glue is evenly distributed and avoid using too much, as excess glue can seep out and create a messy finish.
- Clamping:Clamp the pieces together firmly and allow the glue to dry completely. The drying time will vary depending on the type of glue used, but it’s typically recommended to wait at least 24 hours.
Creating Decorative Elements
Adding decorative elements to your wooden trivets can elevate their aesthetic appeal. Several techniques can be employed, each adding a unique character to your project.
- Wood Burning:Wood burning involves using a heated tool to create designs and patterns on the wood surface. It’s a popular technique for adding intricate details and rustic charm.
- Carving:Carving is a more intricate technique that involves using tools to sculpt designs and patterns into the wood. It can create stunning three-dimensional effects and add a touch of artistry to your trivets.
- Painting:Painting allows you to add color and patterns to your trivets. You can use acrylic paints, oil paints, or even stencils to create a personalized design.
Finishing and Sealing Wooden Trivets
Once the decorative elements are added, it’s time to finish and seal the wooden trivets. This step protects the wood from moisture, stains, and scratches, ensuring durability and longevity.
- Sanding:After applying decorative elements, sand the trivets again to smooth out any rough edges and create a consistent surface. Use a fine-grit sandpaper (220-400) for a smooth finish.
- Finishing:Applying a finish to the wood enhances its natural beauty and protects it from wear and tear. You can choose from various finishes, including oil, wax, or polyurethane. Oil finishes provide a natural look and feel, while wax finishes offer a subtle sheen and protection.
Polyurethane finishes offer the most durable protection, creating a hard, glossy surface.
- Sealing:Sealing the wood helps to protect it from moisture, stains, and scratches. Use a sealant that is compatible with the finish you’ve chosen. Apply the sealant in thin, even coats, allowing each coat to dry completely before applying the next.
Creative Ideas for DIY Wooden Trivet Sets
The possibilities for personalizing your DIY wooden trivet sets are endless! You can create unique pieces that reflect your style and add a touch of personality to your kitchen. Let’s explore some creative ideas to get you started.
Personalizing Wooden Trivets
Adding a personal touch to your trivets can make them truly unique. Here are some ideas to explore:
- Using Different Wood Stains: Experiment with various wood stains to achieve different finishes. For example, you can use a dark walnut stain for a rich and elegant look or a lighter oak stain for a more natural feel. You can even use multiple stains to create interesting patterns or gradients.
- Incorporating Natural Elements: Add natural elements like dried flowers, leaves, or shells to create a rustic and organic aesthetic. You can press these elements into the wood before applying a sealant, or you can use them to create a decorative border around the trivet.
Making a DIY wooden trivet set is a fun and rewarding project. It’s amazing how a few simple pieces of wood can be transformed into something beautiful and functional. Speaking of transforming things, I recently tackled the daunting task of organizing my hall closet – you can check out my tips on how I organized my hall closet in one afternoon.
Now that I have a clean and organized closet, I can finally find all my tools and supplies for future DIY projects, like my next set of wooden trivets!
- Adding Decorative Hardware: Enhance your trivets with decorative hardware like metal knobs, handles, or hinges. These elements can add a touch of whimsy or sophistication, depending on your design.
Creating Thematic Trivet Sets
Themed trivet sets can be a fun and creative way to showcase your interests or celebrate different occasions. Here are some ideas:
- Seasonal Trivets: Create a set of trivets that reflect the different seasons. You can use colors, textures, and natural elements to represent each season. For example, you can use autumn leaves for a fall trivet, snowflakes for a winter trivet, and flowers for a spring trivet.
- Holiday Trivets: Design trivets that celebrate different holidays. You can use holiday-themed colors, patterns, and symbols to create festive pieces. For example, you can create a trivet with a Christmas tree design for Christmas or a pumpkin design for Halloween.
- Personalized Trivets: Create trivets that reflect your personal interests or hobbies. For example, you can create a trivet with a design inspired by your favorite sport, book, or movie.
Customization Options
Here’s a table showcasing different customization options for your wooden trivets:
| Customization Option | Description | Example |
|---|---|---|
| Engraving | Use a wood-burning tool or laser engraver to create intricate designs or personalized messages on the trivet. | A trivet with a floral design engraved on its surface. |
| Mosaic Tile Inlays | Create a decorative mosaic design by embedding small tiles into the wood surface. | A trivet with a geometric pattern made of different colored ceramic tiles. |
| Wood Burning Designs | Use a wood-burning tool to create freehand designs or patterns on the trivet. | A trivet with a whimsical animal design created using wood burning. |
Safety Precautions for DIY Wooden Trivet Sets
Creating a DIY wooden trivet set can be a rewarding project, but it’s essential to prioritize safety throughout the process. Working with wood and tools requires caution and adherence to safety guidelines to prevent accidents and injuries.
Safety Guidelines for Using Power Tools
Using power tools like saws, drills, and sanders can be dangerous if not handled properly. Here are some essential safety guidelines:
- Always wear safety glasses to protect your eyes from flying debris.
- Use hearing protection, such as earplugs or earmuffs, to prevent hearing damage from the noise of power tools.
- Ensure the work area is well-lit and free of clutter to prevent tripping hazards.
- Keep your fingers away from the blade or cutting area of saws and other tools.
- Always disconnect power tools from the power source before making adjustments or changing blades.
- Use a clamp or vice to secure the wood piece while working to prevent it from moving.
- Never operate power tools while fatigued or under the influence of alcohol or drugs.
Proper Handling and Storage of Wood and Adhesives
Wood and adhesives are essential components of DIY wooden trivet sets, and proper handling and storage are crucial for safety.
- Wear gloves when handling wood, especially if it has rough edges or splinters.
- Store wood in a dry, well-ventilated area to prevent warping or mold growth.
- Use adhesives according to the manufacturer’s instructions. Avoid contact with skin and eyes.
- Store adhesives in a cool, dry place, away from direct sunlight and heat.
- Always ventilate the work area when using adhesives to avoid inhaling fumes.
Safety Precautions for Working with Wood
Woodworking involves handling sharp tools and materials, so it’s crucial to take necessary precautions to prevent injuries.
- Always wear safety glasses to protect your eyes from flying debris.
- Use a push stick to guide wood through saws, especially when cutting small pieces.
- Use a dust mask or respirator when sanding wood to avoid inhaling wood dust.
- Keep your fingers away from the blade or cutting area of saws and other tools.
- Use a clamp or vice to secure the wood piece while working to prevent it from moving.
- Store sharp tools in a safe place, out of reach of children.
Inspiration and Resources for DIY Wooden Trivet Sets
Creating a wooden trivet set is a rewarding project, and finding inspiration and resources can be a great starting point. Whether you are a seasoned woodworker or a beginner, there are numerous online resources, communities, and professional designs to fuel your creativity.
Online Resources and Communities
Online resources and communities offer a wealth of knowledge, inspiration, and support for DIY woodworkers. You can find detailed tutorials, step-by-step instructions, and helpful tips from experienced woodworkers. These platforms also provide a space to connect with other woodworkers, share projects, and ask questions.
- YouTube: YouTube is a treasure trove of DIY woodworking videos, with numerous channels dedicated to woodworking projects, including trivet sets. Search for “DIY wooden trivet” or “woodworking trivet” to find tutorials and inspiration.
- Pinterest: Pinterest is a visual platform where you can discover endless ideas and inspiration for DIY projects. Search for “wooden trivet” or “trivet design” to find countless examples and tutorials.
- Reddit: Reddit has numerous woodworking communities, such as r/woodworking and r/DIY, where you can find discussions, advice, and inspiration from fellow woodworkers.
- Woodworking Forums: Online woodworking forums, such as Lumberjocks and WoodworkingTalk, offer a platform for woodworkers to share projects, ask questions, and discuss techniques.
Professional Wooden Trivet Designs
Looking at professional wooden trivet designs can provide valuable inspiration and insights into various design elements, materials, and finishes. Professional designers often incorporate unique shapes, textures, and patterns into their trivets, offering a wealth of ideas for your own project.
- Geometric Trivets: Geometric trivets often feature intricate patterns and designs, showcasing the beauty of wood and its ability to create visually stunning pieces. They can be made from various wood types and finished with oils, waxes, or stains to enhance their natural beauty.
- Rustic Trivets: Rustic trivets often feature a more natural and organic aesthetic, incorporating elements like bark, knots, and imperfections in the wood. These trivets often have a charming and earthy feel, adding a touch of nature to your kitchen decor.
- Contemporary Trivets: Contemporary trivets often feature clean lines, minimalist designs, and a focus on functionality. They can be made from various wood types, such as walnut, maple, or cherry, and often feature a sleek, modern finish.
- Personalized Trivets: Personalized trivets can be engraved with names, dates, or special messages, making them unique and sentimental gifts. They can also be customized with different wood types, finishes, and designs to reflect the recipient’s personal style.
Online Platforms, Blogs, and Books
There are numerous online platforms, blogs, and books that offer DIY wooden trivet tutorials and patterns. These resources provide detailed instructions, tips, and techniques to guide you through the process of creating your own trivet set.