Tied crop top diy – Tied crop tops are having a major moment, and for good reason! They’re cute, versatile, and totally customizable. With a little bit of fabric, thread, and some basic sewing skills, you can create your own unique tied crop top to wear all summer long.
Whether you prefer a classic halter style, a trendy square neck, or something more daring like an off-the-shoulder design, there’s a tied crop top out there for everyone. This DIY project lets you express your personal style and create a piece that fits your body perfectly.
This guide will walk you through every step of the process, from choosing the right fabric to adding finishing touches. We’ll cover everything from taking accurate measurements to sewing the seams and creating the iconic tie closures. So grab your sewing machine and get ready to unleash your inner fashionista!
Introduction to Tied Crop Tops
Tied crop tops have become a fashion staple, captivating hearts with their effortless charm and versatility. These tops offer a unique blend of style and comfort, making them perfect for a variety of occasions, from casual outings to glamorous events.The beauty of tied crop tops lies in their ability to accentuate the waistline, creating a flattering silhouette.
The adjustable ties allow for a personalized fit, ensuring a comfortable and stylish experience. Moreover, the cropped length adds a touch of playfulness and modernity to any outfit.
Different Tied Crop Top Designs
Tied crop tops come in a multitude of designs, catering to diverse styles and preferences. Here are some popular examples:
- Halter Crop Tops: These tops feature a halter neckline that ties at the back of the neck, offering a sophisticated and elegant look. They are particularly flattering for individuals with broader shoulders, as they help to balance the silhouette.
- Square Neck Crop Tops: Square neck crop tops are known for their chic and timeless appeal. The square neckline elongates the neck and draws attention to the shoulders, creating a flattering and feminine look.
- Off-the-Shoulder Crop Tops: Off-the-shoulder crop tops exude a romantic and effortless vibe. The off-the-shoulder design adds a touch of femininity and can be adjusted to suit different necklines and styles.
Materials and Tools: Tied Crop Top Diy

To create your own tied crop top, you’ll need a few essential materials and tools. The specific items may vary depending on your chosen design and fabric, but the following list provides a comprehensive overview of what you’ll likely need.
This section will cover the essential materials, including fabric types, and the tools needed for each step of the DIY process.
Fabric
The choice of fabric is crucial for your tied crop top. Consider the desired look, feel, and drape of the garment when selecting the material. Here are some popular fabric options for tied crop tops:
- Cotton:A versatile and comfortable fabric that comes in various weights and textures. It’s easy to work with and suitable for both casual and dressy looks.
- Silk:A luxurious and flowing fabric known for its drape and shine. It’s perfect for creating elegant and sophisticated tied crop tops.
- Linen:A natural and breathable fabric with a relaxed and textured feel. It’s ideal for summery and bohemian styles.
- Satin:A smooth and shiny fabric that adds a touch of glamour. It’s often used for evening wear and special occasions.
- Chiffon:A lightweight and sheer fabric that drapes beautifully. It’s perfect for creating romantic and feminine tied crop tops.
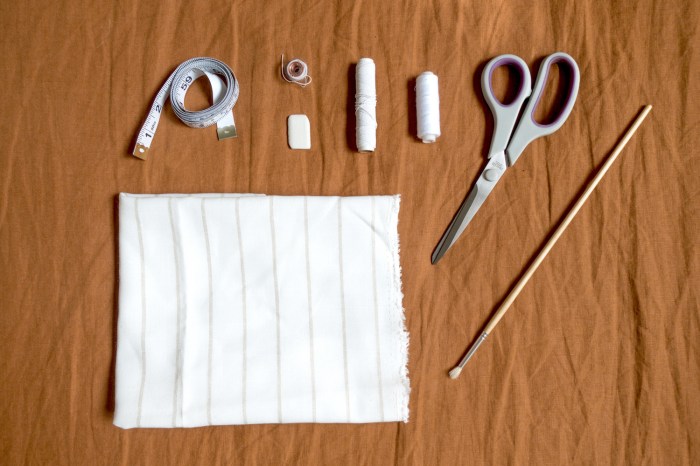
Tools
You’ll need a few essential tools to create your tied crop top. These tools will be used throughout the DIY process, from cutting and measuring to sewing and finishing.
- Scissors:Sharp scissors are essential for cutting fabric accurately and cleanly.
- Measuring tape:A measuring tape is crucial for taking accurate measurements and ensuring a perfect fit.
- Sewing machine:A sewing machine makes the process of stitching fabric much easier and faster. However, if you don’t have a sewing machine, you can use a needle and thread.
- Thread:Choose thread that matches or complements the color of your fabric.
- Pins:Pins are used to hold fabric pieces together before sewing.
- Iron:An iron is used to press seams and create a crisp and professional finish.
- Fabric marker or chalk:A fabric marker or chalk is used to mark fabric for cutting and sewing.
Designing Your Crop Top
Now that you have your materials and tools ready, it’s time to get creative and design your crop top! The possibilities are endless, but the key is to make sure it fits you perfectly and flatters your figure.This section will guide you through the process of taking measurements, designing a flattering neckline and sleeve style, and determining the appropriate length for your crop top.
Taking Measurements for a Custom Fit
Accurate measurements are crucial for creating a crop top that fits you perfectly. Here’s how to take them:
- Bust:Wrap a measuring tape around the fullest part of your bust, keeping it level.
- Waist:Find your natural waistline by bending to the side. Wrap the measuring tape around the narrowest part of your torso.
- Hip:Stand with your feet together and wrap the measuring tape around the widest part of your hips.
- Shoulder to Shoulder:Measure across your back, from one shoulder bone to the other.
- Shoulder to Waist:Measure from the top of your shoulder to your natural waistline.
- Desired Crop Top Length:Decide how long you want your crop top to be. You can measure from your natural waistline to the desired length.
It’s a good idea to take measurements while wearing a bra that you’ll be wearing with your crop top. This will help ensure a comfortable and accurate fit.
I’ve been loving the tied crop top DIY trend lately – it’s so easy to personalize and makes a statement. And to complete the look, I’m all about accessorizing with some eye-catching jewelry, like the gorgeous maple pieces featured in this article on spring summer maple jewelery.
The natural wood tones and intricate designs are the perfect way to add a touch of whimsy and sophistication to any outfit, whether you’re rocking a tied crop top or something else entirely.
Designing a Flattering Neckline and Sleeve Style
The neckline and sleeve style can significantly impact the overall look of your crop top. Here are some tips for designing a flattering neckline and sleeve style:
- Consider your body shape:A scoop neckline can be flattering for those with a smaller bust, while a V-neck can elongate the neck and torso. If you have broad shoulders, you might want to opt for a neckline that draws the eye down, such as a sweetheart or cowl neckline.
- Choose sleeves that complement your arms:Cap sleeves can be flattering for a variety of arm shapes, while short sleeves can be a good choice for those with slim arms. If you have larger arms, you might want to choose a sleeveless style or a longer sleeve.
- Experiment with different necklines and sleeve styles:Don’t be afraid to try different combinations until you find a style that you love.
You can find inspiration from fashion magazines, online retailers, and even your own wardrobe.
A tied crop top is a super versatile piece of clothing that can be dressed up or down. It’s a great way to show off your waistline and add a touch of femininity to your outfit. If you’re looking for a way to make your own tied crop top, there are tons of tutorials online.
And while I’m on the topic of DIY, I recently read about how Mitchell Companies is using Descartes routing solution to optimize their beverage distribution performance. Mitchell Companies enhances beverage distribution performance with Descartes routing solution. This type of innovation is inspiring, and it reminds me that even a simple DIY project like a tied crop top can have a big impact on your style and confidence.
Determining the Appropriate Length for the Crop Top, Tied crop top diy
The length of your crop top can also impact the overall look and feel. Here are some tips for determining the appropriate length:
- Consider your personal style:Do you prefer a longer crop top that hits just above your waist, or a shorter crop top that reveals more skin?
- Think about the occasion:A shorter crop top might be more appropriate for a casual event, while a longer crop top might be more suitable for a dressier occasion.
- Experiment with different lengths:Don’t be afraid to try different lengths until you find one that you feel comfortable and confident in.
Remember, the most important thing is to choose a length that makes you feel good!
Sewing the Crop Top
Now that you’ve got your pattern and fabric ready, it’s time to get sewing! This section will guide you through the process of stitching your crop top together, from cutting the fabric to creating the tie closures.
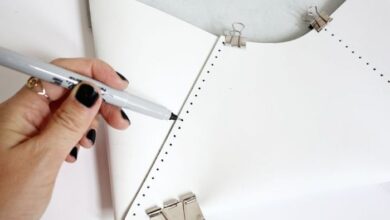
Cutting the Fabric
Before you start sewing, carefully cut out your fabric pieces according to your pattern. It’s essential to use sharp fabric scissors for clean cuts.
- Place your pattern pieces on the fabric, ensuring they are aligned with the grain line. The grain line runs parallel to the selvage edge of the fabric, which is the finished edge of the fabric.
- Pin the pattern pieces to the fabric to prevent them from shifting.
- Carefully cut around the pattern pieces, leaving a seam allowance of about 1/2 inch (1.25 cm). This seam allowance will be used to join the fabric pieces together.
Sewing the Seams
Now that you’ve cut out your fabric pieces, you can start sewing them together.
- Start by sewing the shoulder seams. Right sides of the fabric facing each other, pin the shoulder seams together, and sew along the seam allowance.
- Next, sew the side seams, following the same procedure as the shoulder seams.
- Sew the neckline and armholes. Use a zig-zag stitch for these seams to prevent fraying.
Creating the Tie Closures
Now it’s time to create the tie closures for your crop top.
- Cut two strips of fabric for each tie, about 2 inches (5 cm) wide and 18 inches (45 cm) long. The length can be adjusted based on your desired tie length.
- Fold the fabric strips in half lengthwise, wrong sides together, and press with an iron to create a crease. This will make the tie more sturdy and give it a cleaner look.
- Sew along the open edge of the folded fabric strip, leaving a small opening at the end for turning. This will create a tube-like shape for your tie.
- Turn the fabric strip right side out through the opening. Use a blunt object, like a chopstick or knitting needle, to push out the corners.
- Close the opening by hand-stitching it closed.
- Attach the ties to the crop top. You can sew the ties to the corners of the neckline or the sides of the crop top, depending on your desired style.
Finishing Touches
You’ve sewn your crop top, but it’s not quite finished! The final touches are what will transform your creation from a basic garment to a polished and stylish piece. These finishing touches ensure a professional look and feel.
Hemming the Edges
A clean hem is essential for a professional-looking crop top. There are several techniques you can use to hem your crop top.
- Serger Hem:If you have a serger, this is the quickest and most durable method. The serger will stitch a neat, finished edge that prevents fraying.
- Zigzag Stitch:A zigzag stitch can be used on a standard sewing machine to prevent fraying. It’s not as durable as a serger hem, but it’s a good option if you don’t have a serger.
- Double Fold Hem:A double fold hem is a classic technique that involves folding the fabric twice and stitching it down. This is a durable and professional-looking hem.
Adding Decorative Elements
Decorative elements can add a personal touch to your crop top.
- Embroidery:Embroidery is a beautiful way to add intricate designs to your crop top. You can use a sewing machine or hand-embroider.
- Embellishments:There are endless possibilities for embellishments. You can add beads, sequins, rhinestones, buttons, or other decorative items.
- Lace:Lace can be used to trim the edges of your crop top or create decorative details.
Pressing the Seams
Pressing your seams is crucial for a polished look. It helps to flatten the seams and create a smooth, professional finish.
I love the versatility of a tied crop top – you can dress it up or down in a flash! And if you’re looking for inspiration for a new bedroom vibe, check out this amazing green and white main bedroom before after makeover – it’s so calming and fresh! Back to the crop top, I think a simple white one would look great with a pair of high-waisted jeans and a statement necklace.
- Ironing:Use a hot iron and a pressing cloth to press the seams flat.
- Steam Iron:A steam iron can help to remove wrinkles and create a crisp finish.
- Pressing Cloth:A pressing cloth protects the fabric from the heat of the iron.
Styling Your DIY Crop Top
Now that you’ve created your own unique crop top, it’s time to explore all the amazing ways to style it! From casual outings to special events, there’s a look for every occasion.
Styling Your Crop Top with Different Bottoms
The beauty of a crop top is its versatility. It can be paired with a variety of bottoms to create different looks. Here are some ideas:
- High-Waisted Pants:This classic combination is both stylish and flattering. Choose pants in a contrasting color or print to create a bold statement. A high-waisted pair of tailored trousers with a simple crop top is perfect for a sophisticated look, while a more casual option might include a pair of high-waisted jeans.
- Skirts:A crop top can elevate any skirt, from a flowy maxi to a mini. For a casual look, pair your crop top with a denim skirt. For a more formal occasion, try a pencil skirt or a midi skirt with a flowing fabric.
- Shorts:Crop tops look great with shorts, especially high-waisted styles. This combination is perfect for warm weather and can be dressed up or down depending on the occasion. Think denim shorts for a casual vibe or tailored shorts for a more polished look.
Styling Your Crop Top for Different Occasions
- Casual:For a casual look, pair your crop top with denim shorts, jeans, or a flowy skirt. Add a pair of sneakers or sandals for a comfortable and effortless vibe.
- Formal:To dress up your crop top for a formal occasion, pair it with a tailored skirt or pants. Opt for a crop top in a luxurious fabric like silk or satin. Accessorize with heels and statement jewelry.
- Evening Wear:For a glamorous evening look, pair your crop top with a flowing maxi skirt or a high-waisted pant. Add a touch of sparkle with statement jewelry or a sparkly clutch.
Accessorizing Your Crop Top
The right accessories can take your crop top look to the next level. Here are some ideas:
- Belts:A belt can accentuate your waist and add a touch of style. Choose a belt that complements the color of your crop top or your other accessories.
- Jewelry:Statement necklaces, earrings, or bracelets can add a touch of personality to your look. Choose jewelry that complements the style of your crop top and the occasion.
- Hats:A hat can add a touch of sophistication or a casual vibe, depending on the style you choose. A fedora or a wide-brimmed hat can be perfect for a more formal occasion, while a baseball cap or a beanie can be perfect for a casual look.
Tips for Success
Crafting your own tied crop top is a fun and rewarding experience, but it’s important to keep a few key tips in mind to ensure a successful project. These tips will help you navigate the process with ease and achieve a polished, professional-looking result.
Choosing the Right Fabric
The choice of fabric is crucial for the success of your tied crop top. The right fabric will not only enhance the look but also impact its wearability and overall feel.
- Weight:For a casual, everyday look, opt for lightweight fabrics like cotton or linen. These fabrics are comfortable and drape beautifully. For a more structured look, consider using medium-weight fabrics like denim or broadcloth.
- Texture:The texture of your fabric can add a unique element to your crop top. A smooth fabric like satin or silk will give a more formal and elegant vibe, while a textured fabric like corduroy or tweed will create a more casual and rustic look.
- Stretch:If you’re planning to create a fitted crop top, choose a fabric with some stretch. This will allow for ease of movement and comfort.
Troubleshooting Common Sewing Challenges
Even experienced sewers encounter challenges from time to time. Here are some tips to overcome common sewing difficulties:
Uneven Seams
Uneven seams can detract from the overall appearance of your crop top.
- Use a Seam Guide:A seam guide is a helpful tool that can ensure your seams are consistently even.
- Practice:Practice sewing straight lines on scrap fabric before working on your crop top.
- Check Your Tension:If your sewing machine tension is too loose or too tight, it can cause uneven seams.
Fabric Puckering
Fabric puckering occurs when the fabric gathers or wrinkles around the seams.
- Use a Smaller Stitch Length:A smaller stitch length can help to prevent puckering.
- Press Your Seams:Pressing your seams after sewing can help to smooth out any wrinkles and prevent puckering.
- Use a Fabric Sheeting:A fabric sheeting can help to prevent the fabric from puckering as you sew.
Practice and Patience
Mastering any craft, including sewing, requires practice and patience. Don’t get discouraged if your first attempt isn’t perfect. With each project, you’ll gain valuable experience and improve your skills.
- Start with Simple Projects:Begin with simple sewing projects to build your confidence and skills.
- Take Your Time:Don’t rush the process. Take your time and focus on each step to ensure a high-quality result.
- Don’t Be Afraid to Experiment:Experiment with different fabrics, stitches, and techniques to discover what works best for you.