Tulle circle skirt DIY is a project that’s both enchanting and surprisingly achievable. Remember that time you saw a ballerina twirling in a billowing tulle skirt? That feeling of wonder and elegance is what we’re going to recreate today.
Whether you’re aiming for a whimsical fairy-tale look or a touch of romantic flair, a tulle circle skirt is a versatile piece that can be dressed up or down for any occasion. The best part? You don’t need to be a seasoned seamstress to make your own.
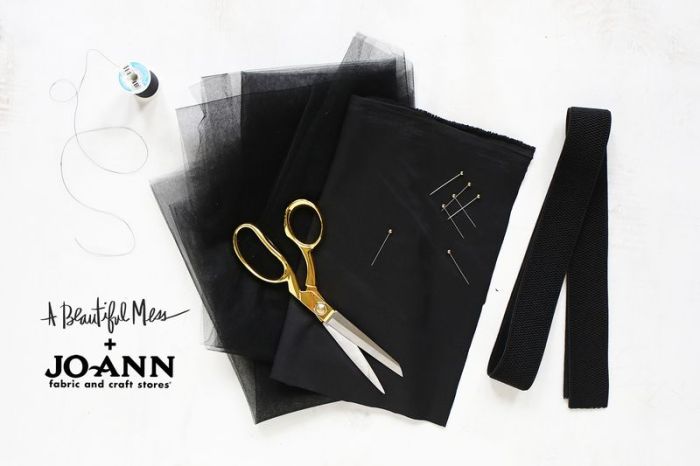
With just a few simple materials and a dash of creativity, you can transform a plain piece of tulle into a breathtaking masterpiece.
This DIY project isn’t just about creating a beautiful garment, it’s about embracing the joy of crafting and expressing your unique style. Imagine the satisfaction of wearing a skirt that you made yourself, a garment that embodies your personal touch and brings a touch of magic to your wardrobe.
Let’s embark on this journey together, and I promise, the results will be worth every stitch!
Tulle Circle Skirt: A DIY Dream Come True

I remember the first time I wore a tulle circle skirt. It was for a friend’s birthday party, and I felt like a princess as I twirled around the dance floor. The skirt was so airy and light, it felt like I was floating.
Ever since then, I’ve been in love with tulle circle skirts. They’re so versatile, you can dress them up or down, and they always make a statement. Tulle circle skirts are a timeless fashion staple that exude elegance and whimsy.
Their airy and voluminous silhouette creates a captivating visual appeal, adding a touch of magic to any outfit. Whether you’re attending a formal event, a casual outing, or simply want to add a touch of charm to your everyday look, a tulle circle skirt is sure to make you feel special.
The Benefits of Creating a DIY Tulle Circle Skirt
Making your own tulle circle skirt has numerous benefits, allowing you to personalize your style and create a truly unique piece. Here are a few reasons why you should consider taking on this DIY project:
- Cost-effectiveness:You can save a significant amount of money by creating your own skirt instead of buying one from a store.
- Customization:You have complete control over the design, color, and length of your skirt, allowing you to create a piece that perfectly reflects your personal style.
- Creativity:DIY projects are a great way to unleash your creativity and express yourself through fashion. You can experiment with different colors, textures, and embellishments to make a skirt that’s truly one-of-a-kind.
- Sense of accomplishment:There’s nothing quite like the feeling of satisfaction that comes with completing a DIY project. You’ll be proud of yourself for creating something beautiful with your own hands.
Assembling the Skirt

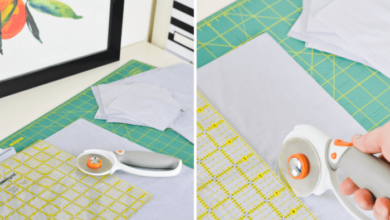
Now that you have all your tulle circles cut, it’s time to start assembling the skirt. This is the fun part where you see your vision come to life! We’ll be layering the tulle circles to create a full and flowing skirt, and we’ll secure each layer to the waistband for a beautiful and secure finish.
Securing Tulle Layers to the Waistband, Tulle circle skirt diy
You can choose from various methods to attach the tulle layers to the waistband, each with its pros and cons. Here are some popular options:
- Sewing:This method is great for a durable and professional finish. You can use a sewing machine or sew by hand, depending on your preference and skill level. Sewing provides a strong hold for the tulle layers and ensures a neat and tidy look.
Making a tulle circle skirt is a fun and rewarding DIY project, especially if you’re running a small business selling handmade clothing. The materials can be a significant expense, but luckily, there are ways to offset those costs! You can check out this list of top ten tax write offs for small biz owners to see if any apply to your business.
Knowing these deductions can make a big difference in your bottom line, leaving you with more resources to invest in beautiful fabrics for your next tulle circle skirt creation.
However, it can be time-consuming, especially if you have multiple layers.
- Fabric Glue:This is a faster and easier option compared to sewing. Fabric glue is readily available and easy to use. It creates a strong bond between the tulle and the waistband. However, it’s important to choose a high-quality fabric glue that won’t leave any residue or damage the fabric.
Making a tulle circle skirt is such a fun project, and it’s surprisingly easy! The key is to have a good system for organizing all those layers of tulle. Laura’s organization-focused entryway is a great source of inspiration for how to keep things neat and tidy.
Once you’ve got your tulle organized, you can start layering and creating a truly beautiful and whimsical skirt.
- Safety Pins:This method is the quickest and easiest for attaching tulle layers. Simply pin each layer to the waistband using safety pins. However, it’s not as secure as sewing or glue, and the pins might be visible.
Layering the Tulle Circles
Now, let’s discuss how to assemble the tulle circles into layers. The key is to create a smooth and even distribution, ensuring a beautiful and flowing skirt.
Making a tulle circle skirt is a fun and rewarding project, but it can definitely create a bit of a mess! Once you’ve gathered all your supplies and tackled the layers of tulle, you’ll likely have a mountain of fabric scraps.
This is where some clever storage solutions come in handy! Check out these 7 tried and tested bedroom storage tips to maximize your space to keep your crafting area organized and ready for your next DIY adventure. With a little planning, you can easily keep your crafting supplies in check, making your next tulle project even smoother!
- Start with the waistband:Begin by placing your waistband on a flat surface. This will serve as the base for your skirt.
- Attach the first layer:Take the largest tulle circle and carefully attach it to the waistband using your chosen method (sewing, glue, or safety pins). Make sure the circle is centered and smooth.
- Adding subsequent layers:Now, take the next largest tulle circle and place it on top of the first layer, slightly overlapping the edges. Secure this layer to the waistband, ensuring it’s smooth and even.
- Continue layering:Repeat the process of adding tulle circles, each slightly smaller than the previous one, overlapping the edges, and securing them to the waistband. You can adjust the amount of overlap based on your desired fullness.
- Finishing the layers:Once you have all the tulle layers attached, check for any uneven edges or gaps. You can adjust the tulle circles by slightly pulling or pushing them until you achieve the desired look.
Finishing Touches: Tulle Circle Skirt Diy
Now that your tulle circle skirt is assembled, it’s time to add your personal touch and make it truly your own. This is where your creativity shines! You can embellish the skirt with ribbons, lace, beads, or anything else that catches your eye.
Adding Embellishments
There are many ways to embellish your tulle circle skirt, and the possibilities are endless.
- Ribbons:Ribbons can be sewn around the waistband, used to create bows, or even woven into the tulle itself.
- Lace:Lace can be sewn onto the skirt’s hemline, used to create a delicate overlay, or even incorporated into the waistband.
- Beads:Beads can be sewn onto the skirt in various patterns, creating a shimmering effect.
When attaching embellishments, make sure they are securely fastened. Use a strong thread and a needle that is appropriate for the fabric you are working with. For delicate embellishments, consider using a beading needle.
Creating a Custom Waistband
A custom waistband can add a touch of elegance to your tulle circle skirt.
- Fabric:Choose a fabric that complements the tulle and sew it into a waistband shape. You can use a contrasting color for a bold statement or a matching color for a more subtle look.
- Ribbon:A wide ribbon can be used as a waistband, adding a touch of whimsy.
- Elastic:Elastic is a comfortable and practical option for a waistband, especially for skirts that need to stretch.
Once your waistband is ready, attach it to the skirt using a sewing machine or by hand. Make sure the waistband is securely attached so it doesn’t come loose.
Styling and Care

Now that your tulle circle skirt is complete, it’s time to explore the endless styling possibilities and learn how to care for it properly to ensure its beauty lasts.
Styling the Tulle Circle Skirt
The tulle circle skirt is a versatile piece that can be styled for a variety of occasions, from casual outings to formal events. Its airy and whimsical nature adds a touch of elegance and sophistication to any outfit.
- Casual Chic: Pair your tulle circle skirt with a simple graphic tee, a denim jacket, and sneakers for a relaxed yet stylish look. A cute crossbody bag completes the ensemble. For a slightly more dressed-up casual look, consider a tucked-in blouse or a sweater with a statement belt.
- Formal Elegance: For a formal event, style your tulle circle skirt with a fitted top, a blazer, and heels. A clutch bag and statement jewelry add a touch of glamour. Consider a silk or satin top for a luxurious feel.
- Festive Flair: Embrace the festive spirit by pairing your tulle circle skirt with a sparkly top or a sequined sweater. Add a pop of color with bold accessories like a bright scarf or a statement necklace. Festive footwear, such as glitter heels or embellished sandals, complete the look.
Caring for Your Tulle Circle Skirt
Proper care is essential to maintain the beauty and longevity of your tulle circle skirt. Here are some tips for washing and storing your skirt:
- Hand Wash: Always hand wash your tulle circle skirt in cold water using a mild detergent. Avoid using harsh chemicals or bleach, as they can damage the delicate fabric.
- Gentle Drying: Gently squeeze out excess water and lay the skirt flat on a clean towel to dry. Avoid wringing or twisting the fabric, as this can cause wrinkles or damage the tulle.
- Storage: Store your tulle circle skirt in a cool, dry place, away from direct sunlight. Hang it on a padded hanger or fold it carefully to prevent creases or wrinkles.
Accessorizing Your Tulle Circle Skirt
Accessorizing your tulle circle skirt is a great way to personalize your look and create a cohesive ensemble. Here are some ideas for shoes, tops, and jewelry:
- Shoes: The choice of footwear depends on the occasion and the overall look you’re aiming for. For casual outings, sneakers, flats, or ankle boots are perfect. For formal events, heels, sandals, or pumps add elegance. Festive occasions call for sparkly shoes, embellished sandals, or colorful platforms.
- Tops: A simple fitted top, a tucked-in blouse, a sweater, or a statement top can complement the tulle circle skirt. Consider the color scheme and the overall aesthetic you’re going for.
- Jewelry: Statement necklaces, delicate earrings, or bold bracelets can elevate your tulle circle skirt look. Choose jewelry that complements the color scheme and style of your outfit.