Wood Leather Magazine Holder DIY: This project isn’t just about building a magazine holder; it’s about creating a piece of functional art that combines the warmth of wood with the timeless elegance of leather. Imagine crafting a holder that’s as beautiful as it is practical, a piece that adds character to your home while keeping your favorite magazines organized.
The process is rewarding, and the result is a unique statement piece you’ll be proud to display.
The combination of wood and leather offers a unique aesthetic appeal, creating a piece that seamlessly blends rustic charm with modern sophistication. A magazine holder is a practical necessity, but it can also be a decorative element that enhances the overall ambiance of a space.
This DIY project allows you to customize your magazine holder, ensuring it perfectly complements your existing decor.
Introduction
There’s something incredibly satisfying about crafting something with your own hands. DIY projects, especially those that blend the warmth of wood with the timeless elegance of leather, offer a unique blend of creativity and functionality. A magazine holder, for instance, is a simple yet essential piece of furniture that can add a touch of sophistication to any space.
The Appeal of Wood and Leather
The combination of wood and leather in a magazine holder creates a captivating aesthetic. Wood, with its natural grain and warmth, provides a grounding element, while leather, known for its durability and luxurious feel, adds a touch of refinement. This pairing is a testament to the enduring appeal of traditional craftsmanship, offering a timeless elegance that complements a variety of interior styles.
Materials and Tools
This DIY project requires a few basic materials and tools. The choice of materials will influence the final look and feel of your magazine holder.
Building a wood and leather magazine holder is a fun DIY project, and while it’s not as complex as operating a remote-controlled robot, there are still safety considerations. For instance, ensuring the tools you use are sharp and well-maintained is crucial, just like understanding the safety spectrum of teleoperation is vital when working with remotely controlled machines.
But once you’ve got the safety basics down, you can focus on the creative aspects of your project, like choosing the right leather and wood for your magazine holder.
Wood
The wood you choose will be the foundation of your magazine holder. It’s important to select a wood that is strong enough to hold the weight of magazines and durable enough to withstand everyday use.
- Hardwoods:Hardwoods are generally denser and more resistant to scratches and dents. Popular choices for this project include oak, maple, walnut, and cherry. These woods offer a natural beauty and will age gracefully.
- Softwoods:Softwoods are typically less expensive and easier to work with. Pine, fir, and cedar are good options. While they may be more susceptible to scratches, they can be stained or painted to match your decor.
Leather
Leather adds a touch of elegance and durability to the magazine holder.
- Full-grain leather:This is the highest quality leather, with the top layer of the hide intact. It’s known for its durability, natural beauty, and ability to develop a rich patina over time.
- Top-grain leather:This leather is similar to full-grain, but the top layer may have been sanded or buffed to create a smoother surface. It’s still durable and attractive.
- Split leather:This leather is made from the lower layers of the hide, making it less durable than full-grain or top-grain. It’s typically more affordable, but it may not be as long-lasting.
Hardware
- Wood glue:This is essential for bonding the wood pieces together. Choose a high-quality wood glue that is specifically designed for woodworking.
- Screws:Use screws to secure the leather to the wood. Choose screws that are appropriate for the thickness of your wood and leather.
- Finishing nails:These are used to attach the leather to the wood, providing a more discreet finish than screws.
- Wood stain or paint:This is optional, but it can help to enhance the natural beauty of the wood or give it a custom look.
- Leather conditioner:This helps to keep the leather supple and prevents it from drying out.
Tools
- Measuring tape:This is essential for accurate measurements.
- Pencil:Use this to mark your cuts and measurements.
- Saw:A handsaw, jigsaw, or circular saw can be used to cut the wood. Choose a saw that is appropriate for the type of wood you are using.
- Drill:A drill is needed to pre-drill holes for screws and to attach the leather.
- Screwdriver:This is used to drive the screws.
- Hammer:This is used to drive the finishing nails.
- Sandpaper:Use sandpaper to smooth out the edges of the wood and to create a smooth finish.
- Clamps:Clamps are used to hold the wood pieces together while the glue dries.
- Safety glasses:Wear safety glasses to protect your eyes from sawdust and flying debris.
- Dust mask:Wear a dust mask to prevent inhaling sawdust.
Design and Planning: Wood Leather Magazine Holder Diy
The design of your magazine holder is where you can truly express your creativity. It’s not just about functionality but also about how it complements your decor and personal style. Before diving into construction, let’s explore some design possibilities and plan the process.
Design Options
The design of your magazine holder is a reflection of your personal style and the overall aesthetic of your space. Here are some key considerations:
- Shape:Magazine holders can come in various shapes, from simple rectangles and squares to more intricate designs. Consider the space you have and the type of magazines you want to store. A tall and narrow holder might be ideal for a limited shelf space, while a wider holder could accommodate larger magazines or even books.
- Size:The size of your holder will depend on the size of your magazines and the number you want to store. You can make a compact holder for a small collection or a larger one for a more extensive library.
- Style:You can choose a classic, modern, rustic, or minimalist style to match your home decor. Consider the materials you want to use, such as wood, leather, metal, or a combination.
Examples of Designs
Here are some design ideas to spark your imagination:
- Classic:A simple rectangular holder made of solid wood with a leather strap for closure. This design exudes elegance and timeless appeal.
- Modern:A sleek and minimalist holder made of metal with angled edges and a geometric pattern. This design adds a touch of sophistication to any space.
- Rustic:A reclaimed wood holder with a distressed finish and metal accents. This design evokes a sense of warmth and history.
- Unique:A holder shaped like a book with a leather spine and metal hinges. This design is both functional and decorative, adding a touch of whimsy to your home.
Planning Process
Planning is essential to ensure your magazine holder is functional and visually appealing. Here’s a step-by-step guide:
- Determine your needs:Consider the size and type of magazines you want to store, the space you have available, and the style you desire.
- Sketch your design:Draw a rough sketch of your magazine holder, paying attention to its shape, size, and features. This will help you visualize your project and make any necessary adjustments.
- Take measurements:Measure the space where you plan to place the holder and the magazines you want to store. This will ensure your holder fits properly and accommodates your collection.
- Create a template:Using your sketch and measurements, create a template on paper or cardboard. This will serve as a guide for cutting your wood and leather pieces.
- Choose your materials:Select the type of wood and leather that best suits your design and style. Consider the thickness and grain of the wood and the color and texture of the leather.
- Gather your tools:Ensure you have all the necessary tools for cutting, shaping, and assembling your magazine holder, such as a saw, drill, sandpaper, and glue.
Construction Process

Now that you have your materials and design planned, it’s time to get your hands dirty and start building your magazine holder. The construction process involves preparing the wood, cutting and shaping it, and then assembling the pieces. The leather part is added at the end, providing a beautiful and functional finishing touch.
Building a wood and leather magazine holder is a fun DIY project that lets you get creative with materials and design. While working on the project, I found myself thinking about how to add a bit of life to my living space.
I decided to learn more about learning about indoor plants to add some natural beauty to the room. After all, a little greenery can really complement the warmth of wood and leather, making the magazine holder feel even more at home.
Preparing the Wood
Before you start cutting and assembling, you need to prepare the wood. This involves sanding the wood to create a smooth surface and ensure the pieces fit together properly.
- Sand the wood with different grit sandpaper, starting with coarse grit and moving to finer grit to remove any rough edges or imperfections. This will create a smooth surface for your magazine holder.
- If you’re using a wood stain, apply it at this stage. Make sure to follow the manufacturer’s instructions for application and drying time.
- Once the stain is dry, apply a sealant to protect the wood from scratches and spills. This will also help to enhance the natural beauty of the wood.
Cutting and Shaping the Wood
Now that the wood is prepared, you can start cutting and shaping the pieces for your magazine holder.
I’m currently working on a wood and leather magazine holder DIY project, and I’m loving the process of combining these two materials. It reminds me of another creative project I recently completed – a stitched photo art project where I used thread to stitch together different photos, creating a unique and textured piece.
Both projects involve a similar level of detail and precision, and I find that kind of focus really satisfying. I’m excited to see how the magazine holder turns out, and I might even try incorporating some stitching details into the design.
- Use a saw to cut the wood to the dimensions you’ve planned. Be sure to use a saw that is sharp and appropriate for the type of wood you’re working with.
- Use a router or sandpaper to create any curves or bevels you need for your design. You can also use a jigsaw for more intricate cuts.
- If you’re using a router, be sure to use a router table or a router jig to ensure that the cuts are precise and safe.
Assembling the Wood
Once all the pieces are cut and shaped, you can start assembling the magazine holder.
- Use wood glue to attach the pieces together. Be sure to apply the glue evenly and clamp the pieces together until the glue dries completely. If you’re using screws or nails, pre-drill holes to prevent the wood from splitting.
- Use a sander to smooth out any rough edges or imperfections after the glue has dried. This will give your magazine holder a finished look.
- Once the assembly is complete, you can apply a final coat of sealant to protect the wood from scratches and spills.
Working with Leather
The leather part of your magazine holder adds a touch of elegance and functionality. Here’s how to work with the leather:
- Cut the leather to the size and shape you need. Use a sharp utility knife or leather shears to cut the leather cleanly and precisely.
- If you need to shape the leather, use a leather punch or a leather mallet to create curves or bends. You can also use a leather stamp to add decorative details to the leather.
- Attach the leather to the wood base using leather glue or leather tacks. If you’re using leather glue, be sure to apply it evenly and clamp the leather to the wood until the glue dries completely. If you’re using leather tacks, use a hammer to drive the tacks into the wood.
Be sure to use a tack hammer that is designed for leather work.
Finishing Touches
The final stage of your DIY magazine holder project is all about adding those finishing touches that will elevate your creation from good to great. This is where you get to express your personal style and create a truly unique piece.
We’ll explore various techniques for finishing the wood and leather, along with tips for adding decorative elements.
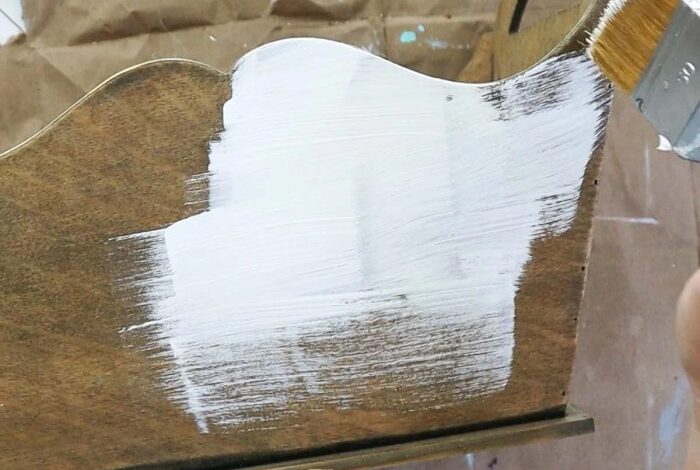
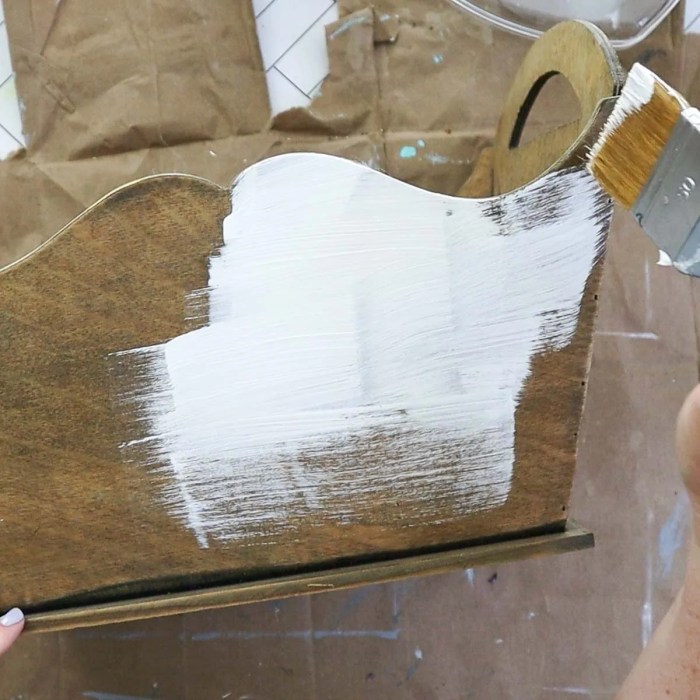
Wood Finishes
Wood finishes play a crucial role in protecting the wood and enhancing its natural beauty. Here are some popular options:
- Staining:Staining adds color and depth to the wood without obscuring its grain pattern. You can choose from a wide range of colors and finishes, including oil-based, water-based, and gel stains. For a more natural look, use a wood stain that closely matches the color of your wood.
- Painting:Painting allows you to completely change the color of the wood and create a more modern or contemporary look. Use a high-quality paint specifically designed for wood surfaces.
- Varnishing:Varnishing provides a protective layer that shields the wood from scratches, moisture, and UV damage. Varnishes come in various finishes, from matte to high gloss. Choose a finish that complements the overall style of your magazine holder.
Applying Finishes, Wood leather magazine holder diy
Achieving a smooth, even finish requires careful application:
- Preparation:Before applying any finish, ensure the wood is clean, dry, and free of dust or debris. Sanding the wood with progressively finer grits will create a smooth surface for the finish to adhere to.
- Application:Apply the finish in thin, even coats, following the manufacturer’s instructions. Allow each coat to dry completely before applying the next.
- Finishing Touches:Once the finish is dry, you can use fine-grit sandpaper to smooth out any imperfections and achieve a polished look.
Decorative Elements
Adding decorative elements can personalize your magazine holder and make it truly unique:
- Metal Accents:Metal accents like brass or copper can add a touch of elegance and sophistication. Consider using metal corner protectors, decorative hinges, or even small metal plates with engraved designs.
- Engraving:Engraving can be used to add personalized touches like initials, dates, or quotes. You can have your design engraved professionally or use a handheld engraving tool for a DIY approach.
- Leather Embellishments:If you’re using leather for the magazine holder, you can add decorative elements like leather straps, buckles, or stitching. These embellishments can enhance the overall look and functionality of the holder.
Variations and Customization
This project is a great starting point for creating a personalized magazine holder that fits your unique style and needs. You can easily modify the design to accommodate different magazine sizes, create a unique shape, or add additional storage features.
The possibilities are endless, limited only by your imagination and the tools you have available.
Different Sizes and Shapes
The basic design can be easily scaled up or down to accommodate different magazine sizes. For example, you could make a larger holder for oversized coffee table books or a smaller one for magazines with a narrower format. You could also experiment with different shapes, such as a circular or hexagonal holder.
Additional Storage Options
Adding additional storage options to your magazine holder is a great way to maximize its functionality. You could incorporate a small shelf for displaying decorative items, a drawer for storing remote controls or other small items, or even a built-in stand for a tablet or phone.
Personalized Touches
One of the best things about building your own magazine holder is the opportunity to personalize it with your own unique style. You can add decorative elements like inlays, carvings, or paint to create a truly one-of-a-kind piece. You could also use a variety of wood finishes to achieve different looks, from a natural rustic finish to a sleek and modern one.
Consider adding a personalized touch like a monogram, a family crest, or a meaningful quote to make the holder truly your own.
Experimenting with Materials and Finishes
While wood and leather are classic materials for a magazine holder, you can experiment with other materials to create a unique look. Consider using reclaimed wood, metal, or even fabric for a more contemporary feel. You can also play around with different finishes, such as painting, staining, or waxing, to achieve the desired look.
For example, a magazine holder made from reclaimed wood with a distressed finish would have a rustic and vintage appeal, while a sleek metal holder with a polished finish would have a more modern look.