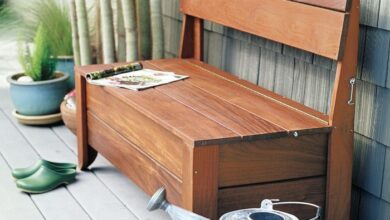
5 Ways to Update a Thrifted Photo Frame – Tired of the same old boring photo frames? Give your home decor a refresh with a thrifted find and a little creativity! Whether you’re a seasoned DIYer or a crafting newbie, updating a thrifted photo frame is a fun and affordable way to add personality to your space.
From a simple coat of paint to adding embellishments or covering it with fabric, the possibilities are endless. Get ready to unleash your inner artist and transform those forgotten frames into eye-catching accents.
Refresh with Paint: 5 Ways To Update A Thrifted Photo Frame
A fresh coat of paint can instantly transform a thrifted photo frame, giving it a new lease on life. You can choose from various paint types, each with its unique properties and finishes.
From adding a pop of color with paint to decoupaging with vintage fabric scraps, there are so many ways to give a thrifted photo frame a new life. And if you’re looking for a more unique approach, try incorporating elements from a DIY project like this leather copper cup organizer diy for a rustic touch.
You could even use leather scraps to create a textured frame border or incorporate copper accents for a touch of industrial chic. The possibilities are endless!
Types of Paint for Photo Frames
The choice of paint depends on the desired look and the material of the frame. Here’s a breakdown of popular options:
- Spray Paint:This is a quick and easy option, perfect for covering large areas and achieving a smooth, even finish. It’s available in a wide range of colors and finishes, including matte, gloss, and metallic. However, spray paint can be messy and requires proper ventilation.
- Acrylic Paint:Acrylic paint is water-based, making it easy to clean up. It dries quickly and is available in a vast array of colors. Acrylic paint is versatile and can be used for various techniques, including layering, blending, and texturing.
- Chalk Paint:Chalk paint offers a matte, vintage-inspired finish. It adheres well to various surfaces, including wood, metal, and glass. Chalk paint is known for its ease of application and ability to create a distressed or aged look.
Color Palettes and Design Ideas
The color palette and design you choose will depend on your personal style and the overall aesthetic of your home decor.
Revamping a thrifted photo frame is a fun way to add a personal touch to your home décor. You can paint it, decoupage it, or even add some fabric for a unique texture. If you’re looking for a springy update, why not try adding some fresh flowers?
You could even create a whole Easter centerpiece with flower stations, as described in this article on celebrating Easter with flower stations bouquets. The bright colors and fresh scents of the flowers will make your thrifted frame feel brand new.
- Classic Neutrals:White, black, gray, and beige are timeless choices that complement any decor.
- Bold Colors:For a statement piece, consider using bold colors like emerald green, deep blue, or vibrant red.
- Metallic Finishes:Gold, silver, and copper finishes add a touch of elegance and sophistication.
- Patterned Frames:Use stencils or freehand painting to create patterns on the frame, such as geometric shapes, floral designs, or stripes.
- Textured Frames:Create a unique look by adding texture to the frame using techniques like sponging, stippling, or using a textured roller.
Preparing the Frame for Painting
Proper preparation ensures a smooth and long-lasting paint job.
Giving thrifted photo frames a new life is a fun and budget-friendly way to personalize your home. You can paint them, decoupage them, add fabric, or even create a unique frame with a mix of materials. But don’t forget about your entryway! A personalized home welcome mat, like the ones you can find on exploreinsights.net , is a great way to add a welcoming touch.
Once you’ve got your entryway sorted, you can return to those photo frames and add some charming accents, like vintage buttons or dried flowers, for a truly one-of-a-kind look.
- Clean the Frame:Wipe the frame with a damp cloth to remove dust, dirt, and grime.
- Sand the Frame:Sanding the frame with fine-grit sandpaper will create a smooth surface for the paint to adhere to.
- Prime the Frame:Applying a primer will help the paint adhere better and provide a more even finish.
Add Embellishments
Adding embellishments is a fantastic way to personalize your thrifted photo frame and make it truly unique. You can use a variety of materials, from classic ribbons and buttons to more unconventional items like dried flowers and fabric scraps.
Embellishment Options
Embellishments can transform a plain frame into a statement piece. Here are some popular options:
- Ribbons: Ribbons come in a wide array of colors, textures, and widths. You can use them to create bows, loops, or even a simple border around the frame. For a more rustic look, try using burlap or velvet ribbons.
For a more modern feel, choose satin or silk ribbons in bold colors.
- Beads: Beads offer endless possibilities for embellishing photo frames. You can use them to create patterns, borders, or even entire designs. Consider using different sizes, shapes, and colors of beads to add visual interest. For a more whimsical look, try using beads with unique textures or patterns.
- Buttons: Buttons are another versatile embellishment option. You can use them to create clusters, borders, or even a unique design on the frame. Buttons come in a wide range of colors, sizes, and materials, so you can find the perfect ones to match your frame and style.
- Lace: Lace adds a touch of elegance and sophistication to any photo frame. You can use it to create a border, a simple embellishment, or even a more elaborate design. Lace comes in a variety of styles and colors, so you can find the perfect one to complement your frame.
Incorporating Embellishments, 5 ways to update a thrifted photo frame
The way you incorporate embellishments will depend on the style of your frame. Here are some examples:
- Simple Frame: A simple frame can be enhanced with a ribbon border, a cluster of buttons, or a few strategically placed beads.
- Ornate Frame: An ornate frame can be further enhanced with lace trim, a ribbon bow, or a few delicate beads. Avoid adding too many embellishments to an already ornate frame.
- Modern Frame: A modern frame can be given a unique touch with geometric patterns made from beads, buttons, or even small pieces of wood.
Attachment Techniques
There are several ways to attach embellishments to a photo frame securely. Here are some common techniques:
- Glue: Craft glue is a good option for attaching lightweight embellishments like ribbons, beads, and buttons. Make sure to use a strong glue that is designed for adhering to wood or metal. Apply a small amount of glue to the back of the embellishment and press it firmly onto the frame.
Let the glue dry completely before handling the frame.
- Hot Glue: Hot glue is a quick and easy way to attach embellishments to a photo frame. It provides a strong bond and dries quickly. Apply a small amount of hot glue to the back of the embellishment and press it firmly onto the frame.
Be careful not to burn yourself with the hot glue.
- Sewing: Sewing is a more permanent way to attach embellishments to a photo frame. This technique is best suited for heavier embellishments like fabric scraps or lace. Use a needle and thread to sew the embellishment directly onto the frame.
You can also use a sewing machine for a faster and more precise attachment.
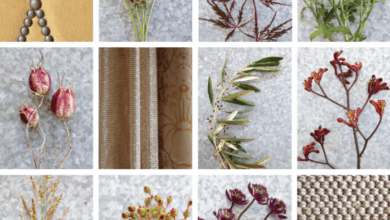
Unique Embellishment Ideas
- Dried Flowers: Dried flowers add a touch of natural beauty to any photo frame. You can use them to create a simple arrangement, a border, or even a more elaborate design. Attach the flowers with glue or hot glue.
- Pressed Leaves: Pressed leaves are another beautiful and natural embellishment option. You can use them to create a simple border, a unique pattern, or even a nature-inspired design. Attach the leaves with glue or hot glue.
- Fabric Scraps: Fabric scraps can be used to create a variety of embellishments. You can use them to create bows, loops, or even a unique design on the frame. Attach the fabric scraps with glue, hot glue, or sewing.
Revamp with Wallpaper
Giving your thrifted photo frame a wallpaper makeover is a fantastic way to add a personal touch and transform its look. It’s a relatively simple process that allows you to experiment with various patterns, textures, and colors, resulting in a unique and stylish piece.
Types of Wallpaper
The type of wallpaper you choose will greatly influence the final look of your photo frame. Consider the following options:
- Patterned Wallpaper:Patterned wallpaper offers endless possibilities for adding visual interest and personality to your frame. From bold geometric designs to delicate floral prints, you can find a pattern to match any style.
- Textured Wallpaper:Textured wallpaper adds a tactile element to your frame, creating a more substantial and dimensional look. Consider textured options like linen, grasscloth, or embossed patterns.
- Peel-and-Stick Wallpaper:Peel-and-stick wallpaper is a user-friendly option, especially for beginners. It comes in a wide range of patterns and is easy to apply and remove without damaging the frame.
Examples of Wallpaper Designs
Here are some examples of how different wallpaper designs can complement different frame styles:
- Modern Frame:A bold geometric pattern or a minimalist abstract design can enhance the modern aesthetic of a sleek frame.
- Vintage Frame:Floral patterns, damask designs, or textured wallpaper with a distressed look can complement the vintage charm of an older frame.
- Rustic Frame:Natural textures like woodgrain or burlap, or wallpaper with a rustic farmhouse pattern, can enhance the rustic appeal of a wooden frame.
Applying Wallpaper to a Photo Frame
Here’s a step-by-step guide to applying wallpaper to your photo frame:
- Measure and Cut:Carefully measure the frame’s surface and cut the wallpaper to size, leaving a small margin for overlap.
- Prepare the Surface:Clean the frame with a damp cloth to remove any dust or debris. Ensure the surface is dry before applying the wallpaper.
- Apply the Wallpaper:If using traditional wallpaper, apply paste to the back of the wallpaper. For peel-and-stick wallpaper, simply peel off the backing. Carefully position the wallpaper on the frame and smooth it out with a squeegee or your fingers, working from the center outwards to eliminate air bubbles.
- Trim Excess:Once the wallpaper is in place, trim any excess with a sharp utility knife, ensuring a clean and professional finish.
Tips for a Neat Finish
Here are some tips to help you achieve a neat and professional finish when applying wallpaper to a photo frame:
- Use a Squeegee:A squeegee is essential for smoothing out the wallpaper and removing air bubbles. Work from the center outwards, applying gentle pressure.
- Overlap the Wallpaper:Overlap the wallpaper slightly to ensure a seamless finish. Trim the excess after the wallpaper is completely dry.
- Avoid Wrinkles:Be careful not to create wrinkles when applying the wallpaper. Smooth it out as you go to prevent any creases.