
Build a Functional Bench with Integrated Storage: A Comprehensive Guide
This comprehensive guide details the process of constructing a sturdy and aesthetically pleasing bench with built-in storage, designed to maximize utility and minimize clutter in various living spaces. Whether you need a convenient entryway seat with a place for shoes and bags, a functional toy chest for a playroom, or an extra seating solution for a dining area, this project offers a customizable and rewarding DIY experience. We will cover material selection, precise measurement techniques, step-by-step assembly, finishing options, and tips for ensuring a durable and attractive final product. Understanding the fundamental principles of woodworking and utilizing the right tools will be crucial for success.
Material Selection: Choosing the Right Wood and Hardware for Durability and Aesthetics
The foundation of any successful woodworking project lies in the careful selection of materials. For a bench with built-in storage, balancing cost, durability, workability, and aesthetic appeal is paramount. Plywood is an excellent choice for the main structural components, such as the seat, sides, and base of the storage compartment. ¾-inch thick cabinet-grade plywood, such as birch or maple, offers superior strength, stability, and a smooth surface ideal for painting or staining. Avoid construction-grade plywood, as its inconsistencies and knots can compromise the structural integrity and finish quality. For the bench’s legs and any supporting braces, solid wood is recommended. Pine, poplar, or even more durable hardwoods like oak or maple can be used, depending on your budget and desired finish. Pine is cost-effective and easy to work with, while poplar offers a good balance of strength and paintability. Oak and maple provide exceptional durability and a premium look, but come with a higher price tag and require more robust tools for cutting and joining.
Hardware selection is equally important. For joining the wooden components, consider using wood screws of appropriate length to penetrate both pieces without protruding. Pilot holes are essential to prevent wood splitting, especially when working with hardwoods. Wood glue should be used in conjunction with screws to create exceptionally strong and long-lasting joints. For the storage compartment, hinges are required for the lid. Soft-close cabinet hinges are highly recommended for a smooth and controlled opening and closing action, preventing slammed lids and potential finger injuries. Consider the weight of your lid when selecting hinges; heavier lids will require sturdier, more robust hinges. For added convenience, gas struts can be incorporated to hold the lid open, further enhancing the user experience. Drawer slides are necessary if you opt for drawers instead of a lift-up lid. Full-extension drawer slides are ideal for maximizing access to the contents within. Ensure the weight rating of the drawer slides is sufficient for the intended load. Finally, consider the aesthetic of your hardware. Handles or knobs for the lid or drawers should complement the overall style of the bench.
Design and Planning: Sketching Your Vision and Precise Measurement Techniques
Before any cuts are made, a detailed plan and precise measurements are indispensable. Begin by sketching your bench design, considering its intended location and function. Factors to consider include overall dimensions (length, width, and height), the size and type of storage (lift-up lid, drawers, open shelves), and any aesthetic embellishments. For an entryway bench, a typical height might range from 16 to 18 inches to comfortably accommodate footwear underneath. The width should be sufficient for comfortable seating, and the depth should allow for adequate storage. A common depth for a bench with storage is around 18 to 20 inches.
Accurate measurements are non-negotiable. Double-check all dimensions before marking your lumber. Use a quality tape measure and a sharp pencil. For straight cuts, employ a carpenter’s square or a speed square. When marking lines for cutting, ensure the pencil lead is fine enough to create a precise line, minimizing material waste. For any angled cuts, a miter saw or a circular saw with a guide will be essential. If your design includes multiple identical pieces, such as the side panels or drawer fronts, measure and mark one piece meticulously, then use it as a template for the others to ensure uniformity. Label each piece of wood with its corresponding part in the plan to avoid confusion during assembly. This meticulous planning phase will prevent costly mistakes and ensure a well-fitting, professional-looking end product.
Cutting and Preparing Components: Precision for a Seamless Assembly
With your design finalized and measurements confirmed, the next crucial step is to cut your materials with precision. If using a circular saw, a straight edge guide is indispensable for achieving perfectly straight cuts. Clamp the guide securely to your plywood, ensuring it’s aligned with your cut line. For crosscuts on plywood, a blade designed for plywood will minimize tear-out. If using a table saw, ensure the blade is set to the correct depth and that the fence is parallel to the blade. Always use a push stick to keep your hands a safe distance from the blade.
When cutting solid wood for legs or support structures, a miter saw is ideal for precise angled cuts. If you don’t have a miter saw, a handsaw and a miter box can be used, though this requires more physical effort and precision. After cutting, it’s essential to smooth all edges and surfaces. A random orbit sander with progressively finer grits of sandpaper (starting with 120-grit and moving to 220-grit) will prepare the wood for finishing. For any dadoes or rabbets required for joining components, a router with the appropriate bit will be necessary. Ensure the depth and width of these cuts are precisely measured to create snug, interlocking joints. If you are creating drawer boxes, precise cuts for the dadoes that house the drawer bottom are critical for ensuring the drawer slides smoothly and remains square.
Assembly: Building the Frame and Integrating the Storage Mechanism
The assembly process begins with constructing the main frame of the bench. This typically involves attaching the side panels to the base panel. Apply a generous amount of wood glue to the edges of the base panel where the side panels will attach. Then, align the side panels flush with the edges of the base and secure them using wood screws. Drive the screws in straight and countersink them slightly below the surface of the wood so they can be filled later. Use a carpenter’s square to ensure all corners are perfectly 90 degrees.
Next, add any internal support structures, such as cleats or cross braces, that will reinforce the bench and provide a stable platform for the seat and storage mechanism. If building a lift-up lid storage bench, the next step is to construct the lid. This will likely involve joining several pieces of plywood or a solid wood panel. Once the lid is assembled and sanded, attach the hinges. Measure carefully to ensure the lid opens and closes smoothly without binding. For drawers, the construction involves building the drawer boxes, typically with dadoes for the bottom panel and dovetail or rabbet joints for the corners. Once the boxes are assembled, attach the drawer slides to the sides of the drawer boxes and the interior of the bench frame, ensuring they are perfectly level and parallel.
Adding the Seat and Finishing Touches: Crafting a Comfortable and Attractive Surface
With the main frame and storage mechanism in place, it’s time to add the seat. The seat is usually a single piece of plywood or a more decorative material like solid wood, depending on your design. If using plywood, ensure it’s sanded smooth and all edges are rounded over for comfort and safety. Attach the seat to the top of the frame using wood glue and screws, again ensuring the screws are countersunk.
If your bench has a lift-up lid, now is the time to attach it to the frame using the pre-selected hinges. Ensure the lid opens and closes freely and that the hinges are securely fastened. For drawers, slide them into place to test their movement. Adjust the drawer slides if necessary to ensure a smooth operation. At this stage, consider adding any decorative elements, such as trim molding around the edges of the bench or the lid. These details can significantly enhance the aesthetic appeal of your creation.
Finishing: Protecting and Beautifying Your Bench
The finishing stage is where your bench truly comes to life. Thoroughly sand all surfaces, starting with a coarser grit (120-grit) and progressively moving to finer grits (220-grit) for a smooth, blemish-free finish. Wipe down the entire bench with a tack cloth or a damp rag to remove all dust.
If painting your bench, apply a high-quality primer designed for wood. This will ensure even coverage and a durable finish. Once the primer is dry, apply two or more thin coats of your chosen paint color, allowing adequate drying time between coats. For a more durable finish, consider using a polyurethane or acrylic-based paint. If you prefer a natural wood look, staining is an excellent option. Apply the stain evenly with a brush or rag, following the grain of the wood. Wipe off any excess stain after the recommended dwell time. Once the stain is dry, apply multiple coats of a clear protective finish, such as polyurethane or varnish. This will protect the wood from moisture and wear. For a more natural, matte look, a wax finish can be applied over the stain.
Optional Enhancements and Customization: Personalizing Your Storage Bench
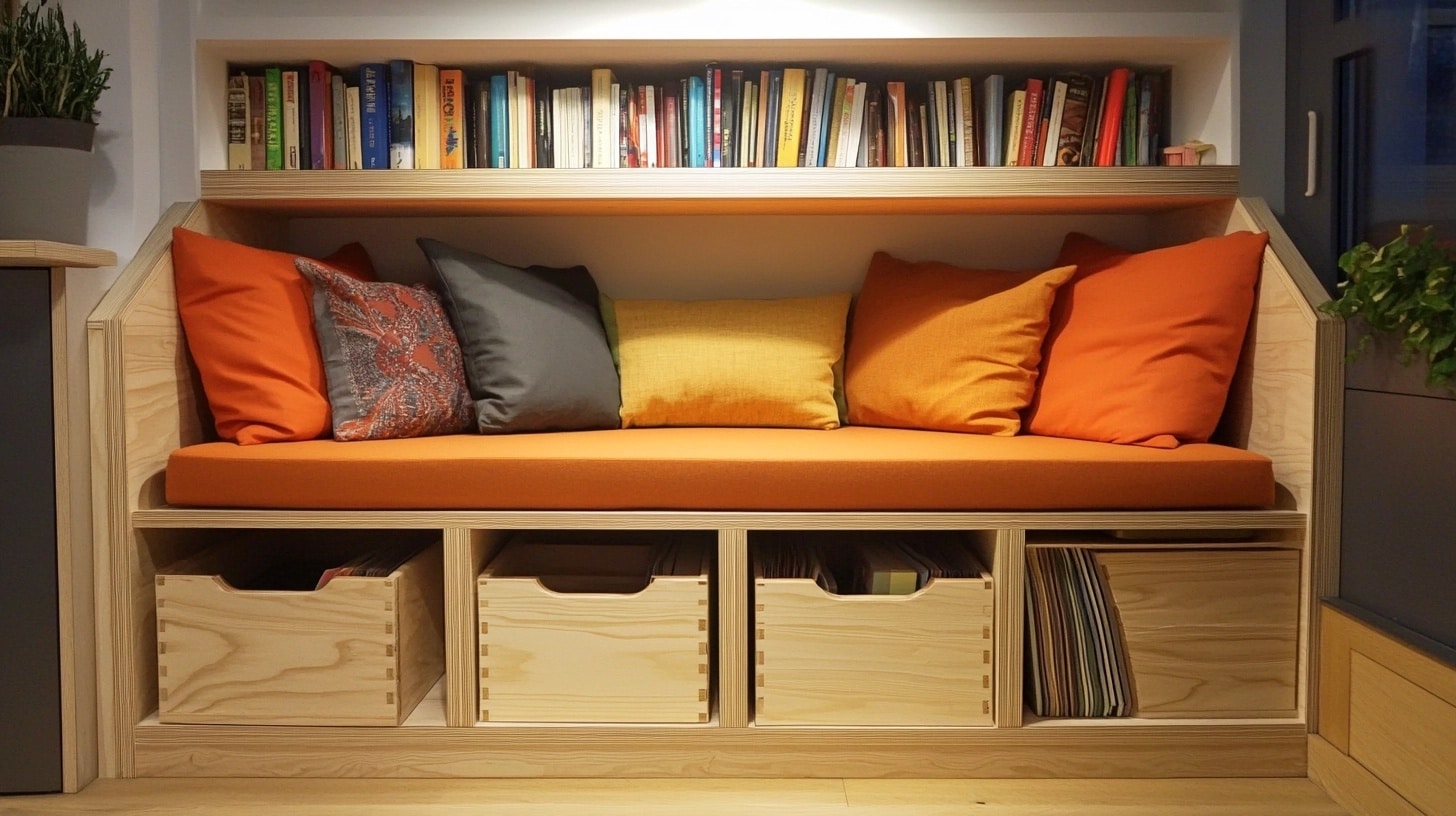
The beauty of building your own storage bench lies in its customizability. Beyond the basic construction, numerous enhancements can be made to tailor it to your specific needs and aesthetic preferences. For added comfort, consider upholstering the seat. This involves cutting a piece of high-density foam to size, covering it with a durable fabric, and stapling the fabric to the underside of the seat base. Alternatively, you can purchase a pre-made cushion that fits your bench dimensions.
For increased functionality, consider adding dividers or shelves within the storage compartment. This can help organize items and prevent them from shifting. Adjustable shelves offer even greater flexibility. If you’ve opted for drawers, you can add drawer organizers or dividers to further compartmentalize the space. For an entryway bench, consider adding hooks to the sides or back for hanging coats or bags. If the bench will be used in a child’s room, ensure all edges are rounded and any hardware is child-safe. For a more rustic look, consider using reclaimed wood for certain components. Experiment with different wood finishes, such as liming wax or an antiquing glaze, to achieve unique visual effects. The possibilities for customization are virtually endless, allowing you to create a truly one-of-a-kind piece that perfectly suits your home.
