DIY light up headboards are a trend that’s gaining momentum, and for good reason! They’re a fantastic way to add a touch of personality and visual interest to your bedroom. Creating your own light up headboard allows you to customize it to match your unique style and create a truly special piece for your space.
Beyond aesthetics, incorporating lighting into your headboard can enhance functionality, offering a warm glow for reading or creating a relaxing ambiance.
This project is a fantastic opportunity to unleash your creativity and transform your bedroom into a haven of personalized style. With a little patience and the right materials, you can easily craft a light up headboard that will be the envy of your friends and family.
DIY Light Up Headboards: A Trend That Adds Ambiance and Style
The DIY light up headboard trend has exploded in recent years, transforming bedrooms from ordinary to extraordinary. This creative approach allows homeowners to personalize their spaces, adding a touch of sophistication and functionality that perfectly complements their individual style.
Creating a custom light up headboard is a fantastic way to express your unique taste and design vision. It goes beyond simply adding a decorative element; it becomes a statement piece that reflects your personality and sets the tone for your bedroom.
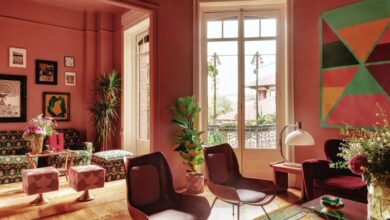
Imagine a headboard that seamlessly blends with your existing décor, adding a warm glow that creates a cozy and inviting atmosphere.
Benefits of Adding Lighting to a Headboard
Integrating lighting into your headboard offers a multitude of benefits, elevating both the aesthetics and functionality of your bedroom.
I’m finally getting around to finishing my DIY light-up headboard project, and I’m so excited to see it come together. I’m planning on adding some funky, vintage-inspired bulbs to give it a unique vibe, kind of like the quirky charm I found in the French Quarter when I was browsing through a New Orleans Louisiana travel guide.
I think the headboard will be the perfect finishing touch to my bedroom, making it a cozy and inviting space.
- Enhanced Ambiance:The soft, diffused light emanating from the headboard creates a warm and inviting atmosphere, perfect for relaxing after a long day or reading a book before bed. The gentle glow is far more soothing than harsh overhead lighting, promoting a peaceful and restful sleep environment.
- Improved Functionality:Headboard lighting serves as a practical addition, providing targeted illumination for reading or other activities in bed. This eliminates the need for additional lamps or overhead lights, minimizing clutter and creating a more streamlined aesthetic.
- Enhanced Decor:A light up headboard can become a focal point in your bedroom, adding a touch of elegance and sophistication. You can choose from various lighting styles and colors to complement your existing décor, creating a personalized and unique space that reflects your individual style.
Design Inspiration and Ideas: Diy Light Up Headboard

Creating a DIY light-up headboard is a fantastic way to personalize your bedroom and add a touch of magic to your space. The possibilities are endless, and the design inspiration is truly abundant. Let’s explore some design ideas and lighting options to ignite your creativity.
Headboard Designs
When it comes to DIY light-up headboards, there are many design possibilities. You can choose a style that complements your existing bedroom décor or go for something completely unique. Here are a few design ideas:
- Classic and Elegant:A simple upholstered headboard with a row of LED strip lights embedded in the back. This creates a subtle glow that adds warmth and ambiance to the room.
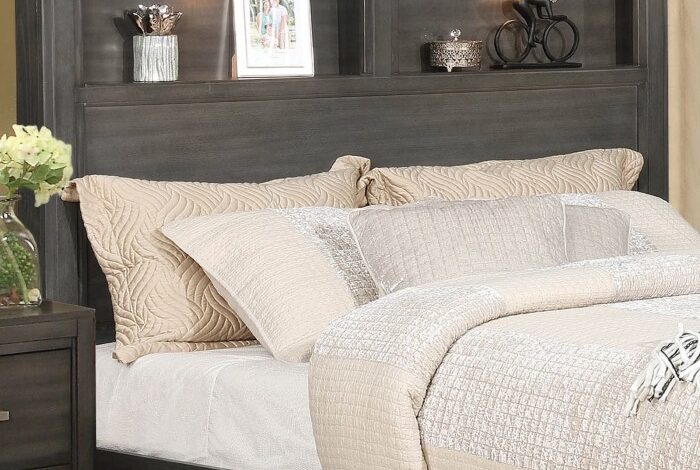
- Modern and Minimalist:A sleek wooden headboard with a single sconce on each side, casting a soft, focused light on the bed. This option provides both functional lighting and a stylish design element.
- Rustic and Industrial:A reclaimed wood headboard with exposed bulbs or Edison lights attached to the back. This design adds a touch of vintage charm and creates a cozy atmosphere.
- Bohemian and Eclectic:A headboard adorned with macrame or fabric panels, with fairy lights woven throughout for a whimsical and dreamy feel.
Lighting Options
Choosing the right lighting for your DIY light-up headboard is crucial for creating the desired ambiance. Here are some popular options:
- LED Strip Lights:These are a versatile and affordable option, offering a wide range of colors and brightness levels. They can be easily installed behind the headboard and are energy-efficient.
- Fairy Lights:These small, twinkling lights add a touch of magic and whimsy to any space. They can be used to create a soft, diffused glow or a more dramatic effect, depending on the arrangement.
- Sconces:These wall-mounted lights provide both ambient and task lighting. Sconces come in various styles, from classic to modern, and can be customized to match your headboard design.
Integrating Lighting with Headboard Materials and Style, Diy light up headboard
The key to a successful DIY light-up headboard is to seamlessly integrate the lighting with the headboard’s materials and style. Here are some ideas:
- Upholstered Headboard:LED strip lights can be hidden behind the fabric, creating a subtle glow that illuminates the headboard without being too intrusive.
- Wooden Headboard:Sconces can be mounted directly to the wood, creating a stylish and functional lighting solution. Alternatively, you can drill holes in the wood and run LED strip lights through them, creating a unique and eye-catching effect.
- Metal Headboard:Fairy lights can be woven through the metal frame, adding a touch of sparkle and creating a warm and inviting atmosphere.
Materials and Tools
Gathering the right materials and tools is essential for a successful DIY light-up headboard project. You’ll need a mix of items for construction, wiring, and lighting. Choosing high-quality and safe components is crucial for both the aesthetics and the safety of your project.
A DIY light-up headboard is a fun and unique way to add personality to your bedroom. I love the idea of incorporating little keepsakes and memories into the design, like the wine corks from special occasions, which I recently learned about in this article on creating traditions around wine cork memories.
Imagine embedding those corks into the headboard, creating a warm glow and a reminder of cherished moments. It’s a simple touch that adds so much character to a space!
Essential Materials
The materials list depends on the design and size of your headboard. Here’s a general list:
- Wood:Choose a sturdy wood like plywood, MDF, or reclaimed wood. Consider the size and style of your headboard.
- Fabric:Select a fabric that complements your bedroom décor and is suitable for upholstery. Consider factors like durability, texture, and color.
- LED Strip Lights:These are available in various colors, lengths, and brightness levels. Choose a waterproof strip if you plan to use it near the headboard’s back.
- LED Power Supply:Ensure the power supply is compatible with your LED strip lights and has sufficient wattage.
- LED Controller:This allows you to control the light’s brightness, color, and effects. Choose a controller with features that suit your needs.
- Wire:Use appropriate gauge wire for connecting the power supply to the LED strip lights.
- Connectors:Use wire connectors to safely connect the wires and ensure a secure connection.
- Staple Gun:This is useful for attaching fabric to the headboard.
- Adhesive:Use a strong adhesive to attach the LED strip lights to the headboard.
- Screws:Use screws to secure the headboard to the bed frame.
- Padding:Consider adding padding for comfort and a more finished look.
Essential Tools
The tools needed for construction and installation include:
- Saw:A circular saw or jigsaw is ideal for cutting the wood to size.
- Drill:Use a drill to create holes for attaching the headboard to the bed frame and for wiring.
- Screwdriver:Use a screwdriver to secure screws and attach components.
- Measuring Tape:Use a measuring tape to accurately measure and cut materials.
- Level:Ensure the headboard is level and properly positioned.
- Wire Strippers:Use wire strippers to remove insulation from the wires for connections.
- Multimeter:A multimeter is helpful for testing the LED strip lights and power supply.
- Safety Glasses:Protect your eyes when working with power tools and sharp objects.
- Work Gloves:Protect your hands from splinters and cuts.
Choosing Safe and High-Quality Components
- LED Strip Lights:Choose LED strip lights with a UL or CE certification, ensuring they meet safety standards.
- LED Power Supply:Ensure the power supply is UL or CE certified and has the correct voltage and amperage for your LED strip lights.
- LED Controller:Choose a controller that is compatible with your LED strip lights and has safety certifications.
- Wire:Use high-quality wire that is rated for the appropriate voltage and amperage.
- Connectors:Choose connectors that are designed for the specific wire gauge and have safety certifications.
Choosing safe and high-quality components is essential for a safe and long-lasting light-up headboard.
Building a DIY light-up headboard is a fun and rewarding project, but it can be a bit overwhelming at first. It’s like trying to navigate the political landscape, where sometimes it feels like you need a guide to help you through the complexities.
For instance, understanding the implications of the Kosa Coppa passing the US Senate can be tricky. Once you get past the initial hurdles, though, building a light-up headboard is a truly satisfying experience, just like seeing a bill you care about pass into law.
Safety Considerations
Creating a light-up headboard involves working with electricity, which requires a high level of caution. Failing to follow safety guidelines can lead to electrical shocks, fire hazards, and damage to your headboard.
Electrical Safety Precautions
It is crucial to prioritize safety when working with electricity. Here are some essential precautions to follow:
- Always disconnect power to the circuit before working on the headboard.
- Use insulated tools and wear protective gear, such as rubber gloves and safety glasses.
- Ensure that all wiring connections are secure and properly insulated.
- Avoid overloading circuits, as this can lead to overheating and potential fire hazards.
- Inspect wiring and components regularly for signs of damage or wear.
- Never work on electrical components when wet or in a damp environment.
Choosing Appropriate Wiring and Components
Selecting the right wiring and components is essential for ensuring the safety and functionality of your light-up headboard.
- Use wiring that is rated for the current and voltage of your lighting system.
- Choose LED lights as they are energy-efficient and generate less heat compared to incandescent bulbs.
- Use a low-voltage power supply for LED lights, ensuring it is rated for the wattage of the lights.
- Use a dimmer switch to control the brightness of the lights, allowing for customizable ambiance.
- Select components that are UL-listed or meet relevant safety standards.
Safe Handling of Electricity and Tools
- Always unplug tools and appliances before making any adjustments or repairs.
- Use tools that are in good working condition and have proper insulation.
- Avoid using tools in damp or wet environments.
- Be aware of the location of electrical wires and avoid drilling or cutting into them.
- Keep children and pets away from work areas where electricity is involved.
Budget and Time Considerations
Creating a DIY light-up headboard can be a rewarding project, but it’s important to consider the financial and time investment involved. By carefully planning and budgeting, you can ensure a successful and enjoyable DIY experience. This section will explore the potential cost of materials and tools, provide an estimated time commitment for the project, and offer tips for maximizing efficiency and minimizing expenses.
Cost of Materials and Tools
The cost of materials for your DIY light-up headboard will vary depending on the size, design, and materials you choose. Here’s a breakdown of potential expenses:
- Headboard Base:This could be a reclaimed headboard, a piece of plywood, or even a simple wooden frame. Costs can range from $20 to $100 or more, depending on the size and material.
- Lighting:LED strip lights are a popular choice for light-up headboards. They are energy-efficient and come in various colors and lengths. Prices can vary from $10 to $50 or more, depending on the length and features.
- Power Supply:A power supply is necessary to power the LED strip lights. You can find suitable power supplies for around $10 to $20.
- Fabric or Upholstery:If you want to add fabric to your headboard, factor in the cost of fabric, batting, and staple gun staples. Prices can vary greatly depending on the fabric type and quantity.
- Hardware:You may need screws, brackets, wire connectors, and other hardware, which can add a few dollars to the overall cost.
In addition to materials, consider the cost of tools. If you don’t already own them, you may need to purchase:
- Power Drill:Essential for drilling holes for wiring and attaching hardware.
- Screwdriver:Useful for assembling the headboard and securing components.
- Measuring Tape:For accurate measurements of the headboard and materials.
- Level:To ensure the headboard is straight and even.
- Staple Gun:For attaching fabric or upholstery to the headboard.
- Wire Strippers:For preparing the wires for connections.
- Soldering Iron:Optional, but helpful for creating more permanent connections.
Time Commitment
The time commitment for building a DIY light-up headboard can vary depending on the complexity of the design and your experience level. A simple design might take a few hours to complete, while a more intricate project could take a day or two.
Here’s a general timeline for a basic light-up headboard:
- Planning and Design:1-2 hours
- Gathering Materials and Tools:1-2 hours
- Construction:4-6 hours
- Wiring and Installation:2-4 hours
- Finishing Touches:1-2 hours
Tips for Maximizing Efficiency and Minimizing Expenses
Here are some tips to help you stay on budget and complete your project efficiently:
- Shop Around:Compare prices for materials and tools at different retailers to find the best deals.
- Consider Reclaimed Materials:Repurpose old furniture or wooden pallets for the headboard base to save money.
- Utilize Existing Tools:Borrow tools from friends or family if you don’t own them all.
- Plan Ahead:Take your time to plan the design and gather all necessary materials before you start building.
- Work in Stages:Break down the project into smaller, manageable steps to avoid feeling overwhelmed.
Example Projects and Case Studies
Bringing your DIY light-up headboard vision to life requires inspiration and practical examples. This section showcases a diverse range of projects, demonstrating various design approaches and lighting techniques, highlighting their unique features and benefits.
A Rustic Chic Headboard with Warm Lighting
This project features a reclaimed wood headboard with a warm, inviting ambiance created using string lights. The string lights are strategically placed to create a cozy and romantic atmosphere. The rustic charm of the reclaimed wood complements the soft glow of the lights, creating a visually appealing and comforting space.
The headboard’s simplicity allows the lighting to be the focal point, adding a touch of elegance and sophistication to the bedroom.
Modern Minimalist Headboard with LED Strip Lights
This modern minimalist headboard utilizes LED strip lights to create a sleek and contemporary look. The lights are seamlessly integrated into the headboard’s design, highlighting its clean lines and geometric shapes. The cool white light of the LED strips creates a bright and airy atmosphere, perfect for a modern bedroom.
The minimalist design of the headboard allows the lighting to take center stage, creating a visually striking and functional feature.
A Statement Headboard with Integrated Lighting
This statement headboard features integrated lighting that illuminates the headboard’s intricate details and adds a dramatic touch to the bedroom. The headboard’s unique shape and texture are enhanced by the warm glow of the lights, creating a visually captivating focal point.
The integrated lighting provides a soft and ambient glow, creating a cozy and inviting atmosphere. The headboard’s unique design and lighting scheme make it a statement piece in the bedroom, adding a touch of luxury and sophistication.
A Headboard with Adjustable Lighting
This headboard incorporates adjustable lighting, allowing users to customize the brightness and color temperature of the lights to suit their mood and preferences. The adjustable lighting feature adds versatility and functionality to the headboard, making it a practical and stylish addition to any bedroom.
The headboard’s design allows for easy access to the lighting controls, making it convenient to adjust the lighting as needed. The adjustable lighting feature creates a personalized and comfortable sleep environment, catering to individual preferences.
A DIY Headboard with a Unique Lighting Design
This project showcases a DIY headboard with a unique lighting design that adds a personal touch to the bedroom. The headboard’s lighting scheme is inspired by the owner’s interests and hobbies, making it a truly personalized piece of furniture. The headboard’s unique design and lighting scheme make it a statement piece in the bedroom, adding a touch of personality and individuality to the space.