
The Epic Undertaking: Essential Lessons Learned Painting an Entire House
Embarking on the colossal task of painting an entire house is not merely a cosmetic renovation; it’s a trial by fire, a masterclass in DIY perseverance, and a surprisingly insightful journey into the nature of large-scale projects. My recent endeavor to transform the interior of my 2,200-square-foot home, encompassing 15 rooms including hallways and closets, from a drab beige to a vibrant palette, yielded a wealth of knowledge, much of it hard-won through sweat, spilled paint, and the occasional existential crisis. This article distills those critical lessons, offering practical advice for anyone contemplating or currently navigating this monumental undertaking, ensuring your own house-painting odyssey is as efficient and successful as possible.
1. The Unseen Preparation: The Foundation of Success. This is, without hyperbole, the most crucial stage. Rushing or neglecting preparation is a direct route to a shoddy finish and immense frustration. My initial underestimation of this phase led to countless hours of rework. This involves meticulous cleaning of all surfaces – dust, cobwebs, grease, and grime must be eradicated. A simple sugar soap solution is effective for most grime, but consider specific cleaners for kitchen and bathroom areas. Next comes the patching. Every nail hole, crack, and ding needs to be filled with spackle or joint compound. Allow ample drying time, then sand smooth. Uneven patches are glaringly obvious under fresh paint. Don’t just focus on the walls; trim, baseboards, and even ceilings require attention. Then, the masking. This is where patience truly pays off. Use high-quality painter’s tape, ensuring a tight seal along edges of trim, windows, doors, and any fixtures. Invest in good quality drop cloths – not just for floors but also to protect furniture and prevent paint splatter. Overlapping drop cloths creates a seamless barrier. Remember, the more time spent on preparation, the less time you’ll spend fixing mistakes later. This stage is not glamorous, but it’s the bedrock of a professional-looking finish.
2. The Sheen Decision: Beyond Aesthetics. The choice of paint sheen significantly impacts not only the visual appeal but also the durability and practicality of your walls. I learned this the hard way by opting for a flat finish in high-traffic areas like the living room and hallways. While it hides imperfections beautifully, flat paint is porous and incredibly difficult to clean. A minor scuff mark became a permanent fixture. For kitchens and bathrooms, where moisture and grease are prevalent, a satin or semi-gloss finish is non-negotiable. These sheens offer superior washability and moisture resistance. For trim and doors, semi-gloss or high-gloss provides a durable, elegant contrast and can withstand frequent cleaning. My mistake was not considering the functional demands of each room when selecting sheen. Research the pros and cons of flat, eggshell, satin, semi-gloss, and gloss finishes for each specific application within your home.
3. Primer is Not Optional: The Unsung Hero. Initially, I harbored the misguided belief that a good quality paint could cover any existing color without primer, especially when transitioning from light to dark. This was a costly misconception. Primer serves multiple vital functions: it promotes adhesion, blocks stains, evens out surface porosity, and ensures true color representation. In rooms with dark or vibrant existing colors, or where I was painting over glossy finishes, primer was indispensable. Without it, I found myself applying three or even four coats of paint to achieve adequate coverage, which is both time-consuming and wasteful. Furthermore, primer acts as a binder, ensuring the topcoat adheres properly and doesn’t peel over time. For stained or water-damaged areas, a stain-blocking primer is a non-negotiable necessity. Invest in a good quality primer specifically designed for your wall surface and the type of paint you’ll be using. It will save you paint, time, and frustration in the long run.
4. The Paint Quantity Calculation: Erring on the Side of Caution. Estimating paint quantities is a notoriously tricky business. My initial calculations, based on the square footage of each room and general coverage rates, proved optimistic. Factors like surface texture (rough plaster requires more paint than smooth drywall), multiple coats, and the absorbency of the primer all influence how much paint you’ll actually use. I found myself making multiple emergency trips to the paint store, disrupting my workflow and adding to the overall project timeline. The general rule of thumb is to calculate the square footage of the walls (length x height) and then factor in the number of coats. However, it’s always better to overestimate slightly than to run out mid-job, especially if you’re using a custom color, as dye lots can vary. Most paint cans provide an estimated coverage area, but this is often an ideal scenario. For a whole house project, buying in larger quantities, like 5-gallon buckets for main colors, can be more cost-effective and ensures color consistency across all applications of that shade.
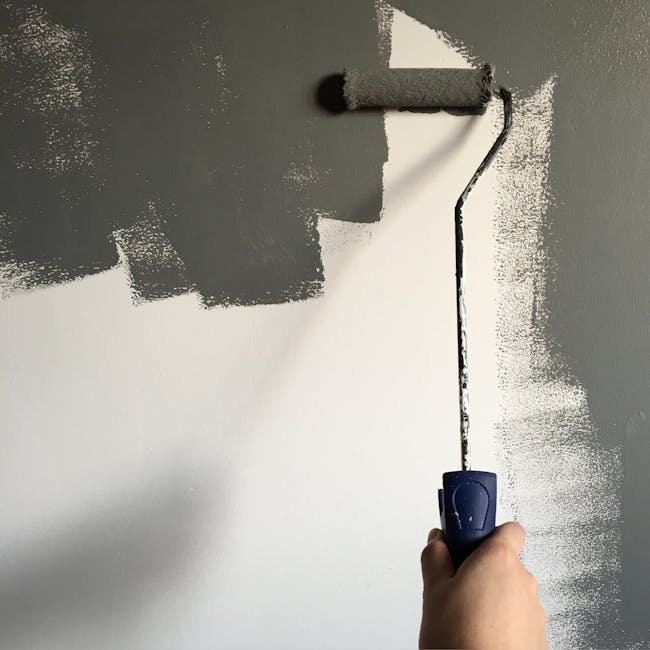
5. The Roller Technique: Achieving an Even Finish. The roller is your workhorse for large wall surfaces, but improper technique leads to dreaded roller marks and uneven coverage. The key is to maintain a "wet edge." This means overlapping your strokes with the previous wet section of paint. Work in manageable sections, rolling from ceiling to floor. Apply paint evenly to the roller, avoiding overloading or underloading. A paint tray with a grid is invaluable for distributing paint on the roller evenly. For cutting in (painting the edges along trim, ceilings, and corners), a high-quality angled brush is essential. Practice smooth, consistent strokes. Don’t press too hard, which can lead to drips. The goal is a uniform, seamless finish, and this is achieved through consistent pressure and overlapping strokes.
6. Brush Strokes of Brilliance: The Art of Cutting In. Cutting in, the process of painting edges and corners where a roller cannot reach, is a skill that requires patience and precision. My early attempts were marked by shaky lines and inconsistent thickness. Investing in a good quality angled sash brush makes a significant difference. The angle allows for better control and cleaner lines. Dip the brush about a third of the way into the paint, then tap off any excess. Hold the brush at an angle to the wall and use light, consistent pressure, moving slowly and deliberately. For very straight lines against trim, consider using a brush with a thin "fan" of bristles at the tip. Don’t try to do too much at once; cut in a section, then immediately roll the adjacent wall to blend the edges before the cut-in paint dries. This "wet-on-wet" technique is crucial for avoiding visible lines between the cut-in and rolled areas.
7. Ventilation and Lighting: The Often-Overlooked Elements. Adequate ventilation is crucial for both drying times and air quality. Painting indoors releases volatile organic compounds (VOCs) into the air, which can be harmful and create a strong odor. I learned this the hard way during a particularly humid week, where rooms felt clammy and paint took an eternity to dry. Open windows and doors whenever possible to create cross-ventilation. Use fans to circulate air, but avoid directing them directly onto wet paint, which can cause uneven drying. Good lighting is also paramount. Natural light is ideal, but for evening work or in rooms with limited windows, ensure you have sufficient artificial lighting. Use a work light that can illuminate the entire wall surface from different angles, revealing any missed spots or imperfections you might otherwise overlook.
8. The Importance of Patience and Taking Breaks: Avoiding Burnout. Painting an entire house is a marathon, not a sprint. Attempting to rush through the process leads to fatigue, mistakes, and a significant decrease in the quality of your work. I initially fell into the trap of trying to paint multiple rooms in a single day. This resulted in sloppy cutting in, missed spots, and sheer exhaustion. It’s essential to break down the project into manageable stages and schedule regular breaks. Don’t be afraid to step away from a room for a day or two if you’re feeling fatigued. Fresh eyes can often spot imperfections you’ve become blind to. Celebrate small victories, like finishing a room or a particularly challenging section. Maintaining motivation is key to seeing the project through to completion.
9. The Unexpected Cost of "Saving Money": When Cheap Becomes Expensive. The temptation to cut corners on supplies is strong when facing such a large project. I experimented with cheaper paint brands and lower-quality brushes and rollers, and the results were disappointing. Lower-quality paint often requires more coats, has less pigment, and is less durable. Cheap brushes shed bristles, leaving unsightly specks in your paint job, and low-quality rollers can leave uneven textures. The time spent fixing these issues, the extra paint purchased, and the eventual need to repaint negate any initial savings. Investing in high-quality paint, primer, brushes, and rollers from the outset will ultimately save you time, money, and significant frustration. The tools and materials are as important as the technique.
10. Clean Up is Not the End: Post-Painting Perfection. The satisfaction of applying the final coat is immense, but the work isn’t over. Proper cleanup is essential for preserving your hard work and ensuring a lasting finish. This involves removing tape carefully, ideally while the paint is still slightly tacky, to avoid peeling. Clean brushes and rollers thoroughly with water (for latex paint) or appropriate solvents (for oil-based paint) immediately after use. Store them properly to maintain their shape and usability for future projects. Wipe down any stray paint drips on trim or floors. Properly dispose of paint cans and rags. A clean workspace not only looks better but also prevents accidental smudges or damage to your freshly painted walls.
11. The Color Palette Dilemma: Consistency and Flow. Choosing colors for an entire house requires careful consideration of how each room will flow into the next. My initial approach was somewhat piecemeal, focusing on individual room aesthetics without a cohesive overarching plan. This resulted in jarring transitions and a lack of visual harmony. It’s beneficial to develop a color palette that considers the overall mood and style you want to achieve for your home. Think about how colors complement each other in adjoining spaces. Lighter, neutral colors in hallways and common areas can create a sense of spaciousness and continuity, while bolder colors can be used strategically in individual rooms. Sampling colors on your walls in different lighting conditions is also crucial, as colors can appear dramatically different under natural and artificial light.
12. The Trim and Door Detail: Often Underestimated Impact. While the walls command the most attention, the impact of well-painted trim and doors cannot be overstated. These elements frame your rooms and add a polished finish. My initial inclination was to rush through them, but the results were lackluster. Proper preparation, including meticulous taping and multiple thin coats of paint, is key. For doors, consider removing them from their hinges for easier, more uniform painting. Pay attention to the details – the edges, the profiles, and any hardware. A crisp, clean line between wall and trim, and a smooth, durable finish on doors, significantly elevates the overall aesthetic of your home.
13. The Learning Curve of Tools: Adapting and Evolving. Throughout this project, I discovered that the right tools for the job can significantly improve efficiency and quality. From investing in a good quality extension pole for high ceilings to discovering the benefits of a paint sprayer for larger open areas (though this comes with its own learning curve and cleanup considerations), each tool presented an opportunity to learn and adapt. Don’t be afraid to experiment with different tools and techniques as you progress. What works for one section might not be ideal for another. Seeking advice from paint store professionals or watching online tutorials can provide valuable insights into the optimal use of various painting tools.
14. The Unexpected Joy of Transformation: The Ultimate Reward. Despite the challenges, the most profound lesson learned was the immense satisfaction derived from transforming my living space with my own hands. The process, while demanding, fostered a sense of accomplishment and a deeper appreciation for the effort involved in creating a beautiful and comfortable home. The journey of painting an entire house is not just about applying paint; it’s about problem-solving, perseverance, and ultimately, creating a tangible and beautiful reflection of your efforts. The lessons learned are not merely about painting techniques but also about project management, attention to detail, and the enduring reward of a job well done.
