
DIY Pampas Grass Wreath: A Comprehensive Guide to Crafting Your Own Boho Chic Decor
Creating a DIY pampas grass wreath offers a sophisticated yet accessible way to infuse your home with a touch of boho elegance. This guide provides a detailed, step-by-step approach, covering material selection, construction techniques, and styling tips, ensuring a stunning and durable end product. Pampas grass, with its feathery plumes and natural texture, brings an organic and ethereal quality to any space, and a DIY wreath allows for complete customization in size, color, and arrangement. This project is ideal for beginners and experienced crafters alike, transforming simple materials into a statement piece that elevates seasonal decor and year-round ambiance. The focus here is on practical execution, empowering you to replicate this on-trend decor item with confidence and creativity.
The foundational element of any successful pampas grass wreath is the careful selection of materials. Begin with a wreath base, which can be crafted from various materials. A wire frame wreath base, readily available at craft stores, provides a sturdy and versatile foundation. For a more natural look, consider a grapevine wreath base, offering inherent texture and a rustic appeal. Alternatively, a foam wreath form can be utilized, though it may require more adhesive to secure the pampas grass effectively. The choice of base will influence the overall aesthetic and ease of assembly. Next, source your pampas grass. Opt for dried pampas grass stalks, ensuring they are fully cured and shed minimally. Look for plumes of varying sizes and densities to create visual interest. Different colors of pampas grass are available, from classic creamy whites and soft beiges to more unique dyed shades of blush, rust, or even black. Consider your desired color palette when selecting your plumes. For securing the pampas grass, a hot glue gun with a sufficient supply of glue sticks is essential. Floral wire or twine can also be used for attaching larger bundles or reinforcing the structure. For added embellishments and a cohesive design, consider incorporating other dried floral elements such as eucalyptus, bunny tails, dried hydrangeas, or even small pinecones. Lastly, have a good pair of craft scissors or secateurs handy for trimming the pampas grass stalks to the desired length. Safety precautions are paramount when working with a hot glue gun; always use it in a well-ventilated area and be mindful of hot glue drips.
The process of preparing your pampas grass plumes is crucial for longevity and aesthetic appeal. Once you have acquired your dried pampas grass, it’s common for individual plumes to shed. To minimize this, a light misting of unscented hairspray or a floral sealant can be applied. Hold the can at a distance of about 12-18 inches from the plume and spray a thin, even coat. Allow the plumes to dry completely before proceeding with wreath assembly. This step not only reduces shedding but also adds a subtle sheen and helps to maintain the shape of the plumes. If your pampas grass appears a little flattened from shipping or storage, you can gently fluff out the plumes by hand or by using a hairdryer on a cool, low setting. For dyed pampas grass, be aware that some color transfer may occur, so handle with care and avoid contact with light-colored surfaces until the sealant has fully set. If you’re using multiple colors or sizes of pampas grass, it’s beneficial to sort them by type and color at this stage, making the assembly process smoother and more organized. Trimming the stems of the pampas grass to a manageable length is also a key preparation step. The length will depend on the size of your wreath base and your desired fullness. Generally, trimming the stems to anywhere from 4 to 10 inches will suffice. This allows for easier manipulation and secure attachment to the wreath form. Consider cutting a variety of stem lengths to create a more natural and dynamic arrangement.
The construction of your DIY pampas grass wreath begins with the wreath base. If you are using a wire frame, you may want to cover it first with floral tape or twine to create a smoother surface for adhesion and to conceal the wire. For a grapevine base, it often provides a natural texture that doesn’t require additional covering. Secure the beginning of your pampas grass arrangement by applying a generous amount of hot glue to the wreath base and pressing the stem of a pampas grass plume firmly into the glue. For larger plumes or a more secure hold, you can wrap the stem with floral wire and twist the wire around the wreath base before adding a dab of hot glue for extra stability. Work in sections, gradually building outwards or inwards, depending on your desired look. For a full and voluminous wreath, focus on layering the pampas grass plumes closely together. Overlap the stems to ensure good coverage of the wreath base. You can create a concentrated focal point in one area or distribute the plumes evenly around the entire wreath. Experiment with different angles and orientations of the plumes to achieve a visually appealing composition. Mixing plume sizes and densities will add depth and character to your design. If you are incorporating other dried florals, strategically place them between the pampas grass plumes, using hot glue to secure them. For instance, eucalyptus sprigs can be tucked in to add greenery and contrast, while smaller dried flowers can fill in any gaps and add pops of color.
To achieve a lush and full appearance, consider the layering and density of your pampas grass. Start by attaching the larger, more prominent plumes to establish the overall shape and volume of your wreath. Apply hot glue to the base of the stem and press it firmly onto the wreath form. For added security, especially with heavier plumes, wrap the stem with floral wire, securing it to the wreath base, and then reinforce with hot glue. As you add more plumes, overlap the stems to create a seamless and dense effect, ensuring no part of the wreath base remains visible. Vary the direction and angle of the plumes to create a more organic and natural flow. Some plumes can be positioned pointing outwards, while others can cascade downwards or be arranged in a more upright manner. This variation adds depth and prevents the wreath from looking flat. If you are using smaller, fluffier plumes or accent dried florals, use these to fill in any sparse areas and to add texture. Tuck these smaller elements between the larger plumes, securing them with a small dab of hot glue. Consider creating a visual hierarchy within your wreath, with a few statement plumes drawing the eye, surrounded by a softer, more diffused arrangement of smaller elements. This technique prevents the wreath from appearing too uniform and adds a sense of handcrafted artistry. For a more avant-garde design, you can intentionally leave some areas less dense, allowing the wreath base to subtly show through, creating a modern and airy aesthetic.
Adding embellishments and accent elements can elevate your DIY pampas grass wreath from simple to spectacular. Once you have achieved your desired level of pampas grass fullness, consider incorporating complementary dried botanicals. Eucalyptus, in its various forms like silver dollar or seeded eucalyptus, offers a beautiful contrast in texture and color, providing a lush green or silvery backdrop. Bunny tails (Lagurus ovatus) are a fantastic choice for their delicate, fluffy appearance, adding another layer of soft texture. Dried hydrangeas, with their intricate florets, can provide a more structured and romantic element. Small pinecones or dried berries can introduce a touch of seasonal flair or a more rustic feel. When attaching these embellishments, use hot glue sparingly, focusing on securing them firmly without obscuring the delicate plumes of the pampas grass. Consider the overall color palette and texture of your wreath when selecting embellishments. For a cohesive look, ensure the accent elements complement, rather than compete with, the pampas grass. You can arrange these elements in clusters to create focal points, or scatter them more subtly throughout the wreath. Another popular embellishment is to wrap parts of the wreath base or the stems with twine or jute for an added rustic touch. For a more bohemian vibe, consider weaving in delicate strands of macrame or ribbon. If you’re creating a wreath for a specific season, think about incorporating elements like dried citrus slices for autumn or small, dried flowers for spring. The key is to use embellishments thoughtfully, enhancing the natural beauty of the pampas grass without overwhelming it.
The final touches and sealing process are critical for the longevity and polished appearance of your DIY pampas grass wreath. Once all the pampas grass and embellishments are securely attached, take a step back and assess your creation. Look for any sparse areas that might need a few extra plumes or smaller accent pieces. Trim any stray stems or wisps of pampas grass that detract from the overall composition. Ensure all glued elements are firmly attached. Now, for the all-important sealing. To prevent excessive shedding of the pampas grass, particularly the delicate plumes, a light misting of an unscented aerosol hairspray or a dedicated floral sealant is highly recommended. Hold the can approximately 12-18 inches away from the wreath and spray a thin, even coat. Avoid over-saturating the plumes, as this can cause them to clump together or lose their airy quality. It’s better to apply two light coats, allowing the first to dry completely, than one heavy coat. This sealing process will not only minimize shedding but also help to maintain the structure and shape of the plumes, ensuring your wreath remains beautiful for longer. Allow the wreath to dry completely in a well-ventilated area before handling or hanging it. For added durability, especially if the wreath will be exposed to moisture or significant handling, consider using a spray sealant designed for dried botanicals. This provides a more robust protective layer.
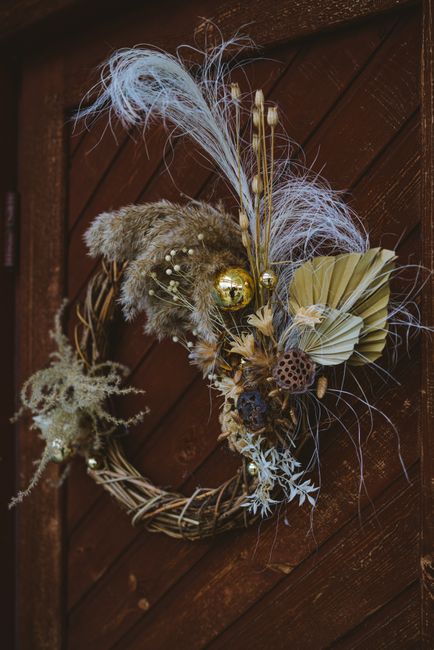
Styling and placement are where your DIY pampas grass wreath truly comes to life. The versatility of pampas grass wreaths allows them to complement a wide range of interior design styles, from minimalist and modern to bohemian and rustic. For a striking entryway statement, hang your wreath on a front door, using a sturdy wreath hanger. Ensure it’s secured properly to withstand outdoor elements. Indoors, a pampas grass wreath can be a beautiful focal point above a fireplace mantel, adding warmth and texture to the living room. It can also adorn a gallery wall, interspersed with artwork and other decorative elements, or hang in a bedroom for a soft, inviting ambiance. Consider the scale of your wreath in relation to the space. A larger wreath makes a bolder statement, while a smaller one can be more intimate. To enhance the natural, organic feel, consider pairing your wreath with other natural elements like wooden furniture, woven baskets, or live plants. The neutral tones of most pampas grass wreaths make them incredibly adaptable to various color schemes. They can provide a soft contrast to bold, vibrant walls or blend seamlessly with more muted, earthy palettes. If your wreath features colored pampas grass or embellishments, coordinate these colors with other decor items in the room for a unified look. For a truly impactful display, consider grouping multiple wreaths of varying sizes or incorporating other dried floral arrangements alongside your pampas grass creation. The subtle movement and delicate texture of the pampas grass will add an ethereal quality to any styled vignette.
Maintenance of your DIY pampas grass wreath is relatively simple, ensuring its beauty endures. The most important aspect of maintenance is minimizing shedding. As previously mentioned, the application of hairspray or floral sealant during the creation process is crucial. However, over time, some natural shedding may still occur. Periodically, you can gently shake the wreath outdoors to dislodge any loose plumes. For dusting, a soft feather duster or a gentle burst of cool air from a hairdryer can be used. Avoid using water or harsh cleaning chemicals, as these can damage the delicate dried material. If your wreath is exposed to direct sunlight for extended periods, the color of the pampas grass may fade over time. To preserve its color, consider hanging the wreath in a location that receives indirect light. If you live in a humid climate, it’s advisable to store your wreath in a dry, well-ventilated area when not in use to prevent moisture damage or mold. For long-term storage, carefully wrap the wreath in tissue paper or a breathable fabric and place it in a box to protect it from dust and damage. By following these simple maintenance tips, your beautiful DIY pampas grass wreath will remain a stunning decorative piece for seasons to come. The inherent fragility of dried botanicals means gentle handling is paramount. Avoid touching the plumes excessively, as this can cause them to break or shed. When moving or repositioning the wreath, grasp it by the base or wreath form rather than the delicate plumes. This careful approach will ensure the longevity of your handcrafted decor.
