
DIY Kitty Rice Heat Pack: A Comprehensive Guide to Crafting Your Own Soothing Companion
Creating a DIY kitty rice heat pack is an accessible and rewarding project for crafters of all skill levels. These charming, handmade heat packs offer comforting warmth and can be a soothing aid for various ailments, from muscle aches and menstrual cramps to general feelings of chill. The simplicity of the materials and the straightforward construction process make this an ideal beginner-friendly craft, while the potential for personalization ensures each kitty heat pack is unique and cherished. Beyond their therapeutic benefits, these heat packs also serve as adorable decorative items or thoughtful handmade gifts. This comprehensive guide will walk you through every step, from selecting materials to final embellishments, ensuring you can confidently craft your own purrfectly warm companion.
The foundational element of any DIY kitty rice heat pack is, unsurprisingly, the fabric. For optimal comfort and durability, a natural, breathable, and heat-resistant fabric is paramount. Cotton, particularly quilting cotton or a sturdy cotton canvas, is an excellent choice. These fabrics are widely available in a vast array of patterns and colors, allowing for immense personalization. Consider the aesthetic you desire for your kitty: a playful floral print might suit a whimsical design, while a solid pastel color could lend a more minimalist and elegant feel. For heat retention and safety, avoid synthetic fabrics like polyester or nylon, as they can melt or scorch when heated, posing a fire hazard. Pre-washing your chosen fabric is a crucial step. This pre-shrinks the material, preventing your finished heat pack from becoming misshapen after its first few cycles in the microwave. It also removes any residual chemicals from the manufacturing process, ensuring a cleaner and safer product. When selecting fabric, pay attention to the weave. A tighter weave will be more durable and less prone to leakage, but a slightly looser weave can be more pliable for shaping the kitty.
The filling is the heart of the heat pack, and for a kitty rice heat pack, uncooked rice is the universally favored option. The grains of rice are small and dense, allowing them to conform to the shape of the body and retain heat effectively. Moreover, rice is readily available, inexpensive, and safe for microwaving. When choosing rice, any common variety like white long-grain, medium-grain, or even brown rice will suffice. Brown rice, with its husk intact, may retain heat slightly longer and offer a more earthy aroma when heated, but it can also be slightly heavier. Avoid instant rice or pre-cooked rice, as these contain moisture and can lead to spoilage or a less effective heat distribution. The quantity of rice needed will depend on the size of your kitty heat pack. A good starting point is to fill it about two-thirds to three-quarters full. This allows for ample heat distribution without making the pack overly rigid or heavy. It’s always better to err on the side of having a little too much rice and being able to remove some than to have too little and end up with a flimsy, ineffective heat pack.
Beyond fabric and filling, several other essential materials will be needed to bring your kitty heat pack to life. Sharp fabric scissors are indispensable for precise cutting of the fabric. A reliable sewing machine will significantly expedite the process and produce stronger seams, but a skilled hand sewer can achieve excellent results with a sturdy needle and thread. Choose a strong polyester thread that is less likely to break under heat stress. A ruler or measuring tape is necessary for accurate pattern drafting and cutting. Fabric markers or chalk are useful for transferring pattern lines onto the fabric. Pins are essential for holding fabric pieces together before sewing. For the optional, yet highly recommended, addition of dried herbs or aromatics, you’ll need small, breathable pouches or simply scatter them amongst the rice. Lavender buds are a popular choice for their calming properties and pleasant scent, but other options like chamomile, peppermint, or even a blend can be explored. Ensure any dried herbs are culinary grade or specifically intended for potpourri to guarantee safety.
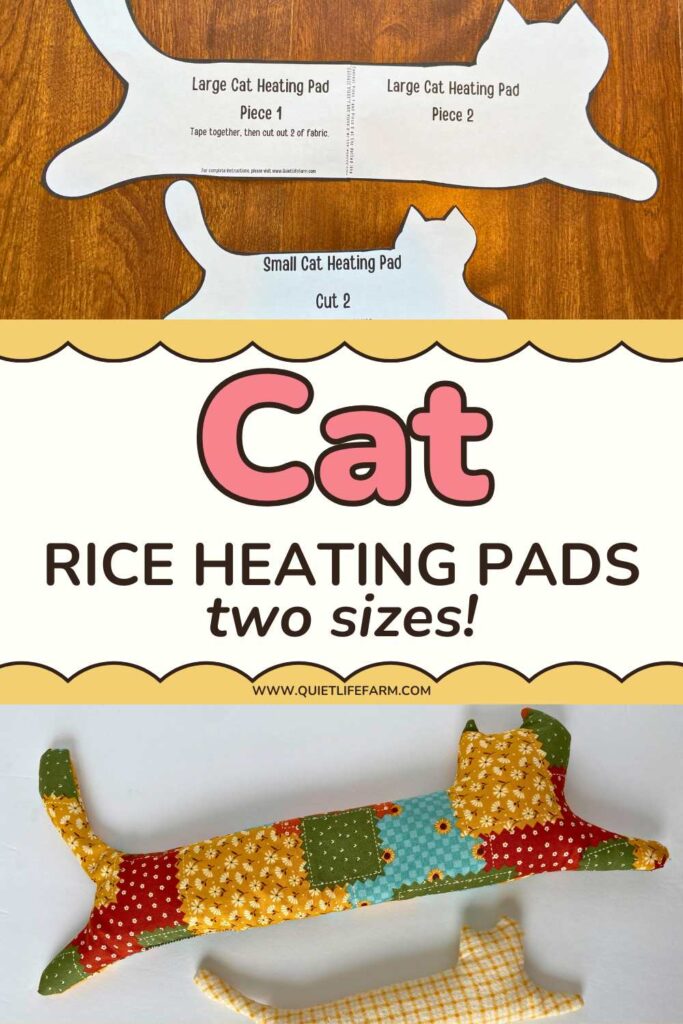
The design phase is where your creativity can truly shine. While a basic oval or rectangular heat pack is functional, embracing the "kitty" aspect elevates the project. The simplest approach involves creating two identical mirrored kitty shapes. You can draw a freehand kitty silhouette on paper or cardstock, or find downloadable patterns online. Consider the size: a lap-sized kitty might be perfect for general use, while a smaller one could be designed for a child’s backpack or to target specific areas. When drawing your pattern, remember to include a seam allowance of approximately 0.5 to 1 centimeter around the entire outline. This allowance is crucial for stitching the two fabric pieces together. Think about the features that define a cat: ears, a tail, and perhaps even a hint of a face. These can be incorporated directly into the pattern or added as separate fabric appliqué pieces later. For a more integrated design, ensure the tail is a continuous part of the main body pattern. If you opt for separate appliqué pieces for ears or a tail, remember to account for their size and placement within your overall design.
Cutting the fabric is a meticulous process that requires precision. Lay your chosen fabric flat, ensuring it’s free of wrinkles. For a standard kitty heat pack, you’ll need to cut two identical pieces from your fabric, mirroring each other if your fabric has a directional pattern. Place your paper or cardstock pattern onto the fabric, pinning it securely to prevent shifting. Using your sharp fabric scissors, carefully cut along the outer edge of your pattern, including the seam allowance. If your kitty design includes separate ear or tail pieces, cut those out as well, ensuring you have the correct number of each (e.g., four ear pieces for two ears, two tail pieces for one tail). It’s advisable to cut out the main body pieces first, then use them as a guide for any smaller appliqué pieces to ensure consistent scaling. Double-checking your cuts before proceeding to the next step is always a wise practice.
The construction of your kitty heat pack involves several sewing stages, each contributing to its structural integrity and aesthetic appeal. Begin by preparing any appliqué pieces. If you’ve decided to add separate ears or a tail, pin these right sides together and sew around the edges, leaving a small opening for turning. Clip the curves and corners to help them lie flat, then turn them right side out. Lightly press them with an iron. Next, take your two main body fabric pieces and place them right sides together. Pin them securely around the entire perimeter, paying close attention to aligning any seams or edges. If you’re adding appliqué ears or a tail, carefully position them between the two main fabric layers, ensuring they are pointing inwards and are positioned where you want them to appear on the finished product. Pin them in place.
Sewing the main body of the kitty heat pack is where the form begins to take shape. Using your sewing machine or needle and thread, stitch around the pinned edges, maintaining your chosen seam allowance. It is crucial to leave an opening of about 5-7 centimeters unstitched. This opening will serve as the filling port, allowing you to insert the rice. When you reach the corners or any points where the fabric needs to turn sharply (like the tip of an ear or the end of a tail), pivot your needle with the presser foot down, then lift the presser foot and continue sewing. This will create a cleaner, more professional-looking finish. Once you’ve sewn around the entire perimeter, carefully clip the seam allowance at the corners and curves. This helps to reduce bulk and allows the fabric to lie flat when turned right side out.
Turning the heat pack right side out is a satisfying moment that reveals the basic form of your kitty. Gently pull the fabric through the opening you left. You may need to use a blunt object, such as a chopstick or a knitting needle, to gently push out the corners and any intricate details like ears or a tail. Once turned, you should have a recognizable, albeit flat, kitty shape. At this stage, it’s a good idea to press the heat pack with an iron. This will create crisp edges and a more polished appearance. Pay attention to the seam allowance around the opening; pressing it inwards will make it easier to close neatly later.
Filling the kitty heat pack is a crucial step that determines its functionality and weight. Carefully pour your chosen uncooked rice into the opening. Use a funnel or a rolled-up piece of paper to guide the rice smoothly into the fabric. Fill the heat pack about two-thirds to three-quarters full. You want it to be substantial enough to hold heat well, but not so full that it becomes stiff and uncomfortable. The exact amount will depend on the size of your kitty. Gently shake the heat pack as you fill it to help distribute the rice evenly. If you are adding dried herbs for aroma, you can mix them directly with the rice before filling, or place them in small muslin bags and tuck them amongst the rice.
Once filled to your satisfaction, it’s time to close the opening. This is a critical step for preventing rice leakage. For the neatest and most secure closure, a ladder stitch (also known as a blind stitch) is recommended. This stitch is almost invisible when done correctly. Fold the raw edges of the opening inwards, tucking them neatly to create a clean edge. Pin the opening closed. Begin by taking a small stitch on one side of the opening, then a small stitch on the opposite side, directly across from the first. Continue alternating sides, taking small, even stitches that catch only a few threads of the fabric. The goal is to create stitches that lie flat and are hidden within the seam. Once the opening is fully closed, tie off your thread securely and trim any excess.
Now comes the fun part: personalization and decoration. This is where your kitty heat pack truly comes to life. You can add safety eyes and a stitched nose and mouth to give your kitty a charming face. For safety eyes, ensure they are securely attached from the inside before you fill the heat pack completely. Alternatively, you can embroider these features using embroidery floss. Black or pink floss works well for noses and mouths. Consider adding whiskers using embroidery or even small lengths of embroidery thread that have been glued in place. If you haven’t incorporated appliqué ears or a tail, you can create these separately from felt or complementary fabric and then hand-stitch or fabric-glue them onto the main body of the heat pack. Felt is an excellent material for this, as it doesn’t fray.
Beyond facial features, think about other decorative elements. Small bows made from ribbon, fabric patches, or even small bells can add extra charm. If your kitty is intended as a gift, consider personalizing it with the recipient’s initial embroidered onto the body. Remember to use fabric-safe glues if you opt for glued elements, and ensure they are heat-resistant. When adding embellishments, consider the overall aesthetic you’re aiming for. A more intricate design with multiple layers of appliqué and decorative stitching might suit a more elaborate kitty, while a simpler, minimalist design could be achieved with just a few well-placed embroidered features.
The heating and cooling instructions are vital for safe and effective use of your DIY kitty rice heat pack. To heat, place the clean, dry heat pack in the microwave on a microwave-safe plate. Heat on medium power for 1-2 minutes. Carefully check the temperature; it should be warm and comforting, not hot. You can add increments of 30 seconds if needed, but always check between each interval. Overheating can damage the rice and fabric, and in extreme cases, create a fire hazard. For cooling, place the heat pack in the freezer in a sealed plastic bag for 1-2 hours. This makes it a soothing balm for swelling and inflammation.
Maintenance and care are straightforward but important for extending the life of your kitty heat pack. Always ensure the heat pack is clean and dry before heating. Spot clean any minor spills or stains with a damp cloth and mild soap, then allow it to air dry completely. Avoid immersing the heat pack in water, as this can cause the rice to clump and potentially spoil. Store your heat pack in a cool, dry place when not in use. If you notice any signs of mold or mildew, or if the rice begins to smell stale, it’s time to replace the filling. Rice is a food product and can eventually spoil, especially if exposed to moisture.
Safety is paramount when crafting and using any item intended for heating. Always supervise children when they are using a heated rice pack. Ensure the heat pack is never left unattended while heating in the microwave. If you have sensitive skin, test the temperature on your forearm before applying it to more delicate areas. Consider adding a layer of fabric or a thin towel between the heat pack and your skin for an extra layer of protection, especially if you are prone to burns. Avoid using the heat pack on open wounds or broken skin. If you experience any discomfort or skin irritation, discontinue use immediately. For individuals with certain medical conditions, it’s always advisable to consult with a healthcare professional before using heat therapy.
The versatility of the DIY kitty rice heat pack extends far beyond simple warmth. They can be a comforting companion for individuals experiencing anxiety or stress, providing a tactile and warm sensation that can be grounding. For those with chronic pain conditions, a warm kitty can offer localized relief and a sense of comfort. They are also excellent for soothing aching muscles after exercise or a long day. In colder months, they provide an eco-friendly alternative to electric heating pads, helping to reduce energy consumption. For children, a well-loved and cozy kitty heat pack can become a treasured bedtime companion, providing comfort and security.
The DIY kitty rice heat pack project offers a wonderful opportunity for upcycling. Consider using remnants of fabric from previous sewing projects or even old, clean cotton clothing items like t-shirts or flannel shirts. This not only reduces waste but also adds a unique sentimental value to your creation. Old tea towels or aprons made from sturdy cotton can also be excellent candidates for fabric. Ensure any repurposed fabric is thoroughly washed and free of any damage that could compromise the integrity of the heat pack. This mindful approach to crafting can make your kitty heat pack even more special.
In conclusion, crafting a DIY kitty rice heat pack is a fulfilling project that yields a practical, comforting, and charming item. From selecting the perfect fabric and filling to personalizing its features, each step allows for creativity and customization. By following these detailed instructions and prioritizing safety, you can create a beloved companion that provides warmth, solace, and a touch of handmade joy for yourself or as a thoughtful gift. The simplicity of the materials and the ease of construction make this an accessible craft for everyone, and the potential for unique designs ensures that no two kitty heat packs are ever quite the same.
