
5 Simple and Easy Scrapbooking Ideas to Preserve Your Memories
Scrapbooking, at its core, is a way to tell stories and preserve memories through a tangible medium. It’s about capturing moments, emotions, and the essence of experiences in a way that photographs alone cannot always convey. While the idea of scrapbooking can sometimes feel overwhelming, conjuring images of intricate embellishments and perfectly aligned layouts, it doesn’t have to be. The beauty of scrapbooking lies in its adaptability, its personal nature, and the fact that it’s for you. This article will explore five straightforward and accessible scrapbooking ideas, designed to be tackled by beginners and seasoned crafters alike, focusing on simplicity, ease of execution, and the profound impact of preserving your precious memories. These ideas emphasize core scrapbooking principles without requiring extensive supplies or advanced techniques, making them perfect for getting started or for those seeking a low-stress creative outlet.
1. The “One Photo, One Story” Layout
This approach is the epitome of simplicity and focus. It strips away the pressure of filling an entire page with multiple photographs and extensive journaling, allowing a single, impactful image to take center stage. The goal here is to select one photograph that truly encapsulates a specific memory, event, or emotion, and then build the entire page around that single visual narrative. This method is incredibly freeing because it eliminates the decision fatigue of choosing between numerous photos and the challenge of finding cohesive themes for multiple images.
-
Choosing Your Photo: Start by browsing your existing photo collection. Look for an image that evokes a strong feeling – joy, nostalgia, pride, even a touch of melancholy. It could be a candid shot of laughter, a picture of a beloved pet, a snapshot of a significant milestone like a birthday or graduation, or a landscape that holds special meaning. The photo doesn’t need to be professionally taken; in fact, often the most authentic and cherished photos are the ones taken spontaneously. Consider the composition of the photo. Is there a clear subject? Does it convey a particular mood? Once you have your chosen image, you’ve already done the most crucial part of the layout.
-
The Background: Select a single sheet of patterned or solid cardstock that complements the colors and mood of your photograph. You don’t need a complex background. A simple, subtle pattern can add visual interest without distracting from the main image. Alternatively, a solid cardstock in a color that pulls out an accent from the photo can be equally effective. If you want to add a touch of depth, consider slightly distressing the edges of the cardstock with a sanding tool or even a nail file for a vintage feel.
-
Journaling is Key: This is where you bring the story to life. Since you have only one photo, your journaling is paramount. Write down the date, the location (if relevant), and most importantly, the story behind the photo. What was happening? Who was there? What were you feeling? Don’t worry about perfect prose; authenticity is far more valuable. You can write directly on the cardstock with a favorite pen, or you can print your journaling onto a small strip of paper and adhere it. Consider using a handwritten font if you’re printing your journaling for a more personal touch. If you have a very short anecdote, you can even write it on a small tag or a sticker.
-
Minimal Embellishments: The beauty of this layout is its restraint. Avoid overwhelming the photo and the story with too many embellishments. A single complementary sticker placed near the photo or journaling, a few carefully chosen brads, or a simple ribbon can add a touch of flair without detracting from the core elements. Think about what naturally fits the theme. If it’s a beach photo, perhaps a tiny shell sticker. If it’s a child’s drawing, a crayon-shaped embellishment. The goal is to enhance, not compete.
-
Variations: This idea can be adapted for different themes. Create a "Quote Page" where a powerful quote is the central element, accompanied by a relevant photo and a brief explanation of why that quote resonates with you. Or a "Moment of Gratitude" page, highlighting something you are thankful for, with a corresponding image and a few sentences about its significance. This "One Photo, One Story" approach is incredibly versatile and ensures that even with limited time or supplies, you can create a meaningful and beautiful scrapbook page.
2. The Chronological Timeline Scrapbook
This idea is perfect for documenting a specific period, a recurring event, or the growth of a person or pet over time. Instead of focusing on individual pages as standalone pieces, you’re creating a cohesive visual narrative that unfolds chronologically. This method is excellent for telling a larger story and provides a clear sense of progression.
-
Defining Your Timeline: Decide what period or event you want to document. This could be a baby’s first year, a child’s school years, a family vacation, the growth of a garden, or even the evolution of a hobby. Once you’ve defined your timeline, break it down into manageable segments. For a baby’s first year, this might be monthly. For a school year, it could be by semester or significant events. For a vacation, it could be by day or by activity.
-
Gathering Your Content: Collect photographs, tickets, brochures, drawings, handwritten notes, or any other ephemera that relates to each point in your timeline. The beauty of a chronological scrapbook is that it embraces a variety of items. Don’t limit yourself to just photos. A ticket stub from a concert, a dried flower from a special outing, or a child’s early scribble can add incredible depth and authenticity.
-
Layout Options: You have several easy options for laying out a timeline.
- Linear Progression: Use a landscape-oriented scrapbook album and create a visual timeline that flows from left to right across multiple pages. You can use a straight line or a dashed line across the pages to guide the eye, with photos and journaling placed above and below the line, corresponding to their point in time.
- Sectioned Pages: Dedicate each page or a spread of two pages to a specific segment of your timeline (e.g., each month of a baby’s first year). Within that page or spread, you can arrange photos and journaling in a simple, clean layout.
- Pocket Pages: These are fantastic for chronological scrapbooking. Using pre-made pocket pages, you can simply slip in photos and journaling cards for each segment of your timeline. This is incredibly fast and requires minimal adhesive. Each pocket can represent a day, a week, or a specific event.
-
Journaling for Context: For each item on your timeline, provide concise journaling that explains its significance and its place in the overall sequence. Even a simple date and a short descriptive sentence can be enough. For example, for a baby’s first year, you might write "3 Months: First smile – those gummy grins melted our hearts!" or for a vacation, "Day 2: Hiking to the waterfall – such a breathtaking view!"
-
Consistent Design Elements: To maintain a cohesive look across your chronological scrapbook, use a few consistent design elements. This might be a particular font for your journaling, a specific color palette for your cardstock and embellishments, or a recurring small motif or sticker. This creates a unified feel and makes the timeline feel like a single, integrated story. This method is perfect for creating family albums, documenting travels, or celebrating the milestones of your children.
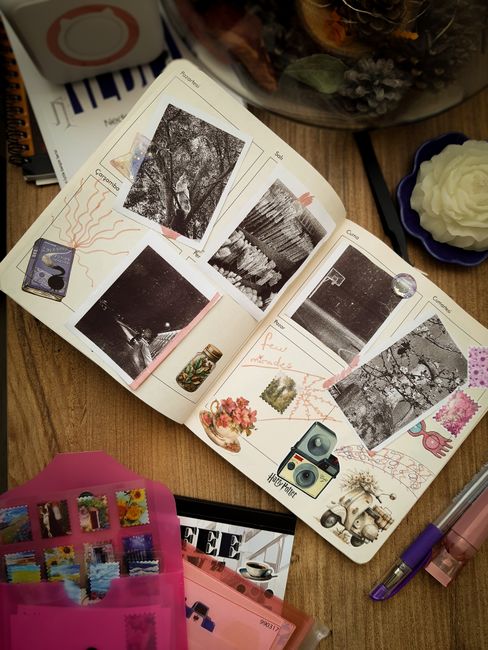
3. The "Pocket Page" Memory Keeper
Pocket pages, often referred to as Project Life, have revolutionized simple scrapbooking. These are pre-divided plastic sleeves that come in various grid layouts, designed to hold photos and journaling cards of different sizes. The beauty of this system is its speed, ease, and the inherent structure it provides. You simply slot in your memories, and the page is instantly filled.
-
Choosing Your Pockets: Pocket pages come in numerous configurations, such as 3×4 inch pockets, 4×6 inch pockets, and larger squares. Select a style that best suits the size and orientation of your photographs. You can mix and match different styles of pocket pages within the same album for variety.
-
Curating Your Content: Gather a collection of photos from a specific event, a week, a month, or even a year. Don’t overthink it. Select a variety of photos, including candid shots, portraits, and detail shots. The pockets will accommodate different sizes, so you don’t need to crop everything to a uniform dimension.
-
Journaling Cards are Your Friend: Many pocket page systems come with coordinating journaling cards, or you can easily create your own using cardstock. These cards are perfect for adding dates, short anecdotes, quotes, or even longer stories. They provide a designated space for writing, making the journaling process less intimidating. If you don’t have pre-made cards, simply cut down colored cardstock to fit your pockets.
-
Filling the Pockets: This is where the magic happens. Simply place your photos and journaling cards into the appropriate pockets. You can arrange them in any order you like. Some people prefer to lay them out before committing, while others enjoy the spontaneous placement. The grid structure itself provides an immediate sense of order and balance.
-
Adding Minimal Embellishments: While the pockets themselves provide a lot of visual interest, you can enhance your pages with a few subtle embellishments. A small sticker placed on a photo, a stamped date on a journaling card, or a few strips of washi tape can add personality without becoming overwhelming. Consider adding larger photos that fill entire pockets, or smaller photos that can be clustered together within a single pocket. The key is to keep it simple and let the photos and journaling speak for themselves. Pocket pages are ideal for everyday memories, vacation recaps, or even for creating a "year in review" album.
4. The Thematic Collection Scrapbook
This idea focuses on a specific theme, hobby, interest, or recurring topic. Instead of chronological progression or a single event, you’re gathering and curating content that relates to a particular passion. This allows for a highly personalized and focused approach to scrapbooking.
-
Identifying Your Theme: Brainstorm topics that you are passionate about or that are significant to your life. This could be anything from a beloved sports team, a favorite type of flower, a specific holiday, a collection of recipes, your love for coffee, or even a series of funny quotes. The more specific and personal the theme, the more engaging your scrapbook will be.
-
Gathering Thematic Content: Collect photographs, clippings from magazines, drawings, handwritten notes, fabric swatches, or any other ephemera that relates to your chosen theme. For a recipe scrapbook, you might collect handwritten recipe cards, photos of the finished dishes, and even ingredient lists. For a gardening theme, you could include photos of your plants throughout the seasons, pressed flowers, and notes on planting dates.
-
Creating Thematic Pages: Each page or spread in your scrapbook can represent a different aspect or sub-theme within your larger topic. For a "Coffee Lover’s" scrapbook, you might have a page dedicated to your favorite coffee shops, another to different brewing methods, and another to funny coffee-related quotes. Within each page, you can use a simple layout that suits the content. This might involve a central photo with accompanying text, a collage of smaller images, or a collection of interesting facts.
-
Journaling with Passion: Your journaling should reflect your enthusiasm for the theme. Share your thoughts, feelings, and experiences related to the topic. If you’re documenting recipes, write down personal anecdotes about who taught you the recipe or a memorable meal where it was served. For a travel theme, share the highlights of your journey and what made each destination special.
-
Cohesive Color Palette and Embellishments: To make your thematic scrapbook visually appealing, choose a color palette and embellishments that align with your theme. For a beach theme, blues, greens, and sandy tones would be appropriate. For a holiday theme, seasonal colors would work best. Consistent use of a few themed stickers, stamps, or even patterned paper can tie the entire collection together beautifully. This thematic approach allows you to delve deeply into your interests and create a truly unique and personal scrapbook.
5. The "Deconstructed" or Minimalist Scrapbook
This approach embraces simplicity and a "less is more" philosophy. It moves away from traditional, highly embellished layouts and focuses on clean lines, negative space, and the power of a few carefully chosen elements. This is perfect for those who find traditional scrapbooking overwhelming or who appreciate a more modern aesthetic.
-
Embrace White Space: The key to minimalist scrapbooking is ample white space. Instead of filling every inch of the page, allow for generous areas of the background cardstock to be visible. This draws attention to your chosen elements and creates a sense of calm and sophistication.
-
Focus on One or Two Photos: Select one or two impactful photographs for your layout. Let these photos be the primary focus. Avoid crowding them with multiple images. The negative space around the photos will help them stand out.
-
Simple Journaling: Keep your journaling concise and to the point. Use a clean, easy-to-read font, whether you’re typing or handwriting. You might choose to write a single sentence, a short paragraph, or even just a date and a few keywords. The goal is to provide context without overwhelming the visual.
-
Subtle Embellishments (or None at All): Embellishments in a minimalist scrapbook are used sparingly and strategically. Think about single, elegant elements rather than clusters of decorative items. This could be a thin strip of washi tape, a single alpha sticker to spell out a word, or a small, simple die-cut. In some minimalist layouts, no embellishments are used at all, relying solely on the photos, journaling, and white space.
-
Clean Lines and Geometric Shapes: Minimalist layouts often feature clean, straight lines and simple geometric shapes. This can be achieved through the way you crop your photos, the placement of your journaling, or the use of a single, bold line of washi tape. Avoid fussy or intricate embellishments.
-
Color Palette Control: A limited color palette is also a hallmark of minimalist design. Stick to neutral tones, black and white, or a very limited selection of complementary colors. This creates a cohesive and uncluttered look. The "Deconstructed" or Minimalist Scrapbook is about intention and making every element on the page count. It’s a refreshing approach that proves you don’t need a lot of “stuff” to create a beautiful and meaningful memory-keeping project.
