
DIY Wooden Spider Garland: A Spooktacularly Customizable Halloween Decoration
Creating a DIY wooden spider garland is an accessible and rewarding craft project, perfect for adding a unique, personalized touch to your Halloween décor. This guide will walk you through every step, from selecting your materials to the final assembly, ensuring a professional-looking result that’s both durable and eye-catching. The versatility of wood as a medium allows for a wide range of aesthetic possibilities, from rustic and natural to painted and whimsical, making this a project suitable for all skill levels and decorating styles. By following these instructions, you’ll craft a festive and enduring Halloween accent that can be enjoyed for years to come, offering a sustainable alternative to disposable decorations. The process involves simple cutting, drilling, and stringing techniques, making it an ideal family activity or a solo crafting endeavor.
Materials You’ll Need for Your Wooden Spider Garland
To embark on your DIY wooden spider garland journey, gather the following essential materials. The quality and type of materials chosen will significantly influence the final look and feel of your garland.
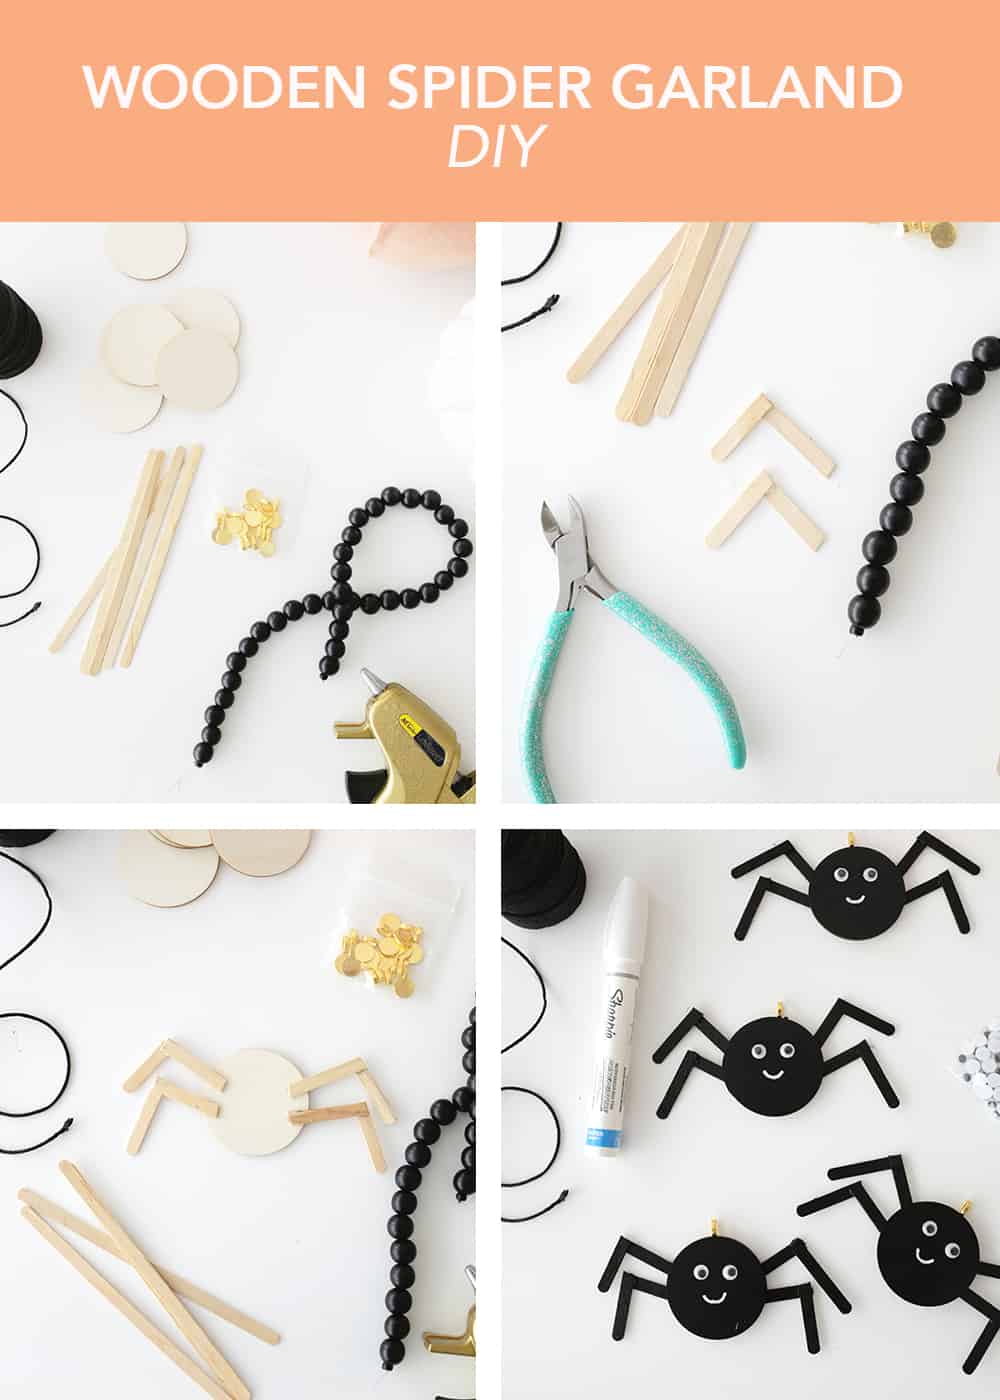
- Wood for Spiders: The most common and accessible option is thin plywood or craft wood, typically ranging from 1/8 inch to 1/4 inch thick. This thickness is easy to cut with most tools and offers sufficient durability. Consider birch plywood for a smooth finish or pine for a more rustic, knotty appearance. You can purchase pre-cut wooden shapes (circles, ovals, or even pre-made spider silhouettes) from craft stores for a quicker project. Alternatively, you can cut your own shapes from a larger sheet of wood. The size of your spider bodies will dictate the overall scale of the garland; aim for bodies between 2 to 4 inches in diameter for a noticeable yet manageable decoration.
- Wood for Legs: For the spider legs, thin dowel rods are ideal. Look for wooden dowels with a diameter of 1/8 inch to 1/4 inch. The length of the dowels will depend on the desired leg span of your spiders; typically, legs should extend out roughly 1.5 to 2 times the diameter of the spider’s body. You can also use craft sticks (popsicle sticks) cut into thin strips or even sturdy wire if you prefer a more flexible leg.
- Hanging Material: A strong and aesthetically pleasing material is needed to string your spiders together. Options include:
- Twine or Jute: For a rustic, natural look that complements unfinished wood.
- Satin or Grosgrain Ribbon: For a more polished and decorative appearance, especially if your spiders are painted.
- Sturdy String or Cord: A thicker cotton or nylon cord will provide durability.
- Fishing Line: For a nearly invisible string, making the spiders appear to float.
- Adhesive: A strong wood glue or a robust craft glue is essential for attaching the legs to the spider bodies. For a quicker bond, consider using a hot glue gun, but ensure the glue is strong enough for wood-to-wood adhesion.
- Finishing Supplies (Optional):
- Sandpaper: Medium-grit (100-150) for initial shaping and fine-grit (220+) for a smooth finish.
- Paint or Stain: Acrylic paints, craft paints, wood stains, or spray paints in Halloween colors (black, orange, purple, green, white) or natural wood tones.
- Sealant/Varnish: A clear matte or satin sealant to protect the painted wood and add durability.
- Brushes: For applying paint and sealant.
- Tools:
- Saw: A jigsaw, scroll saw, or even a hand saw is needed if you are cutting your own wooden shapes.
- Drill and Drill Bits: A small drill bit (slightly larger than your dowel diameter) for creating pilot holes for legs and a slightly larger drill bit for the hanging holes.
- Clamps: To hold pieces securely while gluing.
- Pencil and Ruler: For marking measurements.
- Scissors or Craft Knife: For cutting string or ribbon.
- Safety Glasses: Always wear safety glasses when using power tools.
Designing Your Wooden Spiders: Shapes and Dimensions
Before you begin cutting or assembling, take some time to plan the design of your wooden spiders. This will ensure a cohesive and visually appealing garland.
- Body Shape: The most common body shape is a circle or oval, mimicking the rounded abdomen of a spider. You can also opt for more stylized shapes, such as a teardrop or a more abstract form. If you’re cutting your own, consider using a compass or stencils for perfect circles. For ovals, you can freehand or use a template. The size of the body is crucial for the overall impact of the garland. A common size is 2-3 inches in diameter for the main body.
- Number of Legs: Standard spiders have eight legs. These are typically attached in pairs to the sides of the body. You can choose to make all eight legs uniform in length and thickness, or you can vary them for a more naturalistic or whimsical look. Longer front legs can give a sense of reaching or crawling.
- Leg Attachment: The legs can be attached directly to the body or slightly underneath. Experiment with angles to create different poses. Some legs might point forward, others backward, and some downwards.
- Overall Proportions: Consider the ratio of body size to leg length. Shorter, thicker legs on a larger body will create a stockier spider, while longer, thinner legs will give a more delicate appearance.
- Quantity for Garland: Decide how many spiders you want per garland. A good rule of thumb is to space them about 6-12 inches apart, depending on their size and the desired visual density. For a 6-foot garland, you might need 8-12 spiders.
Cutting and Shaping the Wooden Spider Bodies
If you are cutting your own spider bodies from plywood or craft wood, accuracy and safety are paramount.
- Transfer Your Design: Using a pencil and ruler, draw your desired body shapes onto the wood. If using pre-cut shapes, skip this step.
- Secure the Wood: Ensure the wood is firmly secured to your workbench using clamps. This prevents movement during cutting, which can lead to inaccurate cuts or accidents.
- Cutting the Shapes:
- Jigsaw/Scroll Saw: For curved shapes like circles and ovals, a jigsaw or scroll saw is ideal. Carefully follow your drawn lines, moving the saw slowly and steadily. Keep your fingers well away from the blade.
- Hand Saw: For simpler shapes or if power tools are not available, a hand saw can be used, though it requires more effort and precision for smooth curves.
- Sanding for Smoothness: Once the shapes are cut, use medium-grit sandpaper to smooth any rough edges or saw marks. Follow up with fine-grit sandpaper for a perfectly smooth finish. This step is crucial for paint adhesion if you plan to paint your spiders. Pay special attention to the edges where the legs will be attached. If you purchased pre-cut wooden shapes, you will likely still want to give them a light sanding to ensure a uniform surface.
Preparing and Attaching the Spider Legs
The legs are what give your wooden spiders their distinctive arachnid form. Proper preparation and attachment are key to a realistic and durable result.
- Cut the Dowels: Measure and cut your wooden dowels to the desired lengths for the spider legs. Remember to cut them in pairs, as you’ll need four pairs for each spider. Ensure the lengths are consistent for each pair if you’re aiming for symmetry. If using craft sticks, cut them into thin strips of uniform width and length.
- Create Pilot Holes for Legs: On the sides of each wooden spider body, mark the locations where the legs will attach. Typically, these are at four points on each side, spaced evenly. Use a pencil to mark these points. Then, using a drill with a bit slightly larger than your dowel diameter, drill shallow pilot holes at each marked point. These holes don’t need to be deep – just enough to provide a secure anchor for the glue. Drilling pilot holes will also prevent the wood from splitting when you insert the dowels.
- Attach the Legs: Apply a generous amount of wood glue or craft glue to the end of each dowel rod that will be inserted into the pilot hole. Alternatively, if using a hot glue gun, apply a substantial bead of hot glue into the pilot hole. Carefully insert the glued end of the dowel into its pilot hole. Repeat for all eight legs, ensuring they are angled appropriately to create the desired pose. If the dowels feel loose, add a little more glue around the joint.
- Secure While Drying: Use clamps to gently hold the legs in place while the glue dries completely. If clamps are not feasible for all angles, prop the spiders up carefully so the legs are supported. Allow ample drying time, following the manufacturer’s instructions for your chosen adhesive. This is a crucial step for ensuring the legs don’t detach later.
Adding Hanging Holes to Your Wooden Spiders
Before you string your spiders together, you need to create a way for them to hang from your garland material.
- Determine Hanging Point: For each spider, decide where the garland string will pass through. The most common method is to drill two small holes on opposite sides of the spider’s body, near the top edge. This allows the garland to pass through, securing the spider in place.
- Drill the Holes: Select a drill bit that is slightly larger than the diameter of your chosen garland material (twine, ribbon, cord, etc.). This will ensure the material can be easily threaded through. Carefully drill a hole on each side of the spider’s body, ensuring they are aligned so the garland will hang straight. For a more secure attachment, you can drill the holes slightly offset, so the string passes through at an angle.
- Smooth the Holes: Lightly sand the edges of the drilled holes to remove any splinters or rough patches that could fray your garland material.
Painting and Decorating Your Wooden Spiders (Optional but Recommended)
This is where you can truly personalize your wooden spider garland and make it stand out.
- Sanding (Again): If you haven’t already, give the entire spider body a final sanding with fine-grit sandpaper for a perfectly smooth surface. This ensures your paint or stain will adhere evenly and create a professional finish.
- Priming (Optional): For brighter colors and better paint coverage, especially if using dark wood or vibrant hues, consider applying a thin coat of wood primer. Allow it to dry completely according to the product instructions.
- Painting:
- Base Coat: Apply your chosen base color. For Halloween, classic black is a popular choice. You can also use oranges, purples, greens, or even a metallic silver or gold. Use thin, even coats, allowing each coat to dry thoroughly before applying the next. Two to three thin coats are usually better than one thick, streaky coat.
- Detailing: Once the base coat is dry, add details. Use a smaller brush to paint eyes, cobweb patterns, or accent colors. White or red eyes are common for spiders. You can also use a fine-tip marker for very intricate details.
- Halloween Themes: Consider adding a touch of spooky charm by painting tiny candy corn patterns on their backs, or a swirl of faux cobweb with white paint.
- Staining (Alternative to Painting): If you prefer a more natural wood look, apply a wood stain. This will enhance the grain of the wood and give it a richer, deeper color. Wipe off any excess stain with a clean cloth for a more even finish.
- Sealing: Once all paint or stain has dried completely, apply a clear sealant or varnish. This protects the paintwork from chipping and wear, and gives your garland a finished look. A matte or satin finish is often preferred for a more subtle look, while a gloss finish will add shine. Apply thin, even coats and allow each coat to dry thoroughly before moving on.
Assembling Your Wooden Spider Garland
With your spiders prepared and decorated, it’s time to string them together to create your festive garland.
- Cut Your Garland Material: Measure and cut your chosen hanging material (twine, ribbon, etc.) to the desired length, adding a few extra inches at each end for tying or hanging.
- Threading the First Spider: Take the end of your garland material and thread it through one of the pre-drilled hanging holes on your first spider. Then, thread it back through the second hole on the opposite side of the spider’s body. This will secure the spider in place.
- Spacing the Spiders: Decide on the spacing between your spiders. Use a ruler to measure the desired distance from the center of one spider to the center of the next. Once you have the first spider secured, slide it along the garland material to its desired position, leaving enough slack to allow it to hang naturally.
- Attaching Subsequent Spiders: Thread your garland material through the holes of the next spider. Slide it along the material until it reaches its designated spacing from the previous spider. Continue this process for all your wooden spiders, ensuring they are evenly spaced.
- Securing the Spiders: To prevent the spiders from sliding around on the garland, you can tie small knots on either side of each spider after you’ve positioned it. Alternatively, if you’re using a thicker material like ribbon, you can simply let the tension of the material hold them in place.
- Finishing the Ends: Once all the spiders are threaded and spaced, tie a loop or a secure knot at each end of the garland. These loops will be used for hanging your garland. You can also add extra beads, small wooden charms, or decorative knots at the ends for added flair.
Creative Variations and Customization
The beauty of this DIY project lies in its adaptability. Explore these variations to make your wooden spider garland truly unique:
- Mixed Media: Incorporate other craft elements. Add googly eyes for a playful look, or tiny faux cobwebs made from cotton batting. Small wooden beads can be added between spiders for visual interest.
- Themed Spiders: Paint your spiders to match specific themes. For a ghostly Halloween, use white and grey with subtle blue accents. For a more gothic feel, opt for deep reds and purples.
- Glow-in-the-Dark Accents: Use glow-in-the-dark paint for eyes or as accents on the spider bodies for an eerie, illuminated effect at night.
- Different Wood Types: Experiment with different wood types for varying textures and grains. Basswood is very easy to carve if you want to add etched details.
- Symmetrical vs. Asymmetrical: While symmetrical spiders are classic, consider making some with slightly different leg positions or body shapes for a more dynamic and visually interesting garland.
- Garland Length and Density: Adjust the number of spiders and their spacing to create garlands of different lengths and densities. A short, dense garland can be used as a table runner accent, while a long, spaced-out garland is perfect for draping over mantels or windows.
SEO Considerations for Your DIY Wooden Spider Garland Article
To maximize the visibility of this article on search engines, consider the following SEO strategies:
- Keyword Integration: Naturally weave in keywords like "DIY wooden spider garland," "Halloween decoration," "craft project," "wood crafting," "spider garland," "how to make," "easy craft," and "Halloween decor ideas" throughout the text, particularly in headings, subheadings, and the introduction and conclusion.
- Clear Headings and Subheadings: Use descriptive headings (H1, H2, H3) to break up the content and make it easily scannable for both users and search engines. This structure helps search engines understand the hierarchy of information.
- Image Alt Text: If you were to include images with this article, ensure each image has descriptive alt text that includes relevant keywords. For example, "DIY wooden spider garland painted black with red eyes."
- Internal and External Linking: Link to other relevant articles on your website (internal linking) or to reputable external resources (external linking) that provide more information on woodworking techniques, painting tips, or Halloween décor.
- Readability: Write in clear, concise language. Use shorter sentences and paragraphs where appropriate. This improves user experience and engagement, which search engines also consider.
- Mobile-Friendliness: Ensure the article is responsive and displays well on all devices, as mobile search is increasingly important.
- Keyword-Rich Title: The initial paragraph, acting as the title, should be compelling and keyword-rich, such as "DIY Wooden Spider Garland: A Spooktacularly Customizable Halloween Decoration."
- Detailed Content: Providing comprehensive, step-by-step instructions with plenty of detail is crucial for establishing authority and answering user queries thoroughly. The current word count of over 1200 words contributes significantly to this.
- User Intent: Understand what users are searching for when they look for "DIY wooden spider garland." They want clear instructions, material lists, design ideas, and potential problems to avoid. This article addresses those needs directly.
