DIY Christmas Tree Toppers: Effortless Elegance for Your Festive Fir
Creating a stunning Christmas tree doesn’t always require elaborate store-bought adornments. For many, the perfect finishing touch, the crowning glory of their festive fir, is a DIY Christmas tree topper. These handmade creations offer a unique blend of personality and charm, allowing you to express your individual style while embracing the spirit of the season. Beyond the aesthetic appeal, crafting your own tree topper is a fantastic way to save money, recycle materials, and enjoy a rewarding creative experience. This comprehensive guide explores a variety of easy DIY Christmas tree topper ideas, catering to different skill levels and aesthetic preferences. Whether you’re a seasoned crafter or a complete beginner, you’ll find inspiration and practical instructions to elevate your holiday decor without breaking the bank or your spirit. We’ll delve into the materials, techniques, and design considerations that will ensure your DIY tree topper not only looks spectacular but also stands securely atop your tree, becoming a cherished part of your family’s holiday traditions for years to come.
The Timeless Appeal of a Star-Topped Tree:
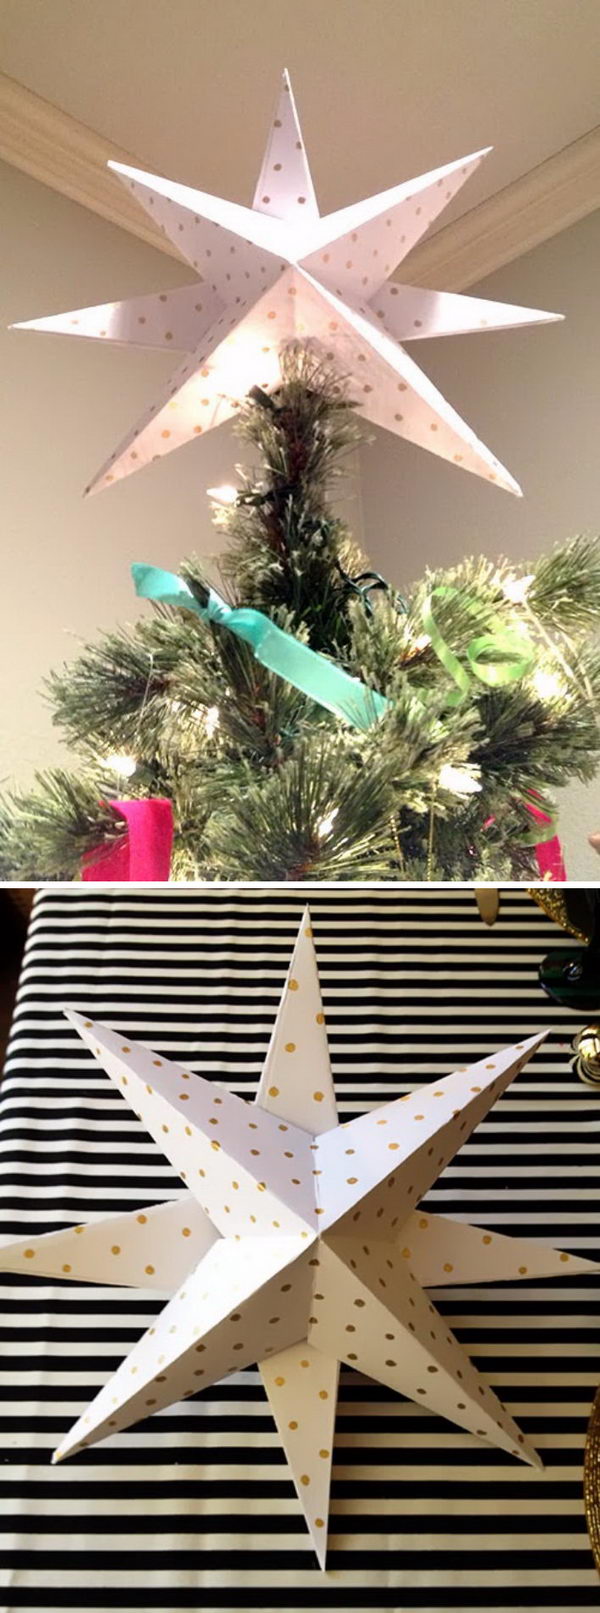
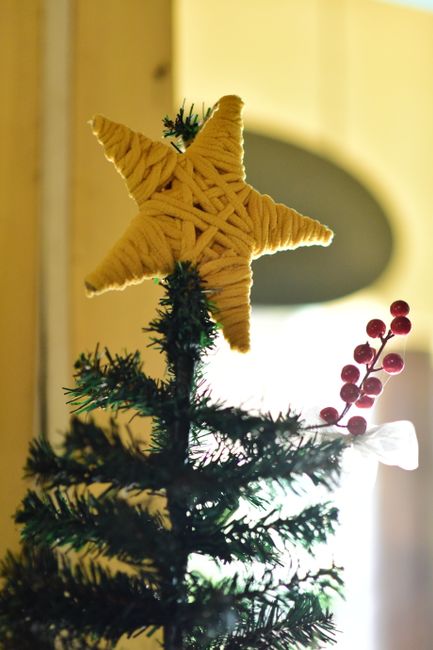
The star is arguably the most traditional and universally recognized Christmas tree topper. Its symbolic meaning, representing the Star of Bethlehem, imbues it with a profound sense of hope and wonder. Fortunately, crafting a DIY star topper is remarkably straightforward, making it an ideal project for all skill levels. One of the simplest yet most impactful methods involves using cardboard or thick cardstock. Begin by sketching a five-pointed star onto your chosen material. You can freehand this or find numerous free printable templates online. Once your star shape is perfected, carefully cut it out. For added dimension and visual interest, consider creating a second, slightly larger star and attaching it to the back of the first, offsetting it slightly to create a layered effect. Alternatively, you can cut out multiple smaller stars and arrange them in a cluster. To give your star a touch of sparkle, judiciously apply glitter. White glue or mod podge works well as an adhesive; brush a thin layer onto the star’s surface and then sprinkle glitter generously. Allow it to dry completely before shaking off any excess. For a more rustic feel, opt for burlap or felt. Cut out your star shape from these materials and then, using fabric glue or a sewing machine, stitch or glue decorative elements like buttons, beads, or small pom-poms. A touch of embroidery floss can also be used to outline the star or create intricate patterns. For a truly luminous star, explore wire and string lights. Bend a sturdy wire, such as floral wire or a straightened coat hanger, into a star shape. Secure the wire ends with pliers. Then, wrap it with thin, battery-operated LED fairy lights, tucking the battery pack discreetly amongst the branches of your tree. This creates a magical, glowing effect that will captivate onlookers. Another elegant option is a paper-folded star, inspired by origami. Simple folded stars can be created with patterned scrapbook paper or even pages from old books. The key is crisp folds and precise angles. For a larger, more impactful star, consider creating a 3D geometric star by cutting out individual triangular or diamond shapes and gluing them together. The beauty of DIY star toppers lies in their versatility; they can be as simple or as intricate as you desire, reflecting your personal style and the overall theme of your Christmas decor.
Beyond the Star: Embracing Unique and Personal Touches:
While stars hold a special place in our hearts, the world of DIY Christmas tree toppers extends far beyond this iconic shape. Embracing individuality allows for truly memorable and personalized decorations. Consider the angel topper. This can be as simple or as elaborate as your crafting skills allow. A basic angel can be fashioned from a cardboard cone for the body, a painted styrofoam ball for the head, and folded cardstock or felt for wings. Embellish with ribbon, glitter, or fabric scraps. For a more sophisticated angel, use a vintage doll or even a Barbie doll, adorning her with a flowing gown made from fabric scraps or lace. The wings can be crafted from feathers, wire and tulle, or even delicate paper cutouts. Another delightful and often overlooked option is the snowman topper. This can be a charming addition, especially for families with young children. Create a multi-tiered snowman using styrofoam balls of varying sizes, stacked and glued together. Paint them white and then add details like button eyes, a carrot nose (use a small piece of orange felt or a painted wooden bead), and a scarf made from a strip of fabric. A small top hat fashioned from felt or cardstock completes the look. For a more whimsical and playful topper, consider a DIY animal motif. Think a friendly reindeer, crafted from brown cardstock with pipe cleaner antlers, or a fluffy owl made from felt and googly eyes. Even a simple gnome with a pointed hat and beard made from yarn can add a touch of whimsy. For those who appreciate a touch of vintage charm, repurposed ornaments offer a fantastic solution. Gather a collection of your favorite oversized ornaments – perhaps a large bauble, a vintage glass finial, or even a cluster of smaller ornaments tied together. Secure them firmly to a central stem or wire structure to create a cohesive and striking topper. This is an excellent way to give new life to ornaments that might otherwise be relegated to the bottom of the ornament box. For a truly unique and conversation-starting topper, think about edible creations. A gingerbread star or snowflake, baked and decorated with icing, can be a delightful and delicious addition. Ensure it’s securely attached with a strong, food-safe adhesive or a specially designed tree topper base. For a more enduring edible-inspired topper, consider decoupage. Cover a cardboard or styrofoam base with images of gingerbread cookies, candy canes, or other festive treats cut from magazines or printed from the internet. Seal with mod podge for durability. The key to successful unique toppers lies in a strong base and secure attachment. Regardless of your chosen motif, consider incorporating elements that reflect your personal interests or family traditions, transforming your tree topper into a truly meaningful symbol of your holiday spirit.
Materials and Techniques for a Secure and Stylish Finish:
The success of any DIY Christmas tree topper hinges not only on its visual appeal but also on its structural integrity. A topper that constantly threatens to topple is a source of frustration, not festive cheer. Therefore, understanding the best materials and techniques for secure attachment is paramount. For most toppers, a sturdy base is essential. This can be a cone made from heavy cardstock, cardboard, or even a plastic or styrofoam cone purchased from a craft store. For lighter toppers, a rolled-up piece of cardstock secured with tape or staples might suffice. For heavier or more elaborate creations, a wooden dowel or a thick wire inserted into the base and extending downwards will provide crucial stability. When attaching the topper to your tree, the method of insertion is key. For toppers with a conical base, simply wedge the base securely amongst the branches at the very top of the tree. Ensure the branches are strong enough to support the weight. If your topper has a dowel or wire stem, gently push it down into the top few branches, allowing the branches to grip the stem and hold it in place. If you’re concerned about the topper slipping, you can secure it further with floral wire or pipe cleaners. Wrap these around the stem and then discreetly around a few sturdy branches. For toppers made from lighter materials like paper or felt, consider using a metal tree topper cone as a base. These cones are designed to slide easily onto the tree’s uppermost branch and provide a secure, metal-reinforced grip. When working with specific materials, consider their unique properties. For glittered toppers, ensure the adhesive is completely dry before attempting to attach it to the tree, as wet glitter can easily smudge and transfer. For felt or fabric toppers, fabric glue is generally more durable than craft glue. If sewing, use a strong thread and consider reinforcing seams. When incorporating lights, always use battery-operated LED lights for safety and convenience. Ensure the battery pack is easily accessible for on/off control and battery changes. For toppers that involve delicate elements like paper or wire, handle them with care to avoid bending or breaking. If you’re creating a multi-component topper, assemble it as much as possible before attaching it to the tree to minimize fumbling at the top. A good rule of thumb is to test the weight and balance of your topper before the final placement. Gently hold it at the top of the tree to gauge its stability. If it feels wobbly, reinforce the base or add additional support. By prioritizing a strong foundation and employing smart attachment techniques, you can ensure your DIY Christmas tree topper remains a proud and steadfast sentinel throughout the holiday season, adding that perfect, personalized flourish to your festive fir.
