Palm Springs Photo Pillow DIY: A Comprehensive Guide to Creating Personalized Home Decor
Transforming your living space with personalized decor has never been easier or more rewarding than with a DIY photo pillow project. This guide focuses specifically on creating a unique Palm Springs-inspired photo pillow, blending iconic desert aesthetics with your cherished memories. Whether you’re aiming for a vibrant mid-century modern vibe or a more subtle desert chic, this comprehensive tutorial will equip you with the knowledge and steps needed to craft a stunning, one-of-a-kind accent piece that captures the essence of Palm Springs. From selecting the perfect photo to executing various printing and sewing techniques, we’ll cover every aspect of this rewarding craft, ensuring your final product is both visually appealing and a true reflection of your personal style.
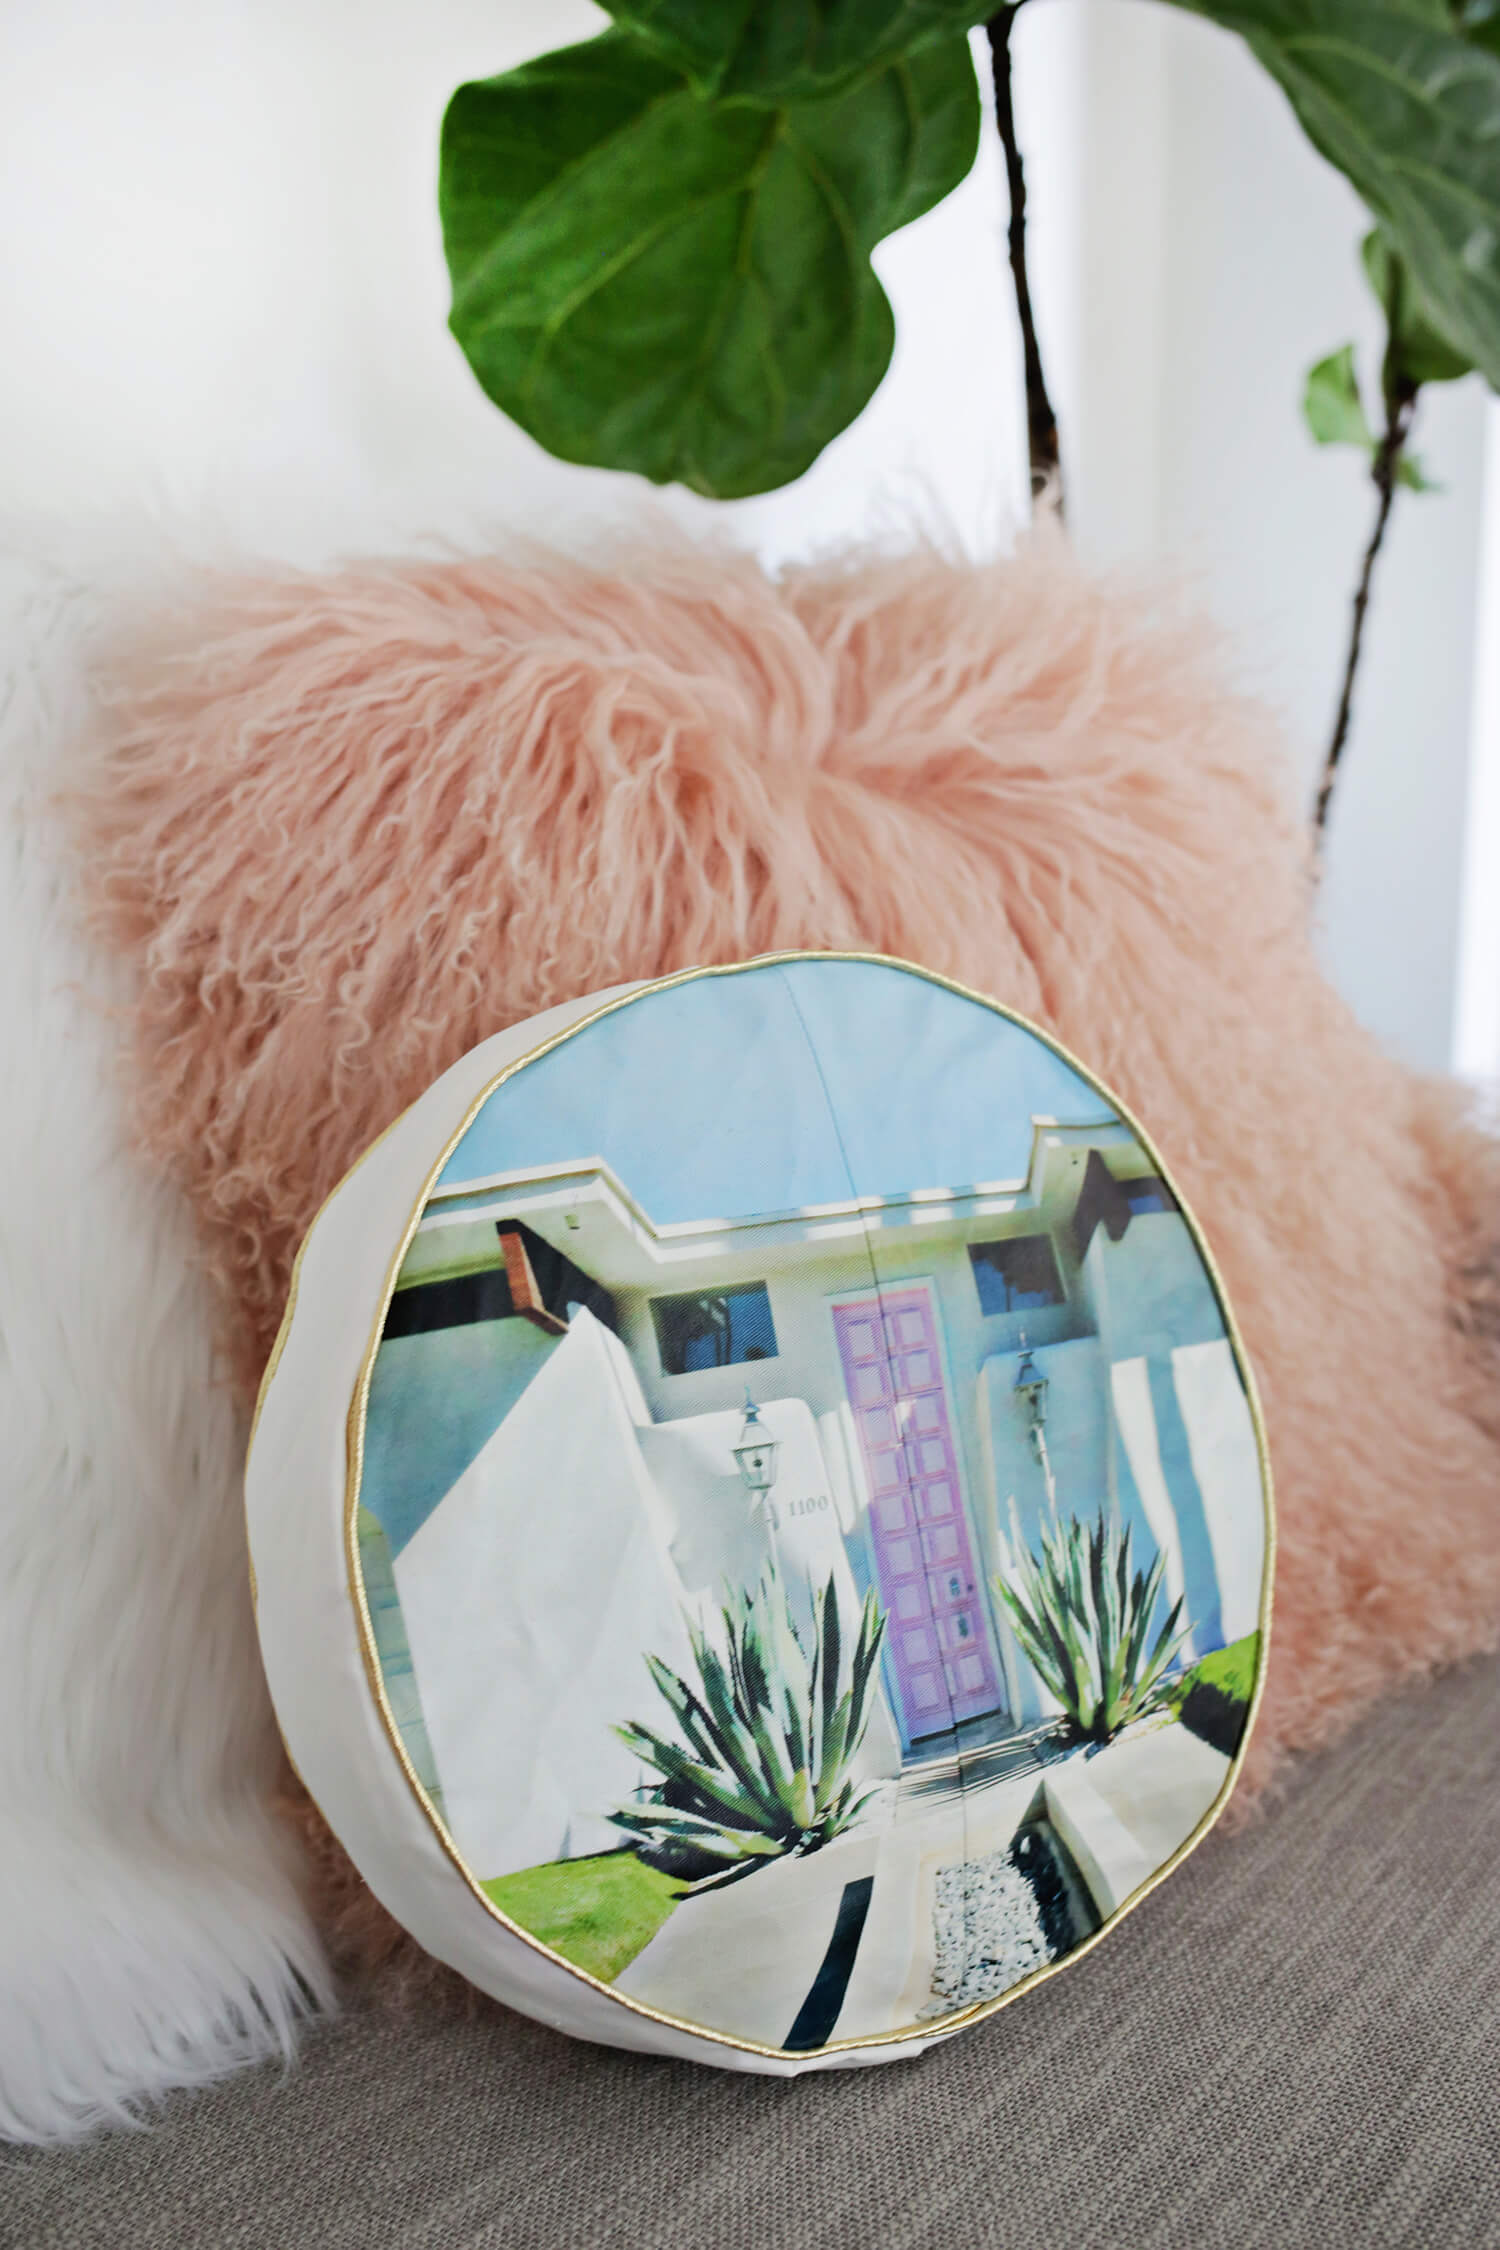
Choosing the Right Palm Springs-Themed Photograph is paramount to the success of your DIY photo pillow. The goal is to select an image that not only evokes the distinct atmosphere of Palm Springs but also translates well onto fabric. Consider iconic architectural elements like boomerang motifs, Googie architecture, or distinctive poolscapes. Alternatively, focus on the natural beauty: vast desert landscapes, dramatic mountain backdrops, or the vibrant colors of bougainvillea against adobe walls. Think about the color palette: saturated blues, oranges, yellows, and greens are synonymous with Palm Springs. High-resolution images are crucial for a crisp, clear print. Low-resolution photos will appear pixelated and blurry on fabric, diminishing the overall aesthetic. Examine the composition of your chosen image. Does it have a strong focal point? Is there enough negative space to prevent the image from feeling cluttered on the pillow? Images with a clear subject, such as a vintage car parked in front of a mid-century home, or a silhouette of palm trees against a sunset, tend to work exceptionally well. Black and white photography can also be incredibly effective, lending a timeless and sophisticated feel that complements the architectural lines often found in Palm Springs. Consider the mood you wish to convey. Are you aiming for a playful, retro vibe, or a more serene, minimalist feel? The photograph you choose will be the cornerstone of your entire design. Explore your personal photo library for images taken during trips to Palm Springs, or search stock photo sites if you haven’t visited personally but are inspired by its aesthetic. Prioritize images that are well-lit and free from distracting elements.
Fabric Selection for Your Palm Springs Photo Pillow influences both the print quality and the overall feel of the finished product. For photo pillows, polyester or polyester blends are generally recommended for their ability to hold vibrant colors and resist wrinkling. These fabrics also tend to be durable and easy to care for, which is a significant advantage for an item that will be handled and enjoyed regularly. Consider the texture of the fabric. A smooth, tight weave will yield the sharpest and most detailed prints. Conversely, a more textured fabric might absorb ink differently, leading to a softer, more vintage-inspired look. For a classic Palm Springs aesthetic, a medium-weight cotton or a linen blend can offer a beautiful drape and a slightly more tactile feel, though it’s important to ensure the fabric is suitable for fabric printing. If you plan to use iron-on transfer paper, opt for fabrics that are compatible with heat, such as cotton or polyester. For sublimation printing, which offers the most vibrant and permanent results, polyester is essential. Think about the color of the base fabric. While you can print directly onto white or light-colored fabric, keep in mind that darker fabrics will alter the appearance of your printed image. If your chosen photo has a light background, printing it on a darker fabric might require a white underbase or a different printing method entirely. For the back of the pillow, you have more flexibility. You could opt for a coordinating solid color fabric, a complementary pattern, or even a different texture to add visual interest. Velvet, faux fur, or a textured linen can create a luxurious contrast to the printed front. Always pre-wash your fabric before starting your project to prevent shrinkage and remove any residual chemicals from manufacturing. This step is crucial for ensuring your finished pillow maintains its size and shape.
Printing Your Palm Springs Photo onto Fabric can be achieved through several DIY-friendly methods, each with its own advantages and considerations.
-
Inkjet Fabric Transfer Paper: This is arguably the most accessible method for home crafters. You’ll need a good quality inkjet printer, fabric transfer paper (available for light and dark fabrics), and an iron or heat press. For Light Fabrics: Print your image in mirror mode onto the treated side of the transfer paper. Carefully position the printed image face down onto your chosen fabric and iron according to the transfer paper instructions. For Dark Fabrics: These papers often have a clear adhesive backing. Print your image normally (not mirrored) onto the paper. Cut around your image, leaving a small border if desired. Peel the backing and carefully place the printed image face up onto your fabric. Then, iron according to the instructions, which usually involves covering the transfer with a protective sheet. Be patient with the ironing process, ensuring even heat distribution. The result can be vibrant, but the transfer might have a slight sheen or feel to it.
-
Sublimation Printing: This method yields the most professional and durable results, but it requires specialized equipment. You’ll need a sublimation printer with sublimation inks, sublimation paper, and a heat press. Sublimation ink chemically bonds with polyester fibers at high temperatures. The image is printed onto sublimation paper, then placed face down onto a polyester-rich fabric (ideally 100% polyester) and heat-pressed. The ink turns into a gas and infuses into the fabric, creating a permanent, breathable print that won’t crack or peel. This is ideal for achieving those vibrant Palm Springs blues and oranges.
-
Fabric Markers or Paints: For a more artistic and handmade look, consider drawing or painting your Palm Springs-inspired design directly onto the fabric using fabric markers or paints. This allows for greater creative control and can result in a truly unique piece of art. You can sketch your design first with a pencil or chalk, then fill it in. Stencils are also a great option for recreating patterns like palm fronds or geometric motifs. This method is more labor-intensive but offers unparalleled personalization.
-
Professional Fabric Printing Services: If you’re seeking the highest quality print without investing in specialized equipment, consider using a professional fabric printing service. Many online companies allow you to upload your image and have it printed onto various fabric types. This is a great option if you’re short on time or want to ensure a flawless finish.
Regardless of the printing method chosen, always test your print on a scrap piece of fabric first to ensure satisfactory results before committing to your pillow fabric. Pay close attention to the instructions provided with your printing materials for optimal outcomes.
Cutting and Preparing Your Fabric Pieces is a critical step for achieving a professional-looking pillow. You will typically need two main pieces for a basic envelope closure pillow: one for the front and one for the back. If you’re using a pre-printed fabric panel, you’ll simply cut that to your desired pillow size.
- Measure and Mark: Decide on the finished size of your pillow. For example, an 18×18 inch pillow requires cutting pieces slightly larger to account for seam allowances. A common seam allowance is 0.5 inches. Therefore, for an 18×18 inch finished pillow, you would cut your front piece to 19×19 inches and your back pieces (if using an envelope closure) to accommodate the overlap.
- Add Seam Allowances: When cutting your printed photo piece, ensure you add a generous seam allowance (typically 0.5 to 1 inch) around all edges. This will give you room to stitch the pillow together. If your printed photo is the exact size you want the finished pillow to be, you will need to cut a separate backing fabric slightly larger and then add seam allowances to that.
- Create the Back Panel (Envelope Closure): For an envelope closure, you’ll need two back pieces. If your front panel is 19×19 inches, you’ll cut two back pieces. One will be the full width (19 inches) and the desired height (e.g., 14 inches). The second back piece will be the same width (19 inches) but shorter (e.g., 12 inches). This overlap creates the envelope opening.
- Hem the Back Panels: For the two back pieces, fold over the edge that will form the opening of the envelope closure twice by about 0.5 inches. Press well and stitch along the folded edge to create a neat hem. This prevents fraying and creates a clean finish.
- Square Up and Trim: After cutting and hemming, use a quilting ruler and rotary cutter (or scissors) to ensure all your pieces are perfectly square. This is crucial for the pillow to lie flat and look professional.
Sewing Your Palm Springs Photo Pillow brings your vision to life. For a standard envelope closure pillow:
- Assemble the Back: Lay the front pillow piece right side up on your work surface. Take one of your hemmed back panels and lay it right side down on top of the front panel, aligning the raw edges. Now, take the second hemmed back panel and lay it right side down on top of the first back panel, overlapping the hemmed edges to create the envelope opening. Ensure the edges of both back panels align with the edges of the front panel. Pin all layers securely in place, paying special attention to the overlapping areas of the back panels.
- Stitch the Pillow: Using a sewing machine and a straight stitch, begin sewing around the entire perimeter of the pillow, maintaining your chosen seam allowance (e.g., 0.5 inches). Start in the middle of one side to hide the beginning and end of your stitching within the seam. Backstitch at the beginning and end of your seam for added durability.
- Clip Corners: Once you’ve sewn all four sides, carefully clip the corners diagonally, being careful not to cut through your stitching. This helps to reduce bulk and allows for sharper corners when you turn the pillow right side out.
- Turn Right Side Out: Reach through the envelope opening and gently pull the pillowcase right side out. Use a point turner or a dull pencil to carefully push out the corners for a crisp finish.
- Insert Pillow Form: Gently insert your pillow form through the envelope opening. Adjust the form so it fills the corners evenly.
- Final Touches: You can iron your finished pillowcase for an extra neat appearance, or leave it as is for a more relaxed, lived-in look. If you used a fabric that can be ironed, a light press will make the envelope closure lay beautifully flat.
For a zipper closure, the process is slightly more involved and requires the addition of a zipper insertion step. This is a good option if you want a more secure closure or a sleeker look. Zipper insertions are readily available online with detailed tutorials.
Stuffing Your Palm Springs Photo Pillow: The choice of pillow insert significantly impacts the final look and feel of your DIY photo pillow.
- Polyester Fiberfill: This is a common and affordable choice, offering a soft and plump fill. It’s easy to work with and can be adjusted to achieve your desired firmness. For a 18×18 inch pillow, you might need a 20×20 inch insert to achieve a fuller look.
- Down or Feather Fill: For a luxurious and moldable pillow, down or feather fill is an excellent option. It provides a soft, sinking feel and a more sophisticated aesthetic. These inserts are generally more expensive than polyester fill.
- Foam Inserts: For a very structured and firm pillow, foam inserts can be used. These are less common for decorative photo pillows but might be suitable for a specific design requirement.
When stuffing your pillow, ensure the insert is distributed evenly, paying attention to the corners. Avoid overstuffing, as this can distort the shape of your pillow and put excessive strain on the seams. Conversely, understuffing will result in a floppy, unappealing pillow. Aim for a firm but comfortable feel.
Adding Embellishments and Finishing Touches to your Palm Springs photo pillow elevates it from a simple DIY project to a truly bespoke decorative item. Consider these ideas to enhance its appeal:
- Piping or Cording: Adding a length of piping or decorative cording along the seams of your pillow can create a polished, professional look. Choose a color that complements your photo or adds a pop of contrasting color characteristic of Palm Springs design.
- Tassels or Pom-Poms: For a playful and bohemian touch, attach tassels or pom-poms to the corners of your pillow. These can be store-bought or handmade from yarn.
- Appliqué or Embroidery: If your photo has a simpler background, consider adding a small appliqué of a cactus, a mid-century modern furniture silhouette, or a geometric pattern. Hand embroidery can also be used to add subtle details or outlines to elements within your photograph.
- Fabric Paint Accents: Use fabric paints to add subtle highlights or to outline specific elements in your photo. This is a great way to personalize the design further and add a unique artistic touch.
- Contrast Piping: If your pillow has a solid color back, you could add contrasting piping around the edge to draw attention to its shape and add a graphic element.
When adding embellishments, consider the overall aesthetic you are trying to achieve. A few well-placed details can make a big impact without overwhelming the central photo. Ensure any embellishments are securely attached to withstand handling and washing.
Caring for Your Palm Springs Photo Pillow ensures its longevity and continued visual appeal. Follow these guidelines:
- Washing Instructions: Check the care instructions for your fabric and printing method. Generally, for fabric printed with inkjet transfers, spot cleaning is recommended. For sublimation prints, the fabric is often washable. If machine washing is necessary, use a gentle cycle with cold water and a mild detergent.
- Drying: Air drying is the gentlest method for preserving the print. Avoid high heat in a dryer, as this can cause fading or damage the transfer. If you must use a dryer, opt for a low-heat setting.
- Ironing: If ironing is necessary, turn the pillow inside out or place a protective cloth over the printed area. Use a low to medium heat setting. Avoid direct contact of the iron with the printed surface, especially for inkjet transfers.
- Sunlight Exposure: Prolonged exposure to direct sunlight can cause fading of fabric prints. Position your pillow away from direct sunbeams to maintain its vibrant colors.
- Spot Cleaning: For minor spills or stains, immediate spot cleaning is the best approach. Use a damp cloth and a small amount of mild soap. Blot the area gently and rinse with a clean, damp cloth.
By following these care instructions, you can ensure your Palm Springs photo pillow remains a beautiful and cherished decorative piece for years to come, continuing to bring a touch of desert charm and personal memories into your home.
