
DIY Twist Back Top: A Comprehensive Sewing Guide for Stylish Customization
The DIY twist back top offers a unique and stylish alternative to standard t-shirts and blouses, providing an interesting visual element that can elevate any outfit. This sewing project is surprisingly achievable for intermediate sewers and even adventurous beginners, allowing for complete customization in terms of fabric, fit, and overall aesthetic. The beauty of a DIY twist back top lies in its versatility; it can be dressed up with a skirt and heels or down with jeans and sneakers, making it a wardrobe staple that you can tailor to your personal style. This guide will walk you through every step, from selecting the perfect fabric to finishing touches, ensuring a professional-looking result you’ll be proud to wear. We will break down the process into manageable sections, covering pattern selection, fabric choice, cutting, sewing construction, and essential tips for achieving a polished finish. Understanding the fundamental construction of this top will empower you to experiment with variations and further personalize your creations.
Choosing the Right Pattern for Your DIY Twist Back Top
The foundation of any successful sewing project is a well-fitting pattern. For a twist back top, you have a few options. You can purchase a commercial pattern specifically designed for this style, which often comes with detailed instructions and size charts. Brands like McCalls, Simplicity, and Butterick frequently offer twist back top patterns, usually categorized under "tops," "blouses," or "knit tops." When selecting a commercial pattern, pay close attention to the finished garment measurements and the recommended fabric types. Another excellent option is to draft your own pattern. This requires more advanced sewing knowledge but offers unparalleled customization. You can start with a basic t-shirt or tank top pattern and then modify it to incorporate the twist back feature. Essentially, you’ll be creating two separate pieces for the back that will be sewn together and then twisted. If drafting your own, remember to account for seam allowances and ease of movement. For beginners or those seeking a quicker project, modifying an existing simple top pattern is often the most practical approach. Consider the neckline style as well; a boat neck, scoop neck, or V-neck all complement a twist back beautifully and can be easily incorporated into your pattern. The key is to choose a pattern that aligns with your skill level and desired aesthetic. Look for patterns that indicate a certain level of difficulty and match it with your sewing experience. Don’t be afraid to experiment with different pattern companies, as each has its own approach to sizing and instructions. Reading reviews of commercial patterns can also provide valuable insights into their ease of use and fit.
Fabric Selection: The Key to a Flawless Twist Back Top
The fabric you choose will significantly impact the drape, comfort, and overall look of your twist back top. For this style, fabrics with good drape and a bit of stretch are ideal. Knits are a popular choice, as they are comfortable to wear and forgiving during the sewing process.
-
Knit Fabrics:
- Jersey Knit: This is a classic choice for t-shirts and tops. It has a smooth surface and drapes beautifully. Look for cotton jersey, modal jersey, or bamboo jersey for softness and breathability. A bit of spandex (around 3-5%) will enhance stretch and recovery, making it easier to sew and wear.
- Interlock Knit: A heavier knit than jersey, interlock has a more stable structure and doesn’t curl at the edges, making it easier to cut and sew. It offers excellent opacity.
- French Terry: This knit fabric has loops on the inside and a smooth surface on the outside. It offers a bit more body and warmth, making it suitable for cooler weather twists tops.
- Rayon Spandex: Known for its incredible drape and luxurious feel, rayon spandex creates a very elegant twist back top. It can be a bit more slippery to work with, so consider using a walking foot on your sewing machine.
-
Woven Fabrics (for a more structured look):
- While knits are generally preferred for their comfort and ease, some woven fabrics can work for a more structured twist back top. Consider lightweight challis, rayon crepe, or silk blends. These fabrics will create a more sophisticated garment but require more precise sewing and fitting. Be aware that woven fabrics will not have the same inherent stretch, so ensure your pattern includes adequate ease for movement.
When selecting fabric, always consider the intended occasion for your twist back top. A soft jersey will be perfect for casual wear, while a drapey rayon or silk blend can elevate the top for evening events. Always pre-wash your fabric before cutting to prevent shrinkage after construction. This is a crucial step that many home sewers overlook, and it can save you a lot of frustration down the line. Consider the wrong side of the fabric as well; some fabrics have a more attractive wrong side that might be exposed in the twist.
Essential Tools and Notions for Your DIY Twist Back Top
Beyond fabric, having the right tools and notions will make your sewing experience smoother and more enjoyable.
- Sewing Machine: A standard sewing machine is essential. If you are working with knits, a machine with a stretch stitch or a serger will be beneficial for creating durable and neat seams.
- Serger (Optional but Recommended): For knit fabrics, a serger is invaluable for finishing seams quickly and professionally, preventing fraying and creating a stretchy edge.
- Rotary Cutter and Cutting Mat: These provide clean and precise cuts, especially important for knit fabrics that can stretch and distort under scissor pressure.
- Fabric Scissors: Essential for any fabric cutting, ensure they are sharp and dedicated solely to fabric.
- Pins or Sewing Clips: To hold fabric pieces together before sewing. Sewing clips are particularly useful for knits as they don’t leave pinholes.
- Measuring Tape: For accurate body measurements and pattern adjustments.
- Fabric Marker or Chalk: For marking pattern lines and design elements on your fabric.
- Thread: Choose a high-quality polyester thread that matches or complements your fabric. For knits, consider using a stretch thread in your bobbin for added seam flexibility.
- Needles: Use the appropriate needle for your fabric type. Ballpoint or stretch needles are essential for knit fabrics to prevent skipped stitches and fabric damage.
- Iron and Ironing Board: Pressing seams as you go is crucial for a professional finish.
- Pattern Weights (Optional): To hold your pattern pieces in place while tracing or cutting, especially useful for slippery fabrics.
- Hand Sewing Needle: For any finishing touches or minor repairs.
Cutting the Fabric: Precision is Key
Once you have your pattern and fabric, it’s time to cut. This step requires accuracy to ensure your top pieces align correctly.
- Pre-wash and Iron Fabric: As mentioned, this is a critical first step to account for any shrinkage.
- Lay Out Fabric: Fold your fabric according to the pattern instructions (usually lengthwise, selvage to selvage). For knits, it’s often best to lay them flat on a single layer to avoid stretching and distortion.
- Place Pattern Pieces: Pin your pattern pieces onto the fabric, ensuring you are following the grainline arrows. For knit fabrics, it’s often recommended to place the pattern pieces in the direction that allows for maximum stretch across the body.
- Trace or Cut: You can either trace around the pattern pieces with a fabric marker or chalk, or cut directly around the pinned pattern. If tracing, ensure your markings are clear and accurate.
- Cut Carefully: Use your rotary cutter or fabric scissors to make precise cuts along the marked lines or the edge of the pattern. Take your time and avoid stretching the fabric as you cut.
- Transfer Markings: Transfer any notches, dots, or other markings from the pattern to your fabric. These are essential for accurate assembly.
- Double-Check: Before moving on, lay out your cut pieces to ensure they match the pattern and have all necessary markings.
Sewing Construction: Assembling Your Twist Back Top
This is where your DIY twist back top starts to take shape. The construction will vary slightly depending on your chosen pattern, but the general principles are the same.
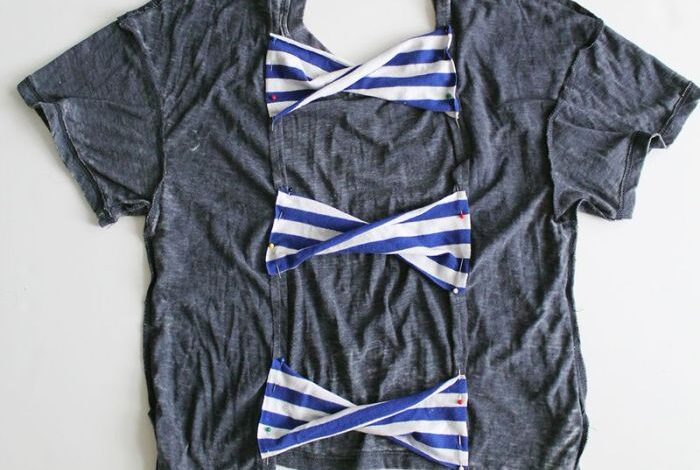
- Prepare the Back Pieces: This is the signature element. Typically, the back of the top will be cut into two separate pieces. You will sew the outer edges of these two back pieces together, stopping at a designated point (usually the shoulder or a few inches down). The raw edges will likely be finished at this stage.
- Sew Shoulder Seams: With right sides together, sew the front and back shoulder seams. If your pattern has a separate neckband, you’ll attach that now as well. For knit fabrics, use a stretch stitch or serger.
- Attach Sleeves (if applicable): If your top has sleeves, set them into the armholes according to your pattern instructions. Again, use a stretch stitch or serger for knit sleeves.
- Sew Side Seams: With right sides together, sew the side seams from the hem of the top up to the underarm. Ensure the underarms align correctly.
- Construct the Twist: This is the unique part. The two back panels are designed to be crossed over each other and then twisted. The specific method for securing the twist will depend on your pattern, but it often involves sewing the two back panels together at the neckline and then manipulating them to create the twist. You’ll then likely sew the twisted panels to the main back body of the top, creating a neat finish at the waist or hem. The goal is to create a secure and aesthetically pleasing twist that doesn’t unravel. This might involve stitching in the ditch or using a specific binding technique.
- Hem the Top: Finish the hem of your top. For knits, a double-folded hem is common, often sewn with a twin needle for a professional, t-shirt-like finish. For woven fabrics, you might opt for a traditional double-folded hem or a rolled hem.
- Finish Neckline: If you haven’t already attached a neckband, finish the neckline. This could involve a facing, a band, or a simple turned-and-stitched hem, depending on your pattern and fabric.
Finishing Touches: Elevating Your DIY Twist Back Top
The finishing touches are what elevate a homemade garment from good to great.
- Pressing: Iron all seams as you sew and give the entire garment a final press. This makes a huge difference in the finished appearance.
- Topstitching: Consider adding topstitching to key areas like the neckline, hem, or sleeve hems. This not only adds a decorative element but also reinforces seams.
- Trim and Tidy: Snip away any loose threads for a clean finish.
- Interfacing (for Wovens): If you’ve used a woven fabric, you might need to interface certain areas like the neckline or plackets for stability.
- Decorative Elements: Depending on your style, you could add embellishments like lace trim, embroidery, or decorative buttons.
Troubleshooting Common Sewing Issues
Even experienced sewers encounter challenges. Here are a few common issues and their solutions for twist back tops:
- Stretchy Fabric Pulling Under the Needle: This is common with knits. Ensure you are using the correct needle (ballpoint or stretch) and that your tension is set appropriately. A walking foot can also help feed the fabric evenly.
- Skipped Stitches: This often indicates a dull needle, incorrect needle type, or improper machine tension.
- Fabric Curling at the Edges: This is typical of jersey knits. Pre-washing helps. When sewing, you can sometimes stitch with the edge slightly "stretched" to counteract the curling.
- Uneven Hem: Ensure your fabric is even when you begin hemming and that your machine is feeding it consistently. Using a hem guide can be very helpful.
- Twist Not Laying Flat: This can happen if the twist isn’t secured properly or if the fabric is too stiff. Experiment with different ways of securing the twist, and ensure your fabric has enough drape.
Customization Ideas for Your DIY Twist Back Top
The beauty of DIY is the ability to personalize. Here are some ideas to make your twist back top truly your own:
- Sleeve Variations: Short sleeves, cap sleeves, 3/4 sleeves, or even long bell sleeves.
- Neckline Variations: V-neck, scoop neck, boat neck, or a halter neck.
- Asymmetrical Hemlines: Create a curved or pointed hem for added visual interest.
- Fabric Combinations: Mix and match different fabrics for a unique look. Perhaps a solid front with a patterned back.
- Cut-outs: Incorporate subtle cut-outs on the shoulders or back.
- Color Blocking: Use contrasting fabric colors to create bold design elements.
- Ruching or Gathering: Add subtle ruching to the sides or the twist for a more fitted or decorative effect.
By following this comprehensive guide, you can confidently create a stylish and personalized DIY twist back top that reflects your individual style and sewing skills. The process is rewarding, and the end result is a garment that is both fashionable and uniquely yours.
