DIY embroidered photo frames offer a unique way to personalize your home decor and create thoughtful gifts. Embroidery, an ancient art form, allows you to express your creativity through intricate designs and vibrant colors. This craft combines the beauty of handmade artistry with the sentimentality of cherished memories, making it a truly special endeavor.
The materials needed are readily available and affordable, making this project accessible to crafters of all skill levels. With a basic understanding of embroidery stitches and a little patience, you can transform a simple photo frame into a stunning work of art.
Introduction to DIY Embroidered Photo Frames
Embroidered photo frames are a unique and personal way to showcase your favorite memories. The intricate designs and colorful threads add a touch of handmade charm to your home décor. These frames are not just decorative pieces but also a reflection of your creativity and skill.Creating an embroidered photo frame is a rewarding and enjoyable craft project that can be customized to your liking.
You can choose from a variety of embroidery stitches, colors, and patterns to create a frame that perfectly complements your personality and style.
Materials and Tools Needed
Embroidered photo frames require basic materials and tools readily available at most craft stores. Here is a list of essential items:
- Embroidery hoop: This is the essential tool that holds the fabric taut while you embroider. Choose a hoop size that accommodates the size of your photo frame.
- Fabric: A variety of fabrics can be used for embroidery, but linen, cotton, and felt are popular choices. Select a fabric that is sturdy and easy to work with.
- Embroidery floss: This is the thread used for stitching. Choose colors that complement your photo and personal style.
- Embroidery needle: Select a needle size appropriate for the thickness of your fabric and embroidery floss.
- Scissors: Use sharp scissors to cut the fabric and embroidery floss.
- Photo frame: Choose a frame that matches the size of your photo and the style of your embroidery.
- Adhesive: Use a strong adhesive to attach the embroidered fabric to the photo frame.
History and Cultural Significance of Embroidery
Embroidery has a rich history and cultural significance, dating back thousands of years. It has been practiced in various civilizations across the globe, from ancient Egypt to China.
I’m finally getting around to finishing my DIY embroidered photo frame project, and I’m so excited to share the results! While I was researching embroidery techniques, I stumbled across an interesting article about PTX Metals Green Canada subsidiary’s acquisition of Thelon Basin uranium claims.
It made me think about how different industries are always evolving, and how even a simple craft like embroidery can be influenced by current events. Now, back to my project! I’m just about ready to frame my finished piece, and I can’t wait to see how it looks.
Embroidery has been a form of art and craft for centuries, reflecting the traditions, beliefs, and aesthetics of different cultures.
Embroidery was often used to adorn clothing, household items, and religious objects. It served as a form of personal expression, social status, and cultural identity.
I’m loving the cozy vibes of fall, and my DIY embroidered photo frame project is really capturing that feeling. The warm tones of the embroidery thread remind me of my favorite autumnal treat, pumpkin spice rice pudding , which is the perfect comfort food for chilly evenings.
I can’t wait to display my finished frame on my mantelpiece, surrounded by candles and a stack of cozy blankets.
- Ancient Egypt: Egyptians used embroidery to decorate clothing, linen, and tomb furnishings. The intricate designs often featured floral motifs, animals, and hieroglyphics.
- China: Embroidery has a long and rich tradition in China, dating back to the Han Dynasty. Chinese embroidery is known for its exquisite craftsmanship, intricate designs, and vibrant colors.
- Europe: Embroidery flourished in Europe during the Middle Ages, with elaborate designs adorning tapestries, altar cloths, and clothing. It was often a form of religious expression and a way to showcase the skill of the embroiderer.
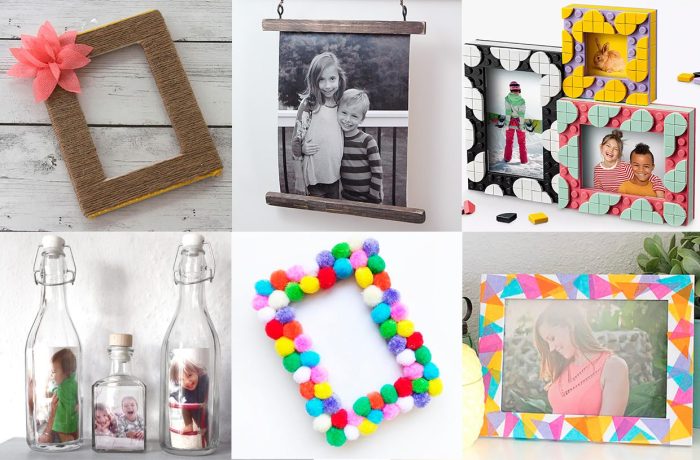
Design Inspiration and Ideas

Embroidered photo frames are a wonderful way to personalize your home decor and create unique gifts. The possibilities are endless when it comes to design, so let’s explore some inspiring ideas and techniques to help you get started.
Embroidery Patterns for Photo Frames
Embroidery patterns specifically designed for photo frames can be found online, in craft stores, or in embroidery books. These patterns often feature borders, corners, and decorative elements that are perfect for framing a photo.
- Floral patterns:These patterns are classic and timeless, and they can be customized with different colors and flower types to match your style. A delicate vine of forget-me-nots or a bold bouquet of sunflowers can add a touch of charm to your frame.
- Geometric patterns:Geometric patterns are modern and versatile, and they can be used to create a variety of looks. Think about simple squares, intricate tessellations, or even abstract designs.
- Nature-inspired patterns:Nature is a great source of inspiration for embroidery patterns. You can find patterns featuring birds, butterflies, leaves, and other natural elements.
- Personalized patterns:For a truly unique touch, you can create your own embroidery patterns based on your favorite hobbies, interests, or memories.
Incorporating Personal Touches and Themes
To make your embroidered photo frame truly special, consider incorporating personal touches and themes into your design.
- Use colors and motifs that reflect the person or event in the photo.For example, if you’re framing a photo of your child’s first birthday, you could use bright colors and whimsical motifs like balloons or cupcakes.
- Add a personal message or quote to the frame.This could be a favorite quote, a special date, or a heartfelt message to the person in the photo.
- Use materials that have personal significance.For example, you could use fabric scraps from a loved one’s clothing or a piece of embroidery floss that has been in your family for generations.
Stitching Techniques and Effects
Different stitching techniques can create a variety of textures and effects in your embroidery.
- Backstitch:Backstitch is a strong and versatile stitch that is perfect for outlining shapes and creating crisp lines.
- Satin stitch:Satin stitch is a smooth and even stitch that is often used to fill in areas of color.
- French knots:French knots are small, decorative knots that can be used to add texture and dimension to your embroidery.
- Chain stitch:Chain stitch is a simple and elegant stitch that is perfect for creating borders, Artikels, and flowing designs.
Step-by-Step Guide to Embroidering a Photo Frame
Embroidering a photo frame is a wonderful way to personalize your home decor and add a touch of handmade charm. It’s a fun and rewarding project that allows you to express your creativity and make a unique piece. Let’s dive into the step-by-step guide to create your own embroidered photo frame.
Preparing the Fabric and Frame
Before you begin embroidering, you need to prepare your fabric and frame. Choose a sturdy fabric that can withstand the tension of embroidery. Cotton or linen are excellent choices. For the frame, you can use a simple wooden frame or even a pre-made photo frame with a removable back.
- Cut the fabric:Measure the size of your frame and cut the fabric accordingly, leaving a 1-2 inch border around the frame. You will use this border to attach the fabric to the frame.
- Stretch the fabric:To ensure a smooth and even surface for embroidery, you need to stretch the fabric tautly over the frame. You can use a staple gun or a fabric stretcher to secure the fabric.
- Secure the fabric:Once the fabric is stretched, use a needle and thread to stitch the fabric edges to the back of the frame. This will prevent the fabric from loosening and ensure a professional finish.
Transferring the Design
You can either design your own embroidery pattern or use a pre-made design. To transfer your design onto the fabric, there are several methods:
- Tracing:You can trace your design onto the fabric using a pencil or tracing paper. Use a lightbox or a window to see the design clearly.
- Iron-on transfer:This method involves using an iron-on transfer sheet, which has a special adhesive that adheres to the fabric when heated.
- Freehand drawing:If you’re confident in your drawing skills, you can draw the design directly onto the fabric using a fabric pen or marker.
Choosing and Using Embroidery Floss
Embroidery floss comes in a wide range of colors and materials. You can use a single strand or multiple strands to create different textures and effects.
Embroidering a photo frame is a great way to personalize a gift or add a touch of handmade charm to your decor. If you’re looking for more DIY projects, you might enjoy checking out this list of 25 clothing accessory DIYs , which includes everything from beaded necklaces to embroidered patches.
Once you’ve mastered those, you can come back to your photo frame and add some intricate embroidery details for a truly unique piece.
- Choosing the right floss:Consider the color scheme of your photo frame and the overall design you want to achieve. For a simple design, you can use one or two colors of floss. For a more intricate design, you can use a variety of colors.
- Using the floss:When using embroidery floss, it’s important to separate the strands and use only the number of strands needed for your design. You can use a needle threader to make it easier to thread the needle.
Embroidery Stitches for Photo Frames
There are many different embroidery stitches that can be used for photo frames. Here are some popular stitches:
- Backstitch:This is a simple and versatile stitch that is perfect for outlining designs and creating straight lines.
- Satin stitch:This stitch creates a smooth, solid surface and is often used for filling in areas of the design.
- French knots:These are small, decorative knots that add texture and dimension to your design.
- Running stitch:This is a basic stitch that is often used for creating Artikels or filling in areas with a more open look.
Finishing the Embroidered Frame
Once you have finished embroidering, you need to finish the frame. This involves securing the back of the frame and adding any finishing touches.
- Securing the back:Use a glue gun or a stapler to secure the back of the frame to the embroidered fabric.
- Adding finishing touches:You can add a layer of fabric to the back of the frame for a more polished look. You can also add a ribbon or a bow to the frame for decoration.
Creative Variations and Techniques
Embroidering a photo frame is a great way to personalize your home decor and add a touch of your unique style. But you can also take your embroidery skills to the next level by incorporating different techniques and embellishments to create truly one-of-a-kind frames.This section explores a range of creative variations and techniques that can elevate your embroidery projects.
You’ll learn about incorporating beads, sequins, and other embellishments, experimenting with different fabrics, mastering freehand embroidery techniques, and even incorporating mixed media elements into your frames.
Embellishments
Adding embellishments like beads, sequins, and other decorative elements can add texture, sparkle, and visual interest to your embroidered photo frames.
- Beads:Beads come in a wide variety of sizes, shapes, and colors, allowing you to create unique patterns and designs. You can sew beads directly onto your embroidery or use them to create borders, accents, or even entire motifs.
- Sequins:Sequins are small, flat, shiny discs that can be sewn or glued onto fabric.
They can be used to create intricate patterns, add a touch of glamour, or simply add a bit of sparkle to your frame.
- Other Embellishments:You can also use other embellishments such as buttons, ribbons, lace, or even small charms to add texture and dimension to your embroidery.
Fabric Choices
Different fabrics can create different effects in your embroidered photo frame.
- Linen:Linen is a natural fiber known for its durability and crisp texture. It’s a good choice for embroidery because it holds its shape well and allows for precise stitching.
- Cotton:Cotton is another popular choice for embroidery, as it’s soft, absorbent, and relatively inexpensive.
It’s also available in a wide range of colors and weights.
- Silk:Silk is a luxurious fabric that adds a touch of elegance to any embroidery project. It’s known for its smooth texture and beautiful drape.
- Felt:Felt is a non-woven fabric that’s soft and easy to work with.
It’s a good choice for creating bold, graphic designs and adding texture to your embroidery.
Freehand Embroidery
Freehand embroidery allows you to create more organic and flowing designs. It’s a great way to express your creativity and personalize your photo frames.
- Practice:Before you start embroidering on your frame, it’s helpful to practice your freehand embroidery techniques on a scrap piece of fabric. This will help you get a feel for the stitches and develop your own style.
- Experiment:Experiment with different stitches and techniques to create unique textures and patterns.
Don’t be afraid to try new things and let your creativity flow.
Mixed Media
Incorporating mixed media elements into your embroidered photo frames can add depth and dimension to your design.
- Paper:You can use paper to create cutouts, collages, or even hand-painted elements to add texture and visual interest to your embroidery.
- Fabric scraps:Use fabric scraps to create appliqués or patchwork elements in your frame.
- Beads and Sequins:As mentioned earlier, beads and sequins can also be used as mixed media elements to add texture and sparkle to your design.
Displaying and Gifting Embroidered Photo Frames

Once your embroidered photo frame is complete, it’s time to showcase its beauty and share it with others. Displaying and gifting your creation involves thoughtful considerations to ensure both the frame and its message are presented effectively.
Displaying Embroidered Photo Frames
The way you display your embroidered photo frame can significantly impact its overall appeal. Here are some ideas for incorporating your frame into various settings:
- On a Mantlepiece or Bookshelf:The classic placement for a framed piece, a mantlepiece or bookshelf allows your frame to stand out as a focal point. Choose a prominent spot where it can be easily seen and admired.
- Above a Bedside Table:A personal touch to a bedroom, an embroidered photo frame above a bedside table adds warmth and character. It’s a perfect place to display a cherished photo or a meaningful message.
- In a Gallery Wall:For a more dynamic display, create a gallery wall featuring your embroidered frame alongside other artwork, photos, or prints. This arrangement allows for a cohesive and eclectic display.
- On a Desk or Work Space:An embroidered frame on a desk or work space can provide a personal touch and a reminder of loved ones or important memories.
Personalizing Embroidered Photo Frames
Beyond the embroidery itself, there are numerous ways to personalize your frame to make it even more special:
- Choosing the Right Photo:The photo you choose should complement the embroidery and evoke the desired sentiment. A black and white photo can add a vintage feel, while a vibrant color photo can create a bold statement.
- Adding a Personal Message:Include a handwritten message on the back of the frame, a heartfelt note, or a poem that resonates with the recipient. This adds a personal touch and makes the gift even more meaningful.
- Embellishing with Beads or Ribbons:Embellishing the frame with beads, ribbons, or other decorative elements can enhance its visual appeal and add a touch of whimsy.
Framing and Preservation
Proper framing and preservation are crucial to protecting your embroidered photo frame and ensuring its longevity:
- Using Acid-Free Materials:Acid-free materials, such as mat boards and backing boards, are essential to prevent discoloration and damage to the embroidery over time. These materials are specially designed to be pH neutral and minimize the risk of acidic degradation.
- Choosing the Right Glass:UV-protective glass is recommended for protecting the embroidery from harmful ultraviolet rays, which can cause fading and damage. Regular glass can also reflect light, creating glare and making it difficult to see the artwork clearly.
- Proper Hanging Techniques:Use appropriate hanging hardware and techniques to ensure the frame is securely hung and does not fall. This is especially important for heavier frames or those hung in high-traffic areas.
Gifting Embroidered Photo Frames, Diy embroidered photo frame
Gifting an embroidered photo frame is a thoughtful and personal gesture. Here are tips for packaging and presenting your creation:
- Packaging:Wrap the frame in tissue paper or acid-free paper to protect it during transport. Consider using a gift box that is slightly larger than the frame to provide extra cushioning.
- Presentation:Present the frame in a beautiful gift bag or wrap it with a ribbon. Include a handwritten card with a personal message expressing your appreciation for the recipient. You can also include a small gift, such as a bouquet of flowers or a scented candle, to enhance the overall presentation.