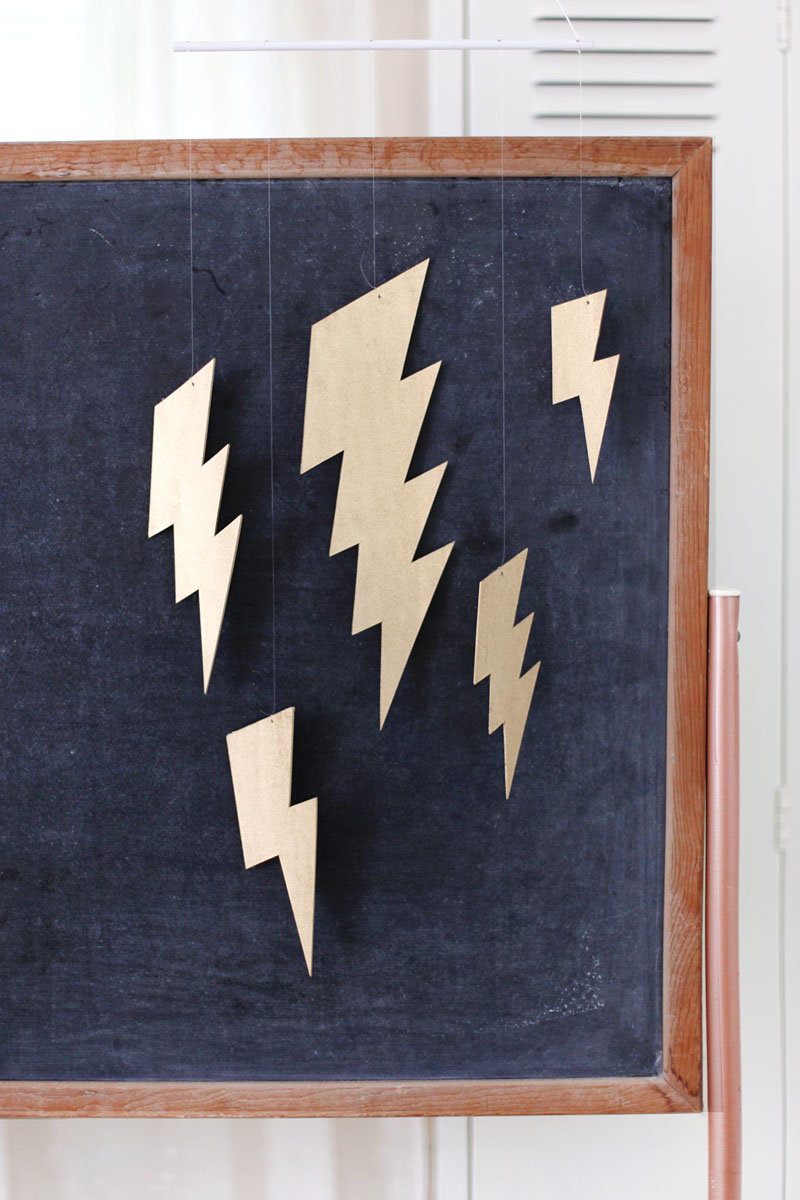
Crafting a Mesmerizing Metallic Lightning Bolt Mobile: A DIY Guide for Electrifying Decor
Creating a metallic lightning bolt mobile is a sophisticated DIY project that injects a spark of dynamic energy and contemporary style into any space. This guide will walk you through the process, from selecting materials to final assembly, ensuring a stunning and durable finished product. We’ll delve into the benefits of this unique decor piece, its potential applications, and the specific techniques that elevate a simple craft into an artistic statement. This mobile isn’t just a decorative item; it’s a conversation starter, a reflection of modern aesthetics, and a testament to your creative prowess. The shimmering, reflective surfaces of metallic materials will capture light and movement, mimicking the fleeting, powerful beauty of a lightning strike, thus adding a touch of celestial drama to your environment.
The allure of a metallic lightning bolt mobile lies in its inherent symbolism and visual impact. Lightning, a force of nature, represents power, sudden inspiration, electrical energy, and transformative change. Translating this raw power into a delicate, suspended mobile creates a fascinating juxtaposition. The metallic finish amplifies this effect, adding a touch of luxury and modernity. Unlike purely naturalistic decor, a metallic interpretation offers a stylized, abstract representation that appeals to a broad range of aesthetic preferences, from minimalist chic to industrial cool. The reflective qualities of the metal are paramount to its success. They interact with ambient light, creating a dynamic visual experience that shifts and changes throughout the day. This inherent interactivity makes the mobile a living piece of art, rather than a static object. The way light glints off the sharp angles and smooth curves of the lightning bolt will draw the eye, providing a focal point that is both captivating and elegant. Furthermore, the metallic nature lends itself to a sophisticated color palette, offering choices that range from classic silver and gold to on-trend rose gold, brushed brass, or even vibrant, iridescent finishes that mimic the spectral colors of electrical discharge. This versatility allows the mobile to seamlessly integrate into diverse interior design schemes.
Materials and Tools: The Foundation of Your Electrifying Creation
To embark on this metallic lightning bolt mobile project, a curated selection of materials and tools is essential for both functionality and aesthetic appeal. The core of your mobile will be the lightning bolt itself. For a truly metallic look, consider using thin sheets of metal. Aluminum, brass, or copper are excellent choices. Aluminum is lightweight and easy to cut, making it ideal for beginners. Brass and copper offer a richer, warmer metallic tone and are more durable, though they may require slightly more effort to work with. Alternatively, for a lighter, more accessible option, you can utilize metallic cardstock or heavy-duty craft foam sheets that have a metallic finish. These are significantly easier to cut and shape. For a truly professional and durable finish, consider purchasing pre-cut metallic aluminum sheets designed for crafting. These often come in various gauges, with thinner sheets being more pliable for intricate bends and thicker sheets offering more structural integrity.
Beyond the lightning bolt material, you’ll need a sturdy yet lightweight suspension system. This typically involves a base from which the lightning bolt will hang. A wooden dowel, a metal hoop, or even a carefully constructed geometric frame can serve as an excellent base. The connecting elements between the base and the lightning bolt are crucial. Fishing line is a popular choice for its invisibility, creating the illusion that the lightning bolt is floating. However, for a more robust and visible connection, consider thin metallic wire, such as jewelry wire or craft wire, which can complement the metallic aesthetic of the bolt. You will also need a hanging mechanism for the mobile itself, such as a ceiling hook or a wall-mounted bracket.
Essential tools for this project include a sharp craft knife or precision cutting tool for accurate cuts, especially if working with metallic sheets. A pair of sturdy scissors will be useful for cardstock or foam. For shaping and bending metallic sheets, needle-nose pliers and a small hammer or mallet (used with a protective surface) will be invaluable. If you opt for attaching multiple components or reinforcing edges, a strong adhesive like E6000 or a high-quality super glue will be necessary. A ruler and a pencil are indispensable for precise measurements and marking. For a polished finish on metallic sheets, consider investing in fine-grit sandpaper or a metal polishing cloth.
Designing Your Lightning Bolt: Form, Function, and Flair
The design phase is where your creative vision for the metallic lightning bolt mobile truly takes shape. The iconic lightning bolt silhouette can be interpreted in numerous ways, from a sharp, angular representation to a more stylized, flowing form. Consider the scale of your mobile and the intended location. A larger, more dramatic bolt might suit a spacious living room, while a smaller, more delicate rendition could be perfect for a child’s nursery or a home office.
To begin, sketch out your lightning bolt design on paper. Think about the angles and points. A classic lightning bolt has a distinct zig-zag pattern. You might opt for a single, bold bolt or a series of interconnected bolts to create a more complex visual. For a dynamic appearance, experiment with slightly curved lines within the bolt’s structure. Remember, the metallic finish will catch light and emphasize any three-dimensional qualities you introduce.
If you’re working with metallic sheets, consider how the material will be cut and manipulated. Thinner gauges of aluminum can be easily cut with a craft knife and then bent using pliers to create subtle curves or sharper angles. Thicker sheets will require more precise cutting with metal shears or a rotary cutter. For a more robust design, you might choose to layer multiple thin metallic sheets together, creating a thicker, more substantial lightning bolt.
Another design consideration is the integration of the suspension system. You’ll need to determine where and how the fishing line or wire will attach to the lightning bolt. This could be through pre-drilled holes, small eye hooks securely fastened to the bolt, or even by creating small loops at the top of the bolt itself. The placement of these attachment points will influence the balance and movement of the mobile.
For those using metallic cardstock or craft foam, the design process is simplified. You can create templates and easily cut out multiple identical or varied lightning bolt shapes. These can then be layered or connected to form a more intricate design. Consider incorporating different metallic finishes or even contrasting matte and metallic surfaces for added visual depth.
When designing, also think about the overall composition of the mobile. Will it be a single, dominant lightning bolt, or a cluster of smaller elements? Consider the negative space around the lightning bolt. A well-designed mobile balances the visual weight of its components with the surrounding air, creating a sense of lightness and movement. Experiment with different arrangements on paper before committing to cutting your materials.
Construction Techniques: Bringing Your Metallic Vision to Life
The construction phase is where your meticulously designed lightning bolt transforms into a tangible, eye-catching mobile. If you’ve chosen to work with metallic sheets, precision is key. Carefully transfer your design onto the metal using a pencil or a fine-tip marker. Employ a metal ruler for straight lines and a steady hand for curves.
For cutting, use a sharp craft knife on a cutting mat for aluminum. Score the metal repeatedly along your marked lines, applying steady pressure. Once the score line is deep enough, you can often bend the metal along the score to snap it cleanly. For thicker metals or more intricate shapes, metal shears or a rotary cutter might be more appropriate. Always cut away from yourself and wear safety glasses.
After cutting, it’s time for shaping. Needle-nose pliers are your best friends here. Gently bend the edges of the lightning bolt to create subtle contours or sharp angles. If you want a more pronounced bend, you can use a small hammer and a protective surface (like a piece of wood or a rubber mat) to tap the metal into shape. Be patient and work gradually to avoid creasing or tearing the material. If you’re aiming for a slightly three-dimensional bolt, you might cut two identical silhouettes and then carefully bend the edges of one to create a slight overlap, allowing you to glue or rivet them together.
For attaching the suspension system, drill small pilot holes where you plan to attach your fishing line or wire. Use a drill bit slightly smaller than the diameter of your wire or line. For a secure attachment, thread fishing line through the hole and tie a knot, or use a small crimp bead to secure wire. If using eye hooks, screw them firmly into the drilled holes.
If you are layering metallic sheets for added thickness or visual appeal, apply a strong adhesive like E6000 evenly between the layers. Clamp the layers together firmly and allow them to cure completely according to the adhesive manufacturer’s instructions. For a cleaner finish on layered pieces, consider using a very fine-grit sandpaper or a metal polishing cloth to smooth any rough edges.
If you’re using metallic cardstock or craft foam, the construction is more straightforward. Use sharp scissors or a craft knife to cut out your shapes. If layering, use a good quality craft glue. You can reinforce edges by folding them over a thin wire or fishing line, securing with glue. For a more durable option with cardstock, consider using a thin coat of clear sealant or Mod Podge to add a protective layer and a subtle sheen.
The suspension base also requires careful construction. If using a wooden dowel, ensure it’s smooth and sanded. You can paint or stain it to match your decor. For a metal hoop, ensure it’s sturdy and free of any rough edges. Attach your hanging mechanism to this base. Then, connect your lightning bolt to the base using your chosen suspension material (fishing line, wire). Distribute the attachment points evenly to ensure the mobile hangs level and balances effectively.
Finishing Touches and Installation: The Grand Finale
The final stage of creating your metallic lightning bolt mobile involves refining its appearance and seamlessly integrating it into your chosen space. Once the lightning bolt is fully constructed and any adhesive has cured, it’s time for the finishing touches. If you’ve worked with raw metallic sheets, a thorough polishing is essential. Use a soft, lint-free cloth and a metal polish specifically designed for the type of metal you’ve used. For a more subtle sheen, a gentle buffing with a microfibre cloth can achieve a beautiful gleam. This step removes any fingerprints, smudges, and minor imperfections, enhancing the overall reflectivity and luxurious feel of your mobile.
Consider adding other metallic embellishments if desired. Tiny metallic beads threaded onto the suspension lines can add extra sparkle and movement. Alternatively, small metallic charms in complementary shapes like stars or moons could enhance the celestial theme. Ensure any additions are lightweight to avoid unbalancing the mobile.
The installation of your metallic lightning bolt mobile is as crucial as its creation. First, determine the ideal location. A spot with natural light will allow the metallic surfaces to truly shine, creating captivating reflections. Avoid areas with strong drafts that might cause excessive swinging.
For ceiling installation, use a sturdy ceiling hook specifically designed for hanging objects. Ensure it’s screwed securely into a ceiling joist or a wall stud for maximum support. If you’re unsure about the structural integrity of your ceiling, consider consulting a professional. For wall mounting, use a strong bracket that can bear the weight of your mobile.
When attaching the mobile to its hanging point, ensure the suspension lines are adjusted so that the mobile hangs level. This might require minor adjustments to the length of the fishing line or wire connecting the lightning bolt to the suspension base. Gently test the balance by giving the mobile a slight nudge. If it tilts significantly, adjust the attachment points until it hangs straight.
For a truly captivating display, consider the surrounding decor. The metallic sheen of the lightning bolt will complement various styles, from modern and minimalist to industrial and eclectic. If your room features other metallic accents, ensure the finish of your lightning bolt harmonizes with them.
Finally, step back and admire your creation. The dynamic form of the lightning bolt, coupled with the dazzling reflectivity of the metallic finish, will add an electrifying touch of artistry and personality to your home. This DIY metallic lightning bolt mobile is more than just a decoration; it’s a handcrafted masterpiece that embodies power, elegance, and a touch of cosmic wonder. Its visual appeal will undoubtedly draw attention and spark conversation, making it a truly unique and cherished addition to your living space. The interplay of light and shadow across its metallic surfaces creates a constantly evolving display, ensuring it remains a captivating focal point for years to come.
