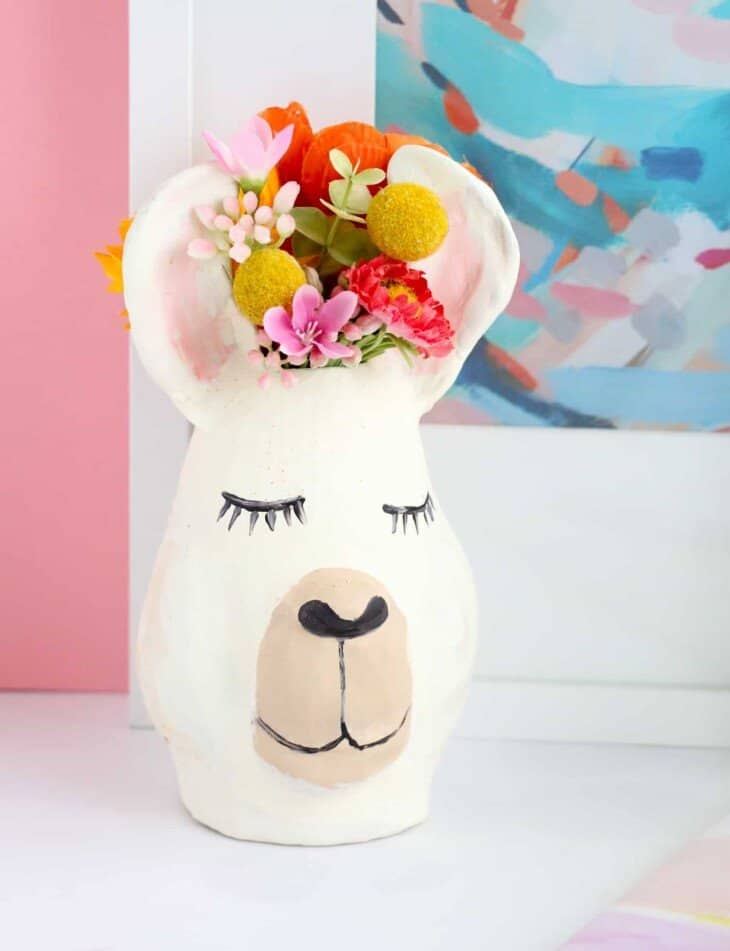
Craft Your Own Charming Llama Vase: A Step-by-Step DIY Guide for Unique Home Decor
Creating your own llama vase offers a delightful and rewarding way to inject personality and artistic flair into your home decor. This project is accessible to crafters of all skill levels, from beginners eager to try their hand at a whimsical craft to experienced DIY enthusiasts looking for a unique statement piece. A handmade llama vase is not only a charming addition to any room but also a fantastic opportunity to personalize your space with a touch of South American-inspired artistry. Unlike mass-produced decor, a DIY llama vase carries the warmth of your personal touch, making it a truly one-of-a-kind item. The process itself can be a meditative and enjoyable experience, allowing for creative expression through color choices, decorative elements, and even the very form of the llama. Whether you envision a sleek, minimalist llama or a brightly colored, elaborately adorned one, this guide will walk you through the essential steps to bring your vision to life.
The foundational element for your llama vase is the vessel itself. You have several excellent options depending on your desired aesthetic and crafting skill. The most straightforward approach involves repurposing an existing vase or container. Look for simple, cylindrical, or slightly tapered vases made of ceramic, glass, or even sturdy plastic. These can be readily found at thrift stores, craft supply shops, or even around your home. Alternatively, you can start with a plain terracotta pot, which offers a wonderfully earthy base for a llama’s rustic charm. For those seeking a more sculpted form, consider using air-dry clay or polymer clay. Air-dry clay is forgiving and doesn’t require a kiln, making it ideal for home-based projects. Polymer clay, on the other hand, offers greater durability and detail once baked according to the manufacturer’s instructions. If you’re feeling particularly adventurous, you could even mold your llama around a more robust base like a thick cardboard tube or a plastic bottle, effectively creating a hollow form that then becomes your vase. The key is to choose a base that can comfortably hold water and plant stems, while also providing a stable structure for your llama transformation. Measure the opening and ensure it’s wide enough to accommodate your desired flowers or foliage. Consider the weight of the finished vase, especially if it will be placed on a shelf or a high surface, and select a base that will provide adequate stability.
Once you’ve selected your base vessel, the next crucial step is to prepare it for its transformation. This preparation is vital for ensuring that your paint and decorative elements adhere properly and create a smooth, professional-looking finish. If you’re using a repurposed glass or ceramic vase, a thorough cleaning is essential. Wash the vase with warm, soapy water to remove any dust, grime, or residue. For stubborn marks, a gentle scrub with a non-abrasive sponge should suffice. After washing, rinse the vase thoroughly and allow it to air dry completely. Moisture can interfere with paint adhesion, so ensure it is bone dry. If your chosen vessel has a glossy surface, a light sanding can significantly improve paint grip. Use a fine-grit sandpaper (around 180-220 grit) and gently scuff the entire exterior surface of the vase. This creates a microscopic texture that the primer and paint can cling to more effectively. Wipe away any sanding dust with a damp cloth and allow it to dry again. For terracotta pots, this sanding step is often less critical, but a quick wipe down to remove any loose dust is still recommended. If you’re working with air-dry clay or polymer clay as your primary sculpting material, ensure your base form is sturdy and free of any cracks or imperfections before proceeding. For air-dry clay, it’s beneficial to seal the dried clay with a primer once it’s hardened to prevent moisture absorption from the paint.
Priming is an indispensable step in achieving a durable and vibrant painted finish on your llama vase. A good primer acts as a bridge between the vase’s surface and your chosen paints, ensuring better adhesion, preventing chipping, and allowing your colors to pop. For most surfaces, a general-purpose acrylic primer is an excellent choice. If you’re working with glass or a very smooth ceramic, opt for a primer specifically designed for non-porous surfaces. If your base is terracotta, an acrylic primer will work well to seal the porous material. Apply a thin, even coat of primer using a foam brush or a spray primer. Foam brushes are great for achieving a smooth, streak-free finish on curved surfaces. If using spray primer, ensure you work in a well-ventilated area and apply in light, sweeping motions from about 8-10 inches away. It’s often better to apply two thin coats of primer rather than one thick one. Allow each coat to dry completely according to the manufacturer’s instructions before applying the next. A well-primed surface will feel slightly rough to the touch once dry, indicating it’s ready for paint. This step might seem tedious, but it’s the foundation for a professional and long-lasting llama vase.
Now comes the exciting part: transforming your primed vessel into a charming llama! The key to creating a recognizable llama shape is to focus on its distinctive features: the long neck, the characteristic head with its upright ears, and the sturdy body. You can achieve this through various methods, depending on your chosen base and your comfort level with artistic sculpting.
Sculpting with Air-Dry Clay or Polymer Clay:
If you started with a very basic vase shape or even a solid form like a cardboard tube, air-dry clay or polymer clay is your primary sculpting medium. Begin by creating the neck. Roll a long, thick log of clay, tapering it slightly at one end for the head. Attach this firmly to the body of your vase. For a more organic look, you can blend the edges where the neck meets the body. Next, sculpt the head. This is where you can inject personality. Create a slightly rounded or elongated snout, and don’t forget the distinctive llama eyes – often depicted as large and expressive. For the ears, roll two small, elongated teardrop shapes and attach them upright to the top of the head. You can refine the shape of the ears to be pointed or slightly rounded. For the body, you can either sculpt it directly onto the vase, adding bulk and form, or if you’re using a pre-existing vase as a base, you can add clay details to define the llama’s silhouette. Think about adding subtle curves to suggest musculature or a gentle hump. For a four-legged llama vase, you’ll need to sculpt four sturdy legs, ensuring they are proportionate to the body and provide good stability. Blend the legs seamlessly into the body. As you sculpt, continuously check the proportions and ensure the overall shape reads as a llama. Don’t be afraid to add texture with tools like sculpting knives, toothpicks, or even the back of a brush.
Adding Llama Features to an Existing Vase:
If you’re working with a pre-made vase, your focus will be on adding sculpted elements to suggest the llama’s form. Air-dry clay or polymer clay can be used here as well. You can sculpt a separate neck piece and attach it to the vase. Similarly, the head can be sculpted as a separate component and then glued or attached with clay to the neck. Ears can be fashioned from clay and adhered to the head. For a more minimalist approach, you might simply paint the vase in a way that suggests a llama’s silhouette, using clever color blocking and line work. You could also create a few key sculpted details, like a stylized head and ears, and attach them to a plain vase. This method allows for a quicker transformation and can be very effective for achieving a contemporary look.
Texturizing for Llama’s Fleece:
A defining characteristic of llamas is their woolly fleece. You can mimic this texture in a few ways. While the clay is still wet, use a fine-toothed comb, a fork, or even your fingernails to create subtle parallel lines or a scrunched effect on the body, neck, and head. Alternatively, after the clay has dried and been primed, you can use textured paints or even a thick, impasto technique with acrylics to build up a fuzzy appearance. Another creative option is to use small pieces of yarn or roving, adhering them to the clay or directly to the primed vase in areas where the fleece would be most prominent.
Painting Your Llama Vase: Bringing it to Life
Once your sculpted llama form is dry and primed (or your existing vase is primed), it’s time to bring your creation to life with color! Acrylic paints are your best friend for this project. They are water-based, dry quickly, and offer a wide range of vibrant hues.
Color Palettes:
- Classic Llama: Think earthy tones like beige, cream, light brown, and soft grey for the body. You can add subtle darker browns or black for accents like the nose, eyes, and inner ears.
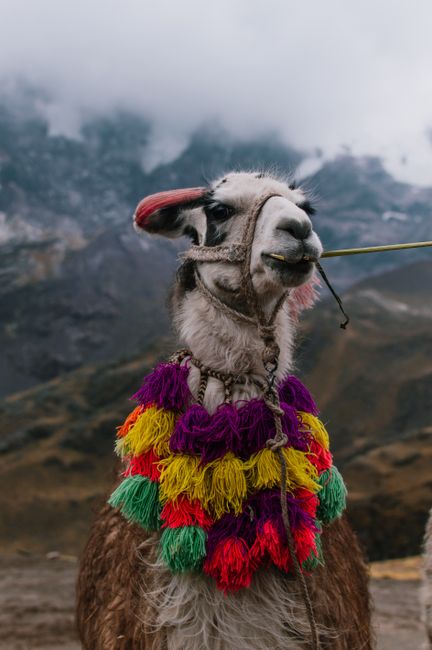
- Vibrant Andes: Embrace the rich colors of South American textiles. Consider bold blues, vibrant reds, sunny yellows, and deep greens. You can create striking color-blocked designs or intricate patterns.
- Pastel Dream: Soft and dreamy llamas can be achieved with pastel shades of pink, mint green, lavender, and baby blue. This creates a whimsical and delicate aesthetic.
- Monochromatic Magic: A sophisticated look can be achieved with a single color palette, using different shades and tints of that color to create depth and interest.
Application Techniques:
- Base Coat: Start with a base coat of your main body color. Apply thin, even coats, allowing each to dry completely before applying the next.
- Details: Use smaller brushes to paint the facial features, ears, and any decorative patterns. Take your time with the eyes to give your llama a soulful gaze.
- Shading and Highlighting: To add dimension, use slightly darker shades of your base color to create shadows in recessed areas and slightly lighter shades to highlight raised areas. Blend these carefully for a smooth transition.
- Textural Painting: If you didn’t sculpt texture into the clay, you can achieve a fuzzy effect with paint. Load your brush with a slightly thicker consistency of paint and dab or stipple it onto the surface to mimic wool.
- Patterning: Get creative with patterns! Think geometric designs, stripes, dots, or even floral motifs inspired by Andean art. Masking tape can be invaluable for creating crisp, straight lines for color blocking or stripes.
Finishing Touches: Sealing and Embellishing
The final steps are crucial for protecting your artwork and adding those extra special touches that make your llama vase truly unique.
Sealing for Durability:
Once your paint is completely dry, it’s essential to seal your llama vase to protect the paint from moisture, chips, and general wear and tear. A clear acrylic sealant or varnish is the ideal choice. You can opt for a matte, satin, or gloss finish, depending on the look you desire. A matte finish offers a more natural, subtle sheen, while a gloss finish provides a more polished and reflective appearance. Apply the sealant in thin, even coats, just like you did with the primer and paint. Allow each coat to dry thoroughly between applications. Ensure you cover all painted areas, including any sculpted details. This sealant will not only protect your artwork but also enhance the vibrancy of the colors.
Embellishments for Extra Flair:
This is where you can truly let your creativity run wild and personalize your llama vase to the fullest. Consider these embellishment ideas:
- Textile Accents: Glue small lengths of colorful yarn, roving, or even macrame cord to areas like the neck, back, or tail to further mimic the llama’s fleece.
- Beads and Sequins: Add small beads or sequins around the eyes, ears, or along painted patterns for a touch of sparkle and texture.
- Pom-Poms: Small, fluffy pom-poms can be attached to the ears or tail for a whimsical, playful touch.
- Feathers: Natural or dyed feathers can be incorporated for a bohemian or tribal feel.
- Fabric Scraps: Cut small pieces of patterned fabric and glue them onto the vase for a decoupage effect.
- Embroidery Floss: Wrap sections of the vase with colorful embroidery floss for a crafty, bohemian aesthetic.
- Googly Eyes: For a playful and humorous touch, consider adding oversized googly eyes.
- Felt Accents: Cut shapes from felt, such as small saddle blankets or decorative tassels, and attach them to your llama.
When adding embellishments, ensure they are securely attached with a strong craft glue. Consider the overall aesthetic you are aiming for and choose embellishments that complement your chosen color palette and style.
Llama Vase Care and Display:
To keep your handcrafted llama vase looking its best, follow these simple care and display tips. Dust your vase regularly with a soft, dry cloth. Avoid using harsh chemicals or abrasive cleaners, as these can damage the paint and sealant. When watering plants placed in the vase, be mindful not to overfill it, and wipe away any spills promptly. Place your llama vase in a location where it won’t be exposed to extreme temperature fluctuations or direct sunlight for extended periods, as this can cause colors to fade over time. Choose a prominent spot where its unique charm can be appreciated, whether it’s on a bookshelf, a mantelpiece, a side table, or as a centerpiece for your dining table.
Creating your own llama vase is more than just a craft project; it’s an opportunity to express your personal style and create a functional piece of art that brings joy and conversation to your home. From selecting the perfect base to the final embellishments, each step offers a chance for creative exploration. The process is rewarding, the result is unique, and the satisfaction of displaying your own handcrafted llama vase is immeasurable. So, gather your materials, unleash your inner artist, and embark on this delightful DIY adventure to craft a llama vase that is as charming and individual as you are. This personalized decor piece will undoubtedly become a cherished part of your home’s ambiance.
