Holiday Door Banner DIY: Ready to add a touch of festive cheer to your home this season? Crafting your own holiday door banner is a fun and affordable way to express your holiday spirit. From classic Christmas designs to whimsical Halloween creations, the possibilities are endless.
This guide will walk you through every step, from gathering materials to hanging your finished masterpiece. Whether you’re a seasoned DIY enthusiast or a beginner, we’ll provide the inspiration and instructions you need to create a festive door banner that’s sure to impress.
Let’s get started!
Introduction to Holiday Door Banners: Holiday Door Banner Diy

Holiday door banners are a fun and festive way to decorate your home and celebrate the season. They add a touch of cheer and personality to your front door, welcoming guests and spreading holiday spirit. Door banners can be a simple way to express your holiday spirit and create a welcoming atmosphere.
They’re a versatile decorative element that can be adapted to different holidays and personal styles.
Types of Holiday Door Banners
Door banners come in various styles, reflecting the diversity of holidays and individual preferences. They can be categorized into festive, seasonal, or themed banners.
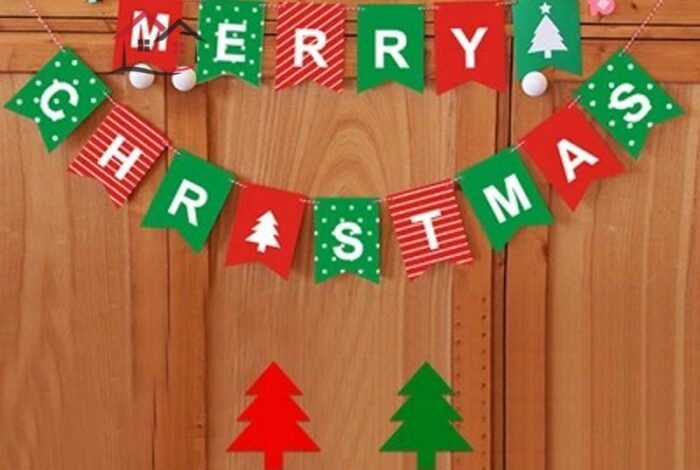
- Festive Banners:These banners are typically associated with general holiday cheer and celebration. They often feature common holiday symbols like snowflakes, stars, or candy canes. Examples include banners with the phrase “Merry Christmas” or “Happy Holidays” in a festive font.
- Seasonal Banners:These banners are specific to a particular season, such as autumn or winter. They might feature images of leaves, pumpkins, or snowmen, depending on the season. For example, a banner with a snowman design would be suitable for winter holidays like Christmas or New Year’s.
- Themed Banners:These banners focus on a specific holiday or theme, like Halloween, Thanksgiving, or Hanukkah. They often incorporate elements unique to that holiday, such as ghosts and pumpkins for Halloween, turkeys and cornucopias for Thanksgiving, or menorahs and dreidels for Hanukkah.
Examples of Holiday Door Banners
Here are some examples of popular holiday door banners and their designs and materials:
- Christmas Banners:Often feature traditional Christmas elements like Santa Claus, reindeer, snowflakes, or Christmas trees. They can be made from fabric, paper, or vinyl, and may include glitter, ribbons, or other embellishments.
- Halloween Banners:Typically feature spooky or whimsical elements like ghosts, bats, pumpkins, or witches. They are often made from fabric, paper, or vinyl, and may include glow-in-the-dark elements or spooky sounds.
- Thanksgiving Banners:Often feature elements like turkeys, pumpkins, cornucopias, or autumn leaves. They can be made from fabric, paper, or vinyl, and may include rustic textures or warm colors.
- Hanukkah Banners:Typically feature elements like menorahs, dreidels, blue and white colors, or Hebrew letters. They can be made from fabric, paper, or vinyl, and may include glitter, ribbons, or other embellishments.
DIY Materials and Tools

Creating a holiday door banner is a fun and creative way to decorate your home for the festive season. This project is perfect for individuals of all skill levels and can be customized to reflect your unique style. The process is simple and requires only a few basic materials and tools.The materials you choose will determine the final look and feel of your banner.
You can use a variety of materials to create your banner, such as fabric, paper, felt, or even recycled materials. The tools you need are also readily available and easy to find.
Materials, Holiday door banner diy
- Fabric or paper:This will be the main material for your banner. You can use any type of fabric or paper, depending on your preference and the style of your banner. Consider using festive colors like red, green, or gold, or patterns like snowflakes, reindeer, or Santa Claus.
- Scissors:Scissors are essential for cutting out shapes and designs for your banner. Choose a pair of sharp scissors that are comfortable to hold and use.
- Glue or tape:Glue or tape is needed to secure the different elements of your banner together. You can use a hot glue gun for a strong bond, or fabric glue for a more permanent solution. If you’re working with paper, double-sided tape or craft glue will work well.
- Markers, paint, or glitter:These materials can be used to add decorative details to your banner. Markers are great for writing messages or adding small details, while paint can be used for larger designs. Glitter can be used to add sparkle and shine to your banner.
- String or ribbon:String or ribbon is used to hang your banner. Choose a sturdy string or ribbon that will hold the weight of your banner. You can use different colors and textures to match your banner’s design.
- Optional:You can also use other materials to enhance your banner, such as:
- Embellishments:Sequins, buttons, or other small decorations can add a touch of sparkle and personality to your banner.
- Stencils:Stencils can be used to create intricate designs or lettering on your banner.
- Punch:A punch can be used to create holes in your banner for hanging or adding embellishments.
Tools
- Scissors:Scissors are essential for cutting out shapes and designs for your banner. Choose a pair of sharp scissors that are comfortable to hold and use.
- Glue or tape:Glue or tape is needed to secure the different elements of your banner together. You can use a hot glue gun for a strong bond, or fabric glue for a more permanent solution. If you’re working with paper, double-sided tape or craft glue will work well.
- Markers, paint, or glitter:These materials can be used to add decorative details to your banner. Markers are great for writing messages or adding small details, while paint can be used for larger designs. Glitter can be used to add sparkle and shine to your banner.
- String or ribbon:String or ribbon is used to hang your banner. Choose a sturdy string or ribbon that will hold the weight of your banner. You can use different colors and textures to match your banner’s design.
A holiday door banner DIY project is a fun way to welcome guests and celebrate the season. You can personalize it with your favorite colors and themes, and it’s a great way to add a festive touch to your home.
If you’re looking for some inspiration for your next project, check out brighten up your spring with prezzyboxs fresh gift selection for some fresh ideas and unique gifts. Once you’ve gathered your supplies, you can get started on your door banner and spread some holiday cheer!
I love making festive door banners for the holidays, and I’m always looking for ways to make them even more eye-catching. Recently, I was inspired to try something different and decided to create a unique frame for my banner. I’ve been thinking about building a small tent for camping trips, so I decided to research how to make my own A-frame tent and I realized the same principles could be applied to my door banner frame.
The result was a sturdy and stylish frame that really made my banner stand out!
I’m so excited about all the holiday decorations I’m making this year! I’m planning on making a fun door banner for my front door, and I think it will look amazing with my new holiday decor. I’m also really inspired by the Brown Thomas Marvel Room I saw online, and I’m thinking of incorporating some of those ideas into my banner as well.
I can’t wait to show it off to everyone when it’s finished!