Frosted pattern privacy glass DIY sets the stage for a journey of creative expression and functional enhancement. Whether you’re seeking to add a touch of elegance to your bathroom, create a more intimate atmosphere in your living room, or simply desire a unique design element, this project allows you to transform ordinary glass surfaces into stunning works of art.
This DIY project empowers you to unleash your inner artist and customize your home’s aesthetic with the versatility of frosted glass patterns. From simple geometric designs to intricate floral motifs, the possibilities are endless, and the process is surprisingly straightforward.
Introduction to Frosted Pattern Privacy Glass: Frosted Pattern Privacy Glass Diy
Frosted pattern privacy glass, also known as etched glass or patterned glass, is a type of glass that has a decorative, frosted pattern applied to its surface. This pattern obscures the view through the glass while still allowing some light to pass through.
Frosted pattern privacy glass DIY projects are a fun way to add a touch of elegance and privacy to your home. It’s amazing how a simple frosted film can transform a plain window into a beautiful design element. While I’m focused on my home improvements, I can’t help but think about the larger world and how social media platforms like Twitter should be responsible for the content shared on them.
Take a look at this article discussing the debate on whether Twitter should ban Trump: probeat twitter should bantrump. It’s a complex issue, but it’s clear that social media platforms have a responsibility to moderate content and create a safe environment for users.
Now, back to my frosted glass project, I’m excited to see how the finished product will look in my bathroom!
It is often used in homes, offices, and commercial spaces to provide privacy without completely blocking out natural light.Frosted pattern privacy glass offers numerous benefits that make it a popular choice for various applications. Its primary function is to provide privacy, preventing people from seeing through the glass while still allowing natural light to illuminate the space.
Frosted pattern privacy glass DIY is a fun way to add a touch of personality to your home, and it’s surprisingly easy to do. I recently used it to create a cool, modern look in my bathroom, and it reminds me of those dreamy photo art displays I saw at a recent art fair.
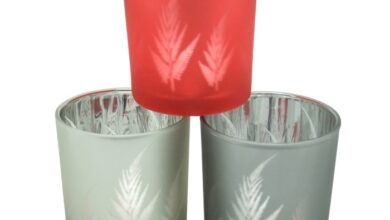
The light filtering through the frosted patterns creates such a beautiful, ethereal effect, and it’s a great way to add privacy without sacrificing natural light.
This makes it ideal for bathrooms, bedrooms, offices, and other areas where privacy is desired.
Frosted pattern privacy glass DIY is a great way to add a touch of elegance and privacy to your home. While I’m busy perfecting my frosting technique, I’m also enjoying celebrating the incredible talent of the actresses who brought Princess Margaret to life in “The Crown,” like Vanessa Kirby and Helena Bonham Carter.
Their nuanced performances have made the character so compelling. Back to my frosted glass project – I’m thinking of a geometric pattern for my bathroom window.
Types of Frosted Patterns, Frosted pattern privacy glass diy
The various frosted patterns available offer a wide range of aesthetic options to complement any décor. These patterns can range from simple geometric designs to intricate floral motifs, allowing for personalized customization. Some common types of frosted patterns include:
- Geometric patterns:These patterns feature simple, repetitive shapes like squares, circles, or lines, creating a modern and minimalist aesthetic.
- Floral patterns:These patterns showcase intricate floral designs, adding a touch of elegance and sophistication to the space.
- Abstract patterns:These patterns offer a unique and artistic look, featuring abstract shapes and designs that can be both modern and traditional.
- Custom patterns:Some manufacturers offer the option to create custom frosted patterns, allowing for unique and personalized designs.
Creating Frosted Patterns with Etching Cream
Etching cream is a popular choice for creating frosted patterns on glass because it’s relatively easy to use and provides a durable finish. It’s a chemical solution that reacts with the glass surface, creating a frosted effect. The process involves applying the cream to the glass surface, allowing it to etch, and then rinsing it off.
The result is a frosted pattern that can be customized with various designs.
Applying Etching Cream Safely and Effectively
Applying etching cream requires careful handling and safety precautions. It’s essential to work in a well-ventilated area, wear gloves and eye protection, and avoid contact with skin and eyes. Here are some tips for applying etching cream safely and effectively:
- Clean the glass surface thoroughly with soap and water to remove any dirt or grease. This ensures the etching cream adheres properly to the glass surface.
- Apply the etching cream to the glass surface using a stencil or a brush. The stencil will help you create precise patterns, while the brush allows for more freehand designs.
- Allow the etching cream to sit on the glass surface for the recommended time, as specified on the product’s instructions. This ensures the etching process is complete and the desired level of frosting is achieved.
- Rinse the etching cream off the glass surface with water. This step removes the etching cream and reveals the frosted pattern.
Examples of Frosted Patterns
Etching cream allows for a wide range of frosted patterns, from simple geometric shapes to intricate designs. Here are a few examples:
- Geometric Patterns:Simple geometric patterns like squares, circles, and triangles can be easily created using stencils. These patterns are versatile and can be used for various applications, such as creating frosted privacy glass for windows or adding decorative accents to glassware.
- Floral Designs:Etching cream can be used to create delicate and intricate floral designs. These designs can be used to create frosted patterns on glass doors, windows, or even vases.
- Personalized Designs:Etching cream can be used to create personalized designs, such as names, initials, or quotes. These designs can be used to add a unique touch to glassware, mirrors, or other glass surfaces.
Tips for Success with DIY Frosted Pattern Privacy Glass

Transforming ordinary glass into a stylish and functional frosted masterpiece is achievable with a little patience and the right techniques. Whether you’re a seasoned DIY enthusiast or a novice, these tips will guide you towards achieving professional-looking results.
Essential Safety Precautions
Working with glass and etching cream requires careful attention to safety. Here’s a breakdown of crucial safety measures to prioritize:
- Always wear protective gear, including gloves, safety glasses, and a respirator mask, to shield yourself from harmful chemicals and glass shards.
- Work in a well-ventilated area to prevent the buildup of fumes from etching cream.
- Keep etching cream away from children and pets. Store it securely in a designated area.
- Handle glass with care, using gloves and appropriate tools to avoid cuts and scratches.
- Follow the manufacturer’s instructions for etching cream usage and disposal.
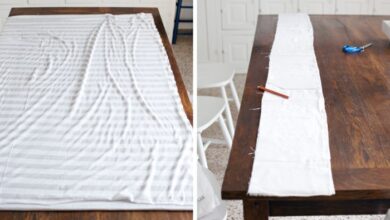
Preparing the Glass Surface
A clean and prepared glass surface is the foundation for a successful frosting project. Here’s how to prepare your glass:
- Thoroughly clean the glass surface with a mild detergent and water. Ensure it’s free of dust, grease, and fingerprints.
- Use a scraper or razor blade to remove any stubborn residue or stickers.
- Allow the glass to dry completely before applying etching cream.
Applying Etching Cream
Applying etching cream with precision is key to achieving your desired frosted pattern. Here’s a guide to applying etching cream:
- Use a stencil or masking tape to create your desired pattern on the glass surface.
- Apply etching cream evenly to the exposed areas of the glass, following the manufacturer’s instructions for application time.
- Avoid getting etching cream on the stencil or masking tape to prevent unwanted frosting.
- Use a squeegee to spread the etching cream evenly and remove any air bubbles.
Troubleshooting Common Problems
Despite careful preparation and application, you might encounter some common problems during the frosting process. Here’s how to address them:
- Uneven Frosting:If the frosting appears uneven, it could be due to uneven application of etching cream or insufficient etching time. Reapply etching cream to the uneven areas or extend the etching time.
- Blurry or Unclear Pattern:If the pattern appears blurry or unclear, it might be due to the stencil not being securely attached to the glass or the etching cream bleeding under the stencil. Ensure the stencil is firmly adhered to the glass and use a sealant or tape to prevent etching cream leakage.
- Frosted Areas Outside the Pattern:If frosting occurs outside the intended pattern, it might be due to etching cream getting under the stencil or masking tape. Carefully remove the stencil or tape and reapply etching cream to the desired areas.
Important Tips for Professional Results
Here are some additional tips to elevate your DIY frosted glass project:
- Practice on Scrap Glass:Experiment with etching cream and stencils on scrap glass before applying it to your final project. This helps you get comfortable with the process and avoid mistakes on your main piece.
- Use a Fine-Grit Sandpaper:After etching, gently sand the edges of the frosted pattern with fine-grit sandpaper to create a smoother, more polished look.
- Apply a Protective Coating:Seal the frosted glass with a clear sealant to protect it from scratches and enhance its durability.