Make your own gummy candy sets the stage for a delicious DIY adventure, where you become the master of your own sugary creations. Imagine crafting vibrant, chewy gummies, bursting with your favorite flavors and colors, all from the comfort of your own kitchen.
The joy of making gummy candy lies not only in the final product but also in the creative process itself. It’s a fun and rewarding experience that allows you to experiment with different flavors, shapes, and textures, while enjoying the satisfaction of creating something truly unique.
From the classic gummy bear to innovative fruity gummies and tangy sour candies, the possibilities are endless. The beauty of making your own gummy candy is the ability to control every aspect of the process. You can choose your favorite ingredients, customize the sweetness level, and even add a touch of your own personality to your creations.
This opens up a world of culinary exploration, where you can experiment with different flavor combinations, experiment with different shapes and sizes, and unleash your inner artist.
The Allure of Homemade Gummy Candy

Gummy candy, with its chewy texture and vibrant colors, holds a special place in the hearts of many. While store-bought gummies are readily available, there’s a growing trend of crafting these treats at home. This surge in popularity stems from a desire for personalized flavors, a quest for cost savings, and the allure of controlling every ingredient that goes into your delicious creations.
Making your own gummy candy is a fun and rewarding project, especially if you love getting creative in the kitchen. It’s like a mini-science experiment with delicious results! It reminds me of the time I saw a video of a bride who made her own wedding dress, emmas diy wedding dress , and I was amazed by her dedication and craftsmanship.
Just like that, you can create your own unique gummy creations, experimenting with different flavors and colors, and wowing your friends with your homemade treats.
The Advantages of DIY Gummy Candy
Making your own gummy candy offers several compelling benefits. You have the freedom to customize your flavors, experiment with unique color combinations, and even incorporate ingredients that align with your dietary preferences. This personalized approach allows you to create gummy candies that perfectly reflect your taste buds and dietary needs.
Ingredients and Supplies
Creating your own gummy candies is a fun and rewarding experience. With just a few key ingredients and simple equipment, you can unleash your creativity and enjoy delicious, personalized treats. Let’s explore the essential ingredients and supplies you’ll need to embark on your gummy candy-making journey.
Essential Ingredients
The magic of gummy candy lies in the perfect blend of ingredients that create its signature texture and flavor. Here’s a breakdown of the key players:
- Gelatin:Gelatin is the star of the show, acting as a gelling agent that transforms the liquid mixture into a jiggly, chewy treat. It’s made from collagen, a protein found in animal tissues, and comes in various forms, including sheets, granules, and powder.
When gelatin is dissolved in hot water and then cooled, it forms a network of protein strands that trap the liquid, resulting in the characteristic gummy texture.
- Sugar:Sugar provides sweetness and contributes to the candy’s texture. It’s typically granulated sugar, which dissolves readily in the hot liquid. The amount of sugar used can affect the candy’s firmness, with higher sugar content leading to a firmer texture.
- Corn Syrup:Corn syrup serves as a humectant, meaning it helps retain moisture and prevents the candy from becoming too hard or brittle. It also adds sweetness and a smooth, glossy finish to the gummy candies.
- Flavorings:This is where you get to unleash your creativity! Flavorings come in a variety of forms, including extracts, oils, powders, and even fruit purees. Choose your favorite flavors, such as fruit, citrus, chocolate, or even spices, to personalize your gummy candies.
- Water:Water is essential for dissolving the gelatin and creating a smooth, consistent mixture. The amount of water used can affect the candy’s texture, so it’s important to follow the recipe’s instructions carefully.
- Acid:Acid, such as citric acid or lemon juice, is often added to gummy candy recipes to balance the sweetness and enhance the flavor. It also helps to prevent the candy from becoming too sticky.
Essential Equipment
You don’t need a fancy kitchen to make gummy candies. With a few basic tools, you can easily create delicious treats at home. Here’s a list of essential equipment:
- Saucepan:A saucepan is crucial for heating the ingredients and dissolving the gelatin. Choose a saucepan that’s large enough to accommodate the recipe’s volume and has a sturdy bottom for even heating.
- Candy Thermometer:A candy thermometer is essential for accurately measuring the temperature of the candy mixture. This ensures that the gelatin is properly dissolved and that the candy reaches the desired consistency. Most gummy candy recipes require a temperature of around 240°F (115°C).
- Baking Sheet:A baking sheet is used for cooling and setting the gummy candies. Choose a baking sheet that’s lined with parchment paper or a silicone baking mat for easy cleanup.
- Silicone Molds:Silicone molds are the ideal choice for making gummy candies. They are flexible, non-stick, and come in a wide variety of shapes and sizes, allowing you to create unique and fun designs.
- Whisk:A whisk is useful for stirring the ingredients and ensuring that the gelatin is fully dissolved.
- Spatula:A spatula is handy for scraping the sides of the saucepan and transferring the candy mixture to the molds.
Gummy Candy Recipes

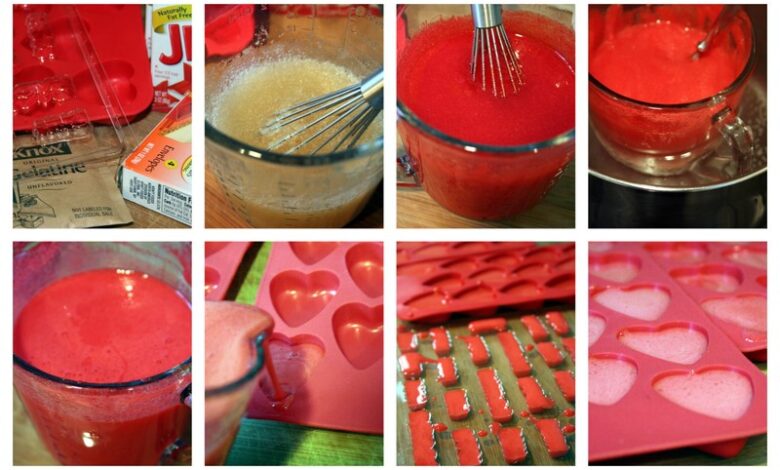
Now that you have all the necessary ingredients and equipment, let’s dive into the fun part: making your own gummy candies! Here are three distinct recipes for classic gummy bears, fruity gummies, and sour gummies. Each recipe provides a detailed step-by-step guide, emphasizing the importance of accurate measurements and temperature control for optimal results.
Making your own gummy candy is a fun and rewarding activity, and it’s a great way to personalize your treats with your favorite flavors and colors. Once you’ve whipped up a batch of delicious gummies, you’ll want to find the perfect outfit for your next workout, and Brown Thomas is the place to go to find stylish and functional activewear.
Brown Thomas offers a wide selection of workout clothes from top brands, so you can look and feel your best while hitting the gym or going for a run. And who knows, maybe your new workout gear will inspire you to make another batch of gummies!
Classic Gummy Bears
This recipe is a timeless favorite and a great starting point for gummy candy making.
Making your own gummy candy is a fun and rewarding activity, especially if you have kids. The process involves melting down gelatin and sugar, adding flavoring and coloring, and pouring the mixture into molds. It’s a great way to get creative and personalize your treats, just like the folks at abm studio the living room after do with their unique DIY projects.
After all, who doesn’t love a sweet, homemade gummy treat?
Ingredients:
- 1 cup (240 ml) water
- 1 cup (200 g) granulated sugar
- 1/2 cup (120 ml) light corn syrup
- 1/4 cup (60 ml) unflavored gelatin
- 1/4 cup (60 ml) fruit juice (any flavor)
- 1/2 teaspoon (2.5 ml) food coloring (optional)
- 1/4 teaspoon (1.25 ml) flavoring extract (optional)
Instructions:
- In a medium saucepan, combine the water, sugar, and corn syrup. Bring to a boil over medium heat, stirring constantly to dissolve the sugar.
- While the syrup is heating, sprinkle the gelatin over 1/4 cup (60 ml) cold water in a separate bowl. Let it bloom for 5 minutes, stirring occasionally.
- Once the syrup reaches a rolling boil, reduce the heat to low and add the bloomed gelatin mixture. Stir constantly until the gelatin is completely dissolved.
- Remove from heat and stir in the fruit juice, food coloring (if using), and flavoring extract (if using).
- Pour the mixture into a greased 8×8 inch baking dish or a silicone mold. Let it cool and set at room temperature for at least 4 hours, or overnight for firmer gummies.
- Once set, cut the gummies into desired shapes using a sharp knife or cookie cutters. Enjoy your homemade gummy bears!
Fruity Gummies
Fruity gummies are a delightful treat with a variety of flavor combinations.
Ingredients:
- 1 cup (240 ml) water
- 1 cup (200 g) granulated sugar
- 1/2 cup (120 ml) light corn syrup
- 1/4 cup (60 ml) unflavored gelatin
- 1/2 cup (120 ml) fruit juice (any flavor)
- 1/4 cup (60 ml) fruit puree (any flavor)
- 1/4 teaspoon (1.25 ml) citric acid (optional)
- 1/4 teaspoon (1.25 ml) food coloring (optional)
Instructions:
- In a medium saucepan, combine the water, sugar, and corn syrup. Bring to a boil over medium heat, stirring constantly to dissolve the sugar.
- While the syrup is heating, sprinkle the gelatin over 1/4 cup (60 ml) cold water in a separate bowl. Let it bloom for 5 minutes, stirring occasionally.
- Once the syrup reaches a rolling boil, reduce the heat to low and add the bloomed gelatin mixture. Stir constantly until the gelatin is completely dissolved.
- Remove from heat and stir in the fruit juice, fruit puree, citric acid (if using), and food coloring (if using).
- Pour the mixture into a greased 8×8 inch baking dish or a silicone mold. Let it cool and set at room temperature for at least 4 hours, or overnight for firmer gummies.
- Once set, cut the gummies into desired shapes using a sharp knife or cookie cutters. Enjoy your homemade fruity gummies!
Sour Gummies
Sour gummies are a popular choice for their tangy flavor.
Ingredients:
- 1 cup (240 ml) water
- 1 cup (200 g) granulated sugar
- 1/2 cup (120 ml) light corn syrup
- 1/4 cup (60 ml) unflavored gelatin
- 1/4 cup (60 ml) fruit juice (any flavor)
- 1 tablespoon (15 ml) lemon juice
- 1/2 teaspoon (2.5 ml) citric acid
- 1/4 teaspoon (1.25 ml) food coloring (optional)
Instructions:
- In a medium saucepan, combine the water, sugar, and corn syrup. Bring to a boil over medium heat, stirring constantly to dissolve the sugar.
- While the syrup is heating, sprinkle the gelatin over 1/4 cup (60 ml) cold water in a separate bowl. Let it bloom for 5 minutes, stirring occasionally.
- Once the syrup reaches a rolling boil, reduce the heat to low and add the bloomed gelatin mixture. Stir constantly until the gelatin is completely dissolved.
- Remove from heat and stir in the fruit juice, lemon juice, citric acid, and food coloring (if using).
- Pour the mixture into a greased 8×8 inch baking dish or a silicone mold. Let it cool and set at room temperature for at least 4 hours, or overnight for firmer gummies.
- Once set, cut the gummies into desired shapes using a sharp knife or cookie cutters. Enjoy your homemade sour gummies!
Gummy Candy Variations

The basic gummy candy recipe is a blank canvas for creativity. With a little experimentation, you can create an array of unique textures, shapes, and flavors. This section explores techniques for customizing your gummy candies, incorporating additional ingredients, and crafting themed treats.
Creating Unique Shapes and Textures
The possibilities for shaping gummy candies are endless. You can use molds, create free-form shapes, or even experiment with layering different colors and flavors.
- Molds: Silicone molds are the most popular choice for creating intricate shapes, as they are flexible and easy to release. A wide variety of molds are available online and in kitchen stores, from simple shapes like stars and hearts to complex designs like animals and characters.
- Free-Form Shapes: If you don’t have a mold, you can create free-form shapes by dropping spoonfuls of gummy mixture onto a baking sheet lined with parchment paper. Once set, you can cut the gummies into desired shapes with a knife or cookie cutters.
- Layering: For multi-colored and multi-flavored gummies, pour a layer of gummy mixture into a mold, let it set slightly, then pour another layer of a different color or flavor on top. Repeat this process until you have the desired number of layers.
- Textured Gummies: You can create textured gummies by adding ingredients like chopped nuts, dried fruit, or even cookie crumbs to the gummy mixture. For a fun twist, try adding a layer of crunchy topping to the gummy mixture before it sets.
Incorporating Additional Ingredients
Beyond the basic gummy recipe, you can enhance your creations by incorporating additional ingredients like fruit puree, chocolate, or nuts.
- Fruit Puree: Adding fruit puree to your gummy recipe not only adds flavor but also creates a vibrant color. Use pureed berries, mango, or citrus fruits for a burst of natural sweetness and color.
- Chocolate: For a decadent treat, consider adding chopped chocolate or cocoa powder to your gummy recipe. You can also dip finished gummies in melted chocolate for a rich and indulgent finish.
- Nuts: To add a crunchy element, incorporate chopped nuts like almonds, peanuts, or walnuts into your gummy mixture. Alternatively, you can use a layer of chopped nuts as a topping for your gummies.
Themed Gummy Candies
Gummy candies are a perfect medium for expressing creativity and creating themed treats. Here are some ideas for holiday-inspired shapes and seasonal flavors:
- Halloween: Create spooky gummy candies in the shapes of pumpkins, ghosts, bats, and spiders. Use black and orange food coloring to enhance the Halloween theme.
- Christmas: Mold gummy candies into festive shapes like Christmas trees, snowflakes, and candy canes. Experiment with red, green, and white food coloring for a Christmas-inspired palette.
- Summer: Capture the essence of summer with gummy candies shaped like fruits, flowers, and beach items. Use bright colors and fruity flavors like lemon, strawberry, and watermelon.
- Easter: Celebrate Easter with colorful gummy candies shaped like eggs, bunnies, and chicks. Use pastel shades of pink, yellow, and blue for a springy touch.
Storing and Preserving Gummy Candies: Make Your Own Gummy Candy
You’ve poured your heart and soul into creating delicious homemade gummy candies. Now, it’s time to ensure they stay fresh and flavorful for as long as possible. Proper storage is key to preserving the texture and taste of your gummy creations.
Storage Recommendations
Storing gummy candies correctly is crucial to prevent them from becoming sticky, drying out, or absorbing unwanted flavors.
- Airtight Containers: The most important step is to store your gummies in airtight containers. This prevents moisture loss and keeps them from absorbing odors from other foods in your refrigerator. Glass or plastic containers with tight-fitting lids are ideal.
- Cool and Dry Environment: Gummy candies are best stored in a cool, dry place. A refrigerator is an excellent option, especially in humid environments. Avoid storing them near strong-smelling foods, as they can absorb those flavors.
Shelf Life, Make your own gummy candy
Homemade gummy candies generally have a shelf life of 1-2 weekswhen stored properly.
- Signs of Spoilage: Watch for signs of spoilage, such as mold growth, a change in texture (becoming sticky or hard), or an off-flavor. If you notice any of these signs, it’s best to discard the candies.